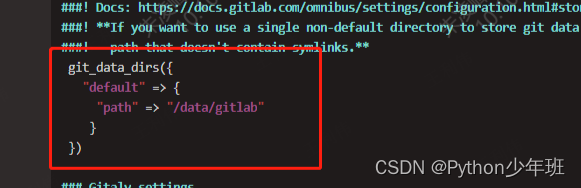
当前位置: 首页centos正文 本文介绍: gitlab部署 gitlab备份 gitlab恢复 1. 下载rpm包 wget https://mirrors.tuna.tsinghua.edu.cn/gitlab-ce/yum/el7/gitlab-ce-10.8.4-ce.0.el7.x86_64.rpm 2. 安装依赖 yum -y install policycoreutils openssh-server openssh-clients postfix policycoreutils-python 3. rpm安装 rpm -ivh gitlab-ce-10.8.4-ce.0.el7.x86_64.rpm 4. 修改gitlab配置文件信息,指定服务ip和端口号 # [root@localhost ~]# vim /etc/gitlab/gitlab.rb #末行模式执行 /external_url/ ## GitLab URL ##! URL on which GitLab will be reachable. ##! For more details on configuring external_url see: ##! https://docs.gitlab.com/omnibus/settings/configuration.html#configuring-the-external-url-for-gitlab #external_url 'http://gitlab.example.com' #将url修改ip和端口或者域名 external_url 'http://192.168.56.11:80' 5. 初始化配置 gitlab-ctl reconfigure 6. 重启服务 gitlab-ctl restart 7. 直接访问 http://192.168.56.11:80 8. 备份旧环境数据 # 命令备份 备份文件路径 /var/opt/gitlab/backups/1700647561_2023_11_22_13.12.15_gitlab_backup.tar gitlab-backup create # 手动备份 /etc/gitlab/gitlab-secrets.json /etc/gitlab/gitlab.rb 9. 修改新环境配置文件 修改备份数据恢复地址 修改备份数据存放地址 10. 重新加载配置文件 gitlab-ctl stop gitlab-ctl reconfigure gitlab-ctl start 11. 将备份数据上传恢复地址 修改备份数据恢复地址 修改备份数据存放地址 12. 停服务 停止gitlab部分服务,保证恢复过程中有数据写入 gitlab-ctl stop unicorn gitlab-ctl stop sidekiq 13. 开始恢复 gitlab-rake gitlab:backup:restore BACKUP=1700647561_2023_11_22_13.12.15_gitlab_backup.tar 原文地址:https://blog.csdn.net/weixin_44623010/article/details/134559768 本文来自互联网用户投稿,该文观点仅代表作者本人,不代表本站立场。本站仅提供信息存储空间服务,不拥有所有权,不承担相关法律责任。 如若转载,请注明出处:http://www.7code.cn/show_14065.html 如若内容造成侵权/违法违规/事实不符,请联系代码007邮箱:suwngjj01@126.com进行投诉反馈,一经查实,立即删除! 主题授权提示:请在后台主题设置-主题授权-激活主题的正版授权,授权购买:RiTheme官网显示所有内容声明:本站所有文章,如无特殊说明或标注,均为本站原创发布。任何个人或组织,在未征得本站同意时,禁止复制、盗用、采集、发布本站内容到任何网站、书籍等各类媒体平台。如若本站内容侵犯了原著者的合法权益,可联系我们进行处理。cegitlabrpm 代码007普通 打赏 收藏 海报 链接