存储Bean对象
配置扫描路径
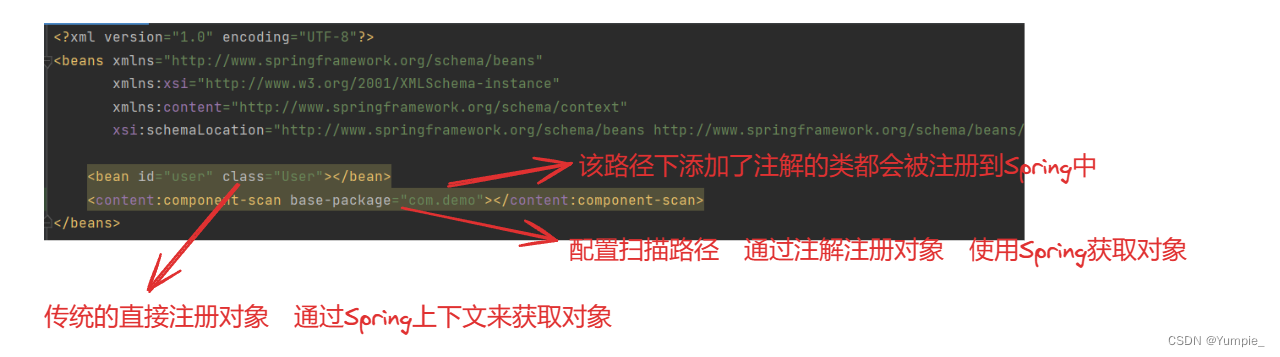
注:
添加注解存储Bean对象
使用注解把 Bean 对象存储到 Spring 中,有两种注解类型可以选择:类注解 和 方法注解,我们下面分别来介绍:
使用类注解
//一共有五种类注解可以进行对象的注册:

@Controller
public class ArticleController {
    public String sayHello(){
        return "hello,controller";
    }
}

@Service
public class UserService {
    public String sayHello(){
        return "hello,service";
    }
}

@Repository
public class UserRepository {
    public String sayHello(){
        return "hello,repository";
    }
}

@Configuration
public class UserConfiguration {
    public String sayHello(){
        return "hello,configuration";
    }
}

@org.springframework.stereotype.Component
public class Component {
    public String sayHello(){
        return "hello,component";
    }
}
//先使用上下文的方式来获取对象,下面介绍更简单的获取对象的方式:

//当使用5大类注解获取bean时,默认 只需要将类名首字母小写即可,  如果bean对象的首字母和第二个字母都是大写时,需要使用原类名才能正确获取到bean对象
        ApplicationContext context = new ClassPathXmlApplicationContext("spring-config.xml");

        ArticleController articleController = context.getBean("articleController",ArticleController.class);
        System.out.println(articleController.sayHello());

        UserService userService = context.getBean("userService",UserService.class);
        System.out.println(userService.sayHello());

        UserRepository userRepository = context.getBean("userRepository",UserRepository.class);
        System.out.println(userRepository.sayHello());

        Component component = context.getBean("component",Component.class);
        System.out.println(component.sayHello());

        UserConfiguration userConfiguration = context.getBean("userConfiguration",UserConfiguration.class);
        System.out.println(userConfiguration.sayHello());
为什么需要五个类注解呢?
在这里使用五个类注解,是为了让程序员看到类注解之后就能直接了解到当前类的用途,不同的类注解的用途是不同的:

Bean命名规则
我们配置扫描路径来注册 Bean 对象时并没有设置对象的 id ,那我们通过上下文的方式来获取对象时该使用什么 id 呢?
//我们查看Spring的源码来获取答案:

public static String decapitalize(String name) {
 if (name == null || name.length() == 0) {
 return name;
 }
 // 如果第⼀个字⺟和第⼆个字⺟都为⼤写的情况,是把 bean 的⾸字⺟也⼤写存储了
 if (name.length() > 1 && Character.isUpperCase(name.charAt(1)) &&
 Character.isUpperCase(name.charAt(0))){
 return name;
 }
 // 否则就将⾸字⺟⼩写
 char chars[] = name.toCharArray();
 chars[0] = Character.toLowerCase(chars[0]);
 return new String(chars);
}
使用方法注解
@Component
public class StudentBeans {
    @Bean
    public Student student(){
        Student student = new Student();
        student.setId(1);
        student.setName("张三");
        student.setAge(18);
        return student;
    }
}
注:
重命名Bean
@Component
public class StudentBeans {
    @Bean(name = {"s1","s2"})
    public Student student(){
        Student student = new Student();
        student.setId(1);
        student.setName("张三");
        student.setAge(18);
        return student;
    }
}
注:
读取Bean对象
我们通过 Spring 注入的方式来更加简单的获取 Bean 对象,一共有三种注入方式:
属性注入
    @Autowired
    private StudentService studentService;
优点:使用简单
缺点:
Setter注入
    private StudentService studentService;
    @Autowired
    public void setStudentService(StudentService studentService){
        this.studentService = studentService;
    }
构造方法注入
	private StudentService studentService;
    //当类中只有一个构造方法时   @Autowired可以省略
    //如果类中有多个构造方法(重载)时,需要加上@Autowired来明确使用哪个构造方法来注入对象
    @Autowired
    public StudentController(StudentService studentService){
        this.studentService = studentService;
    }
优点:
注入多个相同类型的Bean
- 使用@Resource(name=“ ”)
	@Resource(name="student1")
    private Student student1;

	@Resource(name="student2")
	private Student student2;
	@Autowired
	@Qualifier(value="student1")
    private Student student1;

	@Autowired
	@Qualifier(value="student2")
	private Student student2;
@Autowired vs @Resource
- 功能支持不同。@Autowired支持属性注入、setter注入、构造方法注入;而@Resource支持属性注入、setter注入却不支持构造方法注入
- 出身不同:@Autowired来自于Spring框架;@Resource来自于JDK
- 参数支持不同:@Autowired只支持required参数;@Resource支持更多的参数设置
- 依赖识别方式不同:@Autowired默认是以 byType 的方式。也可以使用 @Qualifier 指定 Bean的名称转用 byName 的方式;@Resource默认是以 byName 的方式,当 byName方式无法匹配时,会使用 byType方式
原文地址:https://blog.csdn.net/weixin_62976968/article/details/134520096
本文来自互联网用户投稿,该文观点仅代表作者本人,不代表本站立场。本站仅提供信息存储空间服务,不拥有所有权,不承担相关法律责任。
如若转载,请注明出处:http://www.7code.cn/show_45884.html
如若内容造成侵权/违法违规/事实不符,请联系代码007邮箱:suwngjj01@126.com进行投诉反馈,一经查实,立即删除!
主题授权提示:请在后台主题设置-主题授权-激活主题的正版授权,授权购买:RiTheme官网
声明:本站所有文章,如无特殊说明或标注,均为本站原创发布。任何个人或组织,在未征得本站同意时,禁止复制、盗用、采集、发布本站内容到任何网站、书籍等各类媒体平台。如若本站内容侵犯了原著者的合法权益,可联系我们进行处理。