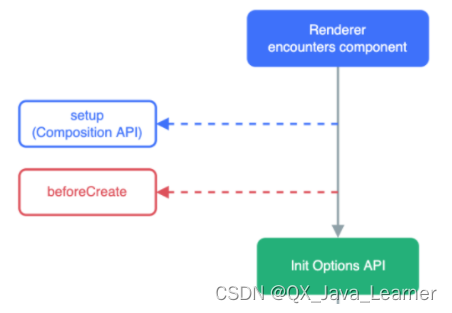
在 vue3.2 中,我们只需在script标签中添加setup。就可以做到,组件只需引入不用注册,属性和方法也不用 return 才能于 template 中使用,也不用写setup函数,也不用写export default ,甚至是自定义指令也可以在我们的template中自动获得。
我们仅在模板中绑定了一些简单的属性名。但是 Vue 实际上在所有的数据绑定中都支持完整的 JavaScript 表达式:
{{ number + 1 }}
{{ ok ? 'YES' : 'NO' }}
{{ message.split('').reverse().join('') }}
<div :id="`list-${id}`"></div>2.调用函数
<span :title="toTitleDate(date)">
{{ formatDate(date) }}
</span>
<template>
<div id="haha" ref="haha"></div>
</template>setup() {
let haha = ref<HTMLElement|null>(null)
console.log(haha)
return {
haha,
}
},haha.style.fontSize = '20px'4.reactive
ref 和 reactive的区别:
<template>
  <div>
    <p>{{title}}</p>
    <h4>{{userInfo}}</h4>
  </div>
</template>

<script setup lang="ts">
import { ref, reactive } from "vue";
type Person = {
    name: string;
    age: number;
    gender: string;
};
const title = ref<string>("彼时彼刻,恰如此时此刻");
const userInfo = reactive<Person>({
  name: '树哥',
  age: 18
})
</script>setup() {
const user = reactive({
name: '小浪',
age: 21,
})
let userObj = toRefs(user)
return {
...userObj,
}
}在功能方面,ref 和 reactive,都是可以实现响应式数据!
在语法层面,两个有差异。ref定义的响应式数据需要用[data].value的方式进行更改数据;reactive定义的数据需要[data].[prpoerty]的方式更改数据。
const actTitle: Ref<string> = ref('活动名称');

const actData = reactive({
    list: [],
    total: 0,
    curentPage: 1,
    pageSize: 10
});

actTitle.value = '活动名称2';

actData.total = 100;但是在应用的层面,还是有差异的,通常来说:单个的普通类型的数据,我们使用ref来定义响应式。表单场景中,描述一个表单的key:value这种对象的场景,使用reactive;在一些场景下,某一个模块的一组数据,通常也使用reactive的方式,定义数据。
那么,对象是不是非要使用reactive来定义呢?其实不是的,都可以,根据自己的业务场景,具体问题具体分析!ref他强调的是一个数据的value的更改,reactive强调的是定义的对象的某一个属性的更改。
import { defineComponent, ref, onMounted } from 'vue';
export default defineComponent({
    name: 'Gift',
    setup() {
        const counter = ref(0);
        onMounted(() => {
            // 处理业务,一般进行数据请求
        })
        return {
            counter
        }
    }
})8.store使用
import { useStore } from “vuex“;
const store = useStore();
const storeData = computed(() => store); // 配合computed,获取store的值。
import { useStore } from "vuex";
import { defineComponent, ref, computed } from 'vue';
export default defineComponent({
    name: 'Gift',
    setup() {
        const counter = ref(0);
        const store = useStore();
        const storeData = computed(() => store); // 配合computed,获取store的值。
        return {
            counter,
            storeData
        }
    }
})
9.router的使用
import { useRouter } from “vue–router“;
const router = useRouter();
const onClick = () => {
router.push({ name: “AddGift” });
}
import { useStore } from "vuex";
import { useRouter } from "vue-router";
import { defineComponent, ref, computed } from 'vue';
export default defineComponent({
    name: 'Gift',
    setup() {
        const counter = ref(0);
        const router = useRouter();
        const onClick = () => {
            router.push({ name: "AddGift" });
        }
        return {
            counter,
            onClick
        }
    }
})
关注点分离,应该分两层意思:第一层意思就是,Vue3的setup,本身就把相关的数据,处理逻辑放到一起,这就是一种关注点的聚合,更方便我们看业务代码。
第二层意思,就是当setup变的更大的时候,我们可以在setup内部,提取相关的一块业务,做到第二层的关注点分离。
import { useStore } from "vuex";
import { useRouter } from "vue-router";
import { defineComponent, ref, computed } from 'vue';
import useMerchantList from './merchant.js';
export default defineComponent({
    name: 'Gift',
    setup() {
        const counter = ref(0);
        const router = useRouter();
        const onClick = () => {
            router.push({ name: "AddGift" });
        }
        // 在该示例中,我们把获取商家列表的相关业务分离出去。也就是下面的merchant.ts
        const {merchantList} = useMerchantList();
        return {
            counter,
            onClick,
            merchantList
        }
    }
})
import { getMerchantlist } from "@/api/rights/gift";
import { ref, onMounted } from "vue";

export default function useMerchantList(): Record<string, any> {
  const merchantList = ref([]);
  const fetchMerchantList = async () => {
    let res = await getMerchantlist({});
    merchantList.value = res.data.child;
  };

  onMounted(fetchMerchantList);

  return {
    merchantList
  };
}
11.interface
使用TS进行业务开发,一个核心的思维是,先关注数据结构,再根据数据结构进行页面开发。以前的前端开发模式是,先写页面,后关注数据。
比如要写一个礼品列表的页面,我们可能要定义这么一些interface。总而言之,我们需要关注的是:页面数据的interface、接口返回的数据类型、接口的入参类型等等。
// 礼品创建、编辑、列表中的每一项,都会是这个数据类型。
interface IGiftItem {
  id: string | number;
  name: string;
  desc: string;
  [key: string]: any;
}

// 全局相应的类型定义
// 而且一般来说,我们不确认,接口返回的类型到底是什么(可能是null、可能是对象、也可能是数组),所以使用范型来定义interface
interface IRes<T> {
    code: number;
    msg: string;
    data: T
}
// 接口返回数据类型定义

interface IGiftInfo {
    list: Array<IGiftItem>;
    pageNum: number;
    pageSize: number;
    total: number;
}
在一个常见的接口请求中,我们一般使用TS这么定义一个数据请求,数据请求的req类型,数据请求的res类型。
export const getGiftlist = (
  params: Record<string, any>
): Promise<IRes<IGiftInfo>> => {
  return Http.get("/apis/gift/list", params);
};
//父组件
<template>
  <child v-model="name" v-model:email="email" />
  <p>姓名:{{ name }}</p>
  <p>邮箱:{{ email }}</p>
</template>

<script lang="ts" setup>
import child from './child.vue'
import { ref } from 'vue'

const name = ref<string>('张三')
const email = ref<string>('666@qq.com')
</script>
// 子组件
<template>
<button @click="updateName">更新name</button>
<button @click="updateEmail">更新email</button>
</template>
<script lang="ts" setup>
// 定义emit
const emits = defineEmits<{
(e: 'update:modelValue', value: string): void
(e: 'update:email', value: string): void
}>()
const updateName = () => {
emits('update:modelValue', '李四')
}
const updateEmail = () => {
emits('update:email', '123456@qq.com')
}
</script>如果v-model没有使用参数,则其默认值为modelValue,如上面的第一个v-model,注意此时不再是像Vue2那样使用$emit('input')了,而是统一使用update:xxx的方式。
13.watch
<script setup lang="ts">
import { ref, watch } from "vue";

const str = ref('彼时彼刻')

//3s后改变str的值
setTimeout(() => { str.value = '恰如此时此刻' }, 3000)

watch(str, (newV, oldV) => {
  console.log(newV, oldV) //恰如此时此刻 彼时彼刻
})

</script><script setup lang="ts">
import { ref, watch } from "vue";
let name = ref('树哥')
let age = ref(18)
//3s后改变值
setTimeout(() => {
name.value = '我叫树哥'
age.value = 19
}, 3000)
watch([name, age], (newV, oldV) => {
console.log(newV, oldV) // ['我叫树哥', 19] ['树哥', 18]
})
</script><script setup lang="ts">
import { reactive, watch } from "vue";
let info = reactive({
name: '树哥',
age: 18
})
//3s后改变值
setTimeout(() => {
info.age = 19
}, 3000)
watch(info, (newV, oldV) => {
console.log(newV, oldV)
})
</script>-
<script setup lang="ts">
import { reactive, watch } from "vue";

let info = reactive({
  name: '树哥',
  age: 18
})

//3s后改变值
setTimeout(() => {
  info.age = 19
}, 3000)


watch(()=>info.age, (newV, oldV) => {
  console.log(newV, oldV) // 19 18
}

</script>
当 watchEffect 在组件的 setup() 函数或生命周期钩子被调用时,侦听器会被链接到该组件的生命周期,并在组件卸载时自动停止。
但是我们采用异步的方式创建了一个监听器,这个时候监听器没有与当前组件绑定,所以即使组件销毁了,监听器依然存在。
<script setup lang="ts">
import { watchEffect } from 'vue'
// 它会自动停止
watchEffect(() => {})
// ...这个则不会!
setTimeout(() => {
  watchEffect(() => {})
}, 100)

const stop = watchEffect(() => {
  /* ... */
})

// 显式调用
stop()
</script>
(以下一样)
基础数据类型的监听:
const name = ref<string>(‘张三’)
watch(name, (newValue, oldValue) => {
console.log(‘watch===’, newValue, oldValue)
})
interface UserInfo {
name: string
age: number
}const userInfo = reactive<UserInfo>({
name: ‘张三’,
age: 10
})
// 监听整个对象
watch(userInfo, (newValue, oldValue) => {
console.log(‘watch userInfo’, newValue, oldValue)
})// 监听某个属性
watch(() => userInfo.name, (newValue, oldValue) => {
console.log(‘watch name’, newValue, oldValue)
})
支持监听多个源
const name = ref<string>(‘张三’)
const userInfo = reactive({
age: 18
})// 同时监听name和userInfo的age属性
watch([name, () => userInfo.age], ([newName, newAge], [oldName, oldAge]) => {
//
})
1、watch是惰性执行,也就是只有监听的值发生变化的时候才会执行,但是watchEffect不同,每次代码加载watchEffect都会执行(忽略watch第三个参数的配置,如果修改配置项也可以实现立即执行)
2、watch需要传递监听的对象,watchEffect不需要
3、watch只能监听响应式数据:ref定义的属性和reactive定义的对象,如果直接监听reactive定义对象中的属性是不允许的,除非使用函数转换一下
4、watchEffect如果监听reactive定义的对象是不起作用的,只能监听对象中的属性。
15.computed
<template>
  <div>
    <p>{{title}}</p>
    <h4>{{userInfo}}</h4>
    <h1>{{add}}</h1>
  </div>
</template>

<script setup lang="ts">
import { ref, reactive,computed } from "vue";
const count = ref(0)

// 推导得到的类型:ComputedRef<number>
const add = computed(() => count.value +1)

</script>原文地址:https://blog.csdn.net/admin12345671/article/details/129640919
本文来自互联网用户投稿,该文观点仅代表作者本人,不代表本站立场。本站仅提供信息存储空间服务,不拥有所有权,不承担相关法律责任。
如若转载,请注明出处:http://www.7code.cn/show_46540.html
如若内容造成侵权/违法违规/事实不符,请联系代码007邮箱:suwngjj01@126.com进行投诉反馈,一经查实,立即删除!