3.3 常用布局
本节介绍常见的几种布局用法,包括在某个方向上顺序排列的线性布局,参照其他视图的位置相对排列的相对布局,像表格那样分行分列显示的网格布局,CommonLayouts以及支持通过滑动操作拉出更多内容的滚动视图。
3.3.1 线性布局LinearLayout
前几个小节的例程中,XML文件用到了LinearLayout布局,它的学名为线性布局。顾名思义,线性布局像是用一根线把它的内部视图串起来,故而内部视图之间的排列顺序是固定的,要么从左到右排列,要么从上到下排列。在XML文件中,LinearLayout通过属性android:orientation区分两种方向,其中从左到右排列叫作水平方向,属性值为horizontal;从上到下排列叫作垂直方向,属性值为vertical。如果LinearLayout标签不指定具体方向,则系统默认该布局为水平方向排列,也就是默认android:orientation=“horizontal”。
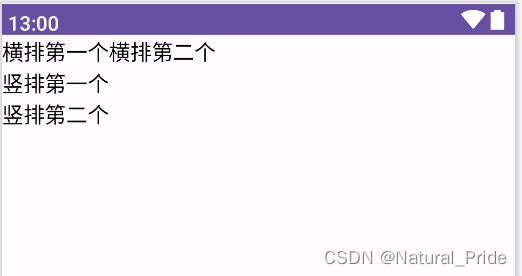
下面做个实验,让XML文件的根节点挂着两个线性布局,第一个线性布局采取horizontal水平方向,第二个线性布局采取vertical垂直方向。然后每个线性布局内部各有两个文本视图,通过观察这些文本视图的排列情况,从而检验线性布局的显示效果。详细的XML文件内容如下所示:
<LinearLayout xmlns:android="http://schemas.android.com/apk/res/android"
    android:layout_width="match_parent"
    android:layout_height="match_parent"
    android:orientation="vertical">

    <LinearLayout
        android:layout_width="match_parent"
        android:layout_height="wrap_content"
        android:orientation="horizontal">

        <TextView
            android:layout_width="wrap_content"
            android:layout_height="wrap_content"
            android:text="横排第一个"
            android:textColor="#000000"
            android:textSize="17sp" />

        <TextView
            android:layout_width="wrap_content"
            android:layout_height="wrap_content"
            android:text="横排第二个"
            android:textColor="#000000"
            android:textSize="17sp" />
    </LinearLayout>

    <LinearLayout
        android:layout_width="match_parent"
        android:layout_height="wrap_content"
        android:orientation="vertical">

        <TextView
            android:layout_width="wrap_content"
            android:layout_height="wrap_content"
            android:text="竖排第一个"
            android:textColor="#000000"
            android:textSize="17sp" />

        <TextView
            android:layout_width="wrap_content"
            android:layout_height="wrap_content"
            android:text="竖排第二个"
            android:textColor="#000000"
            android:textSize="17sp" />
    </LinearLayout>

</LinearLayout>
运行测试App,进入如图3-11所示的演示页面,可见horizontal为横向排列,vertical为纵向排列,说明android:orientation的方向属性确实奏效了.
除了方向之外,线性布局还有一个权重概念,所谓权重,指的是线性布局的下级视图各自拥有多大比例的宽高。
比如一块蛋糕分给两个人吃,可能两人平均分,也可能甲分三分之一,乙分三分之二。两人平均分的话,先把蛋糕切两半,然后甲分到一半,乙分到另一半,此时甲乙的权重比为1:1。甲分三分之一、乙分三分之二的话,先把蛋糕平均切成三块,然后甲分到一块,乙分到两块,此时甲乙的权重比为1:2。
就线性布局而言,它自身的尺寸相当于一整块蛋糕,它的下级视图们一起来分这个尺寸蛋糕,有的视图分得多,有的视图分得少。分多分少全凭每个视图分到了多大的权重,这个权重在XML文件中通过属性android:layout_weight来表达。
把线性布局看作蛋糕的话,分蛋糕的甲乙两人就相当于线性布局的下级视图。假设线性布局平均分为左右两块,则甲视图和乙视图的权重比为1:1,意味着两个下级视图的layout_weight属性都是1。不过视图有宽高两个方向,系统怎知layout_weight表示哪个方向的权重呢?所以这里有个规定,一旦设置了layout_weight属性值,便要求layout_width填0dp或者layout_height填0dp。
如果layout_width填0dp,则layout_weight表示水平方向的权重,下级视图会从左往右分割线性布局;
如果layout_height填0dp,则layout_weight表示垂直方向的权重,下级视图会从上往下分割线性布局。
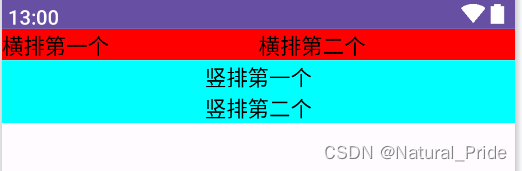
按照左右均分的话,线性布局设置水平方向horizontal,且甲乙两视图的layout_width都填0dp,layout_weight都填1,此时横排的XML片段示例如下:
<?xml version="1.0" encoding="utf-8"?>
<LinearLayout xmlns:android="http://schemas.android.com/apk/res/android"
    xmlns:tools="http://schemas.android.com/tools"
    android:layout_width="match_parent"
    android:layout_height="match_parent"
    android:orientation="vertical"
    tools:context=".LinearLayoutActivity">

    <LinearLayout
        android:layout_width="match_parent"
        android:layout_height="wrap_content"
        android:orientation="horizontal"
        android:background="#ff0000">

        <TextView
            android:layout_width="0dp"
            android:layout_height="wrap_content"
            android:layout_weight="1"
            android:text="横排第一个"
            android:textColor="#000000"
            android:textSize="17sp" />

        <TextView
            android:layout_width="0dp"
            android:layout_height="wrap_content"
            android:layout_weight="1"
            android:text="横排第二个"
            android:textColor="#000000"
            android:textSize="17sp" />
    </LinearLayout>

    <LinearLayout
        android:layout_width="match_parent"
        android:layout_height="wrap_content"
        android:orientation="vertical"
        android:gravity="center"
        android:background="#00ffff">

        <TextView
            android:layout_width="wrap_content"
            android:layout_height="0dp"
            android:layout_weight="1"
            android:text="竖排第一个"
            android:textColor="#000000"
            android:textSize="17sp" />

        <TextView
            android:layout_width="wrap_content"
            android:layout_height="0dp"
            android:layout_weight="1"
            android:text="竖排第二个"
            android:textColor="#000000"
            android:textSize="17sp" />
    </LinearLayout>

</LinearLayout>
把上面两个片段放到新页面的XML文件,其中第一个是横排区域采用红色背景(色值为ff0000),第二个是竖排区域采用青色背景(色值为00ffff)。重新运行测试App,打开演示界面如图3-12所示,可见横排区域平均分为左右两块,竖排区域平均分为上下两块。
3.3.2 相对布局RelativeLayout
线性布局的下级视图是顺序排列着的,另一种相对布局的下级视图位置则由其他视图决定。相对布局名为RelativeLayout,因为下级视图的位置是相对位置,所以得有具体的参照物才能确定最终位置。
如果不设定下级视图的参照物,那么下级视图默认显示在RelativeLayout内部的左上角。用于确定下级视图位置的参照物分两种,一种是与该视图自身平级的视图;另一种是该视图的上级视图(也就是它归属的RelativeLayout)。
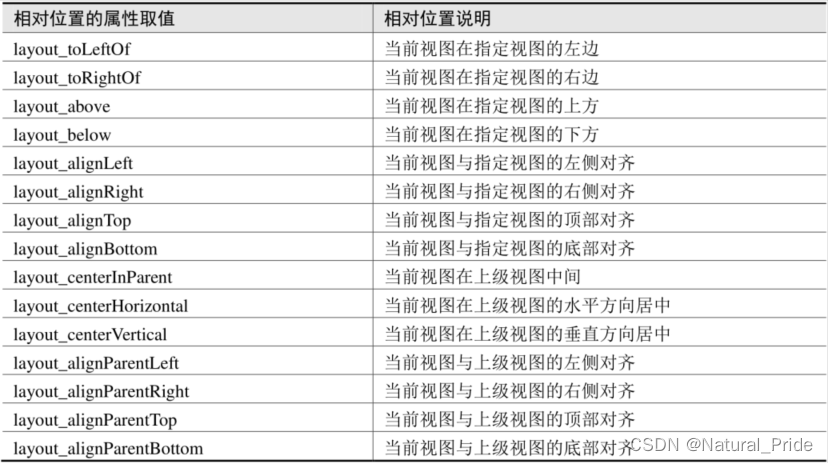
综合两种参照物,相对位置在XML文件中的属性名称说明见表
为了更好地理解上述相对属性的含义,接下来使用RelativeLayout及其下级视图进行布局来看看实际效果图。下面是演示相对布局的XML文件例子:
<?xml version="1.0" encoding="utf-8"?>
<RelativeLayout xmlns:android="http://schemas.android.com/apk/res/android"
    xmlns:tools="http://schemas.android.com/tools"
    android:layout_width="match_parent"
    android:layout_height="150dp"
    tools:context=".RelativeLayoutActivity">

    <TextView
        android:id="@+id/tv_center_horizontal"
        android:layout_width="wrap_content"
        android:layout_height="wrap_content"
        android:layout_centerHorizontal="true"
        android:background="#FFFFFF"
        android:text="我在水平中间"
        android:textColor="#000000"
        android:textSize="11sp" />

    <TextView
        android:id="@+id/tv_center"
        android:layout_width="wrap_content"
        android:layout_height="wrap_content"
        android:layout_centerInParent="true"
        android:background="#FFFFFF"
        android:text="我在中间"
        android:textColor="#E91E63"
        android:textSize="11sp" />

    <TextView
        android:id="@+id/tv_center_vertical"
        android:layout_width="wrap_content"
        android:layout_height="wrap_content"
        android:layout_centerVertical="true"
        android:background="#FFFFFF"
        android:text="我在垂直中间"
        android:textColor="#000000"
        android:textSize="11sp" />

    <TextView
        android:id="@+id/tv_parent_left"
        android:layout_width="wrap_content"
        android:layout_height="wrap_content"
        android:layout_alignParentLeft="true"
        android:background="#FFFFFF"
        android:text="我跟上级左边对齐"
        android:textColor="#000000"
        android:textSize="11sp" />

    <TextView
        android:id="@+id/tv_parent_right"
        android:layout_width="wrap_content"
        android:layout_height="wrap_content"
        android:layout_alignParentRight="true"
        android:background="#FFFFFF"
        android:text="我跟上级右边对齐"
        android:textColor="#000000"
        android:textSize="11sp" />

    <TextView
        android:id="@+id/tv_parent_top"
        android:layout_width="wrap_content"
        android:layout_height="wrap_content"
        android:layout_alignParentTop="true"
        android:background="#FFFFFF"
        android:text="我跟上级顶部对齐"
        android:textColor="#000000"
        android:textSize="11sp" />

    <TextView
        android:id="@+id/tv_parent_bottom"
        android:layout_width="wrap_content"
        android:layout_height="wrap_content"
        android:layout_alignParentBottom="true"
        android:background="#FFFFFF"
        android:text="我跟上级底部对齐"
        android:textColor="#000000"
        android:textSize="11sp" />

    <TextView
        android:id="@+id/tv_left_center"
        android:layout_width="wrap_content"
        android:layout_height="wrap_content"
        android:layout_alignTop="@id/tv_center"
        android:layout_toLeftOf="@id/tv_center"
        android:background="#FFFFFF"
        android:text="我跟中间左边对齐"
        android:textColor="#000000"
        android:textSize="11sp" />

    <TextView
        android:id="@+id/tv_right_center"
        android:layout_width="wrap_content"
        android:layout_height="wrap_content"
        android:layout_alignTop="@id/tv_center"
        android:layout_toRightOf="@id/tv_center"
        android:background="#FFFFFF"
        android:text="我跟中间右边对齐"
        android:textColor="#000000"
        android:textSize="11sp" />

    <TextView
        android:id="@+id/tv_above_center"
        android:layout_width="wrap_content"
        android:layout_height="wrap_content"
        android:layout_above="@id/tv_center"
        android:layout_alignLeft="@id/tv_center"
        android:background="#FFFFFF"
        android:text="我跟中间上面对齐"
        android:textColor="#000000"
        android:textSize="11sp" />

    <TextView
        android:id="@+id/tv_below_center"
        android:layout_width="wrap_content"
        android:layout_height="wrap_content"
        android:layout_below="@id/tv_center"
        android:layout_alignRight="@id/tv_center"
        android:background="#FFFFFF"
        android:text="我跟中间下面对齐"
        android:textColor="#000000"
        android:textSize="11sp" />
</RelativeLayout>
上述XML文件的布局效果如图所示,RelativeLayout的下级视图都是文本视图,控件上的文字说明了所处的相对位置,具体的控件显示方位正如XML属性中描述的那样

3.3.3 网格布局GridLayout
虽然线性布局既能在水平方向排列,也能在垂直方向排列,但它不支持多行多列的布局方式,只支持单行(水平排列)或单列(垂直排列)的布局方式。若要实现类似表格那样的多行多列形式,可采用网格布局GridLayout。
网格布局默认从左往右、从上到下排列,它先从第一行从左往右放置下级视图,塞满之后另起一行放置其余的下级视图,如此循环往复直至所有下级视图都放置完毕。为了判断能够容纳几行几列,网格布局新增了android:columnCount与android:rowCount两个属性,其中columnCount指定了网格的列数,即每行能放多少个视图;rowCount指定了网格的行数,即每列能放多少个视图。
下面是运用网格布局的XML布局样例,它规定了一个两行两列的网格布局,且内部容纳四个文本视图。XML文件内容如下所示:
<?xml version="1.0" encoding="utf-8"?>
<GridLayout xmlns:android="http://schemas.android.com/apk/res/android"
    xmlns:tools="http://schemas.android.com/tools"
    android:layout_width="match_parent"
    android:layout_height="match_parent"
    android:columnCount="2"
    android:rowCount="2"
    tools:context=".GridLayoutActivity">

    <TextView
        android:layout_width="0dp"
        android:layout_columnWeight="1"
        android:layout_height="60dp"
        android:background="#FFCCCC"
        android:gravity="center"
        android:text="浅红色"
        android:textColor="#000000"
        android:textSize="17sp" />

    <TextView
        android:layout_width="0dp"
        android:layout_columnWeight="1"
        android:layout_height="60dp"
        android:background="#FFAA00"
        android:gravity="center"
        android:text="橙色"
        android:textColor="#000000"
        android:textSize="17sp" />

    <TextView
        android:layout_width="0dp"
        android:layout_columnWeight="1"
        android:layout_height="60dp"
        android:background="#660066"
        android:gravity="center"
        android:text="深紫色"
        android:textColor="#000000"
        android:textSize="17sp" />

    <TextView
        android:layout_width="0dp"
        android:layout_columnWeight="1"
        android:layout_height="60dp"
        android:background="#00FF00"
        android:gravity="center"
        android:text="绿色"
        android:textColor="#000000"
        android:textSize="17sp" />


</GridLayout>
运行App观察到的界面如图所示。

由上图可见,App界面的第一行分布着浅红色背景与橙色背景的文本视图,第二行分布着绿色背景与深紫色背景的文本视图,说明利用网格布局实现了多行多列的效果。
3.3.4 滚动视图ScrollView
手机屏幕的显示空间有限,常常需要上下滑动或左右滑动才能拉出其余页面内容,可惜一般的布局节点都不支持自行滚动,这时就要借助滚动视图了。与线性布局类似,滚动视图也分为垂直方向和水平方向两类,其中垂直滚动视图名为ScrollView,水平滚动视图名为HorizontalScrollView。这两个滚动视图的使用并不复杂,主要注意以下3点:
(1)垂直方向滚动时,layout_width属性值设置为match_parent,layout_height属性值设置为wrap_content。
(2)水平方向滚动时,layout_width属性值设置为wrap_content,layout_height属性值设置为match_parent。
(3)滚动视图节点下面必须且只能挂着一个子布局节点,否则会在运行时报错Caused by:java.lang.IllegalStateException:ScrollView can host only one direct child。
下面是垂直滚动视图ScrollView和水平滚动视图HorizontalScrollView的XML例子:
<?xml version="1.0" encoding="utf-8"?>
<LinearLayout xmlns:android="http://schemas.android.com/apk/res/android"
    xmlns:tools="http://schemas.android.com/tools"
    android:layout_width="match_parent"
    android:layout_height="match_parent"
    android:orientation="vertical"
    tools:context=".ScrollVIewActivity">

    <HorizontalScrollView
        android:layout_width="wrap_content"
        android:layout_height="200dp">

        <!--水平方向的线性布局,两个子视图的颜色分别为青色和黄色-->
        <LinearLayout
            android:layout_width="wrap_content"
            android:layout_height="match_parent"
            android:orientation="horizontal">

            <View
                android:layout_width="300dp"
                android:layout_height="match_parent"
                android:background="#AAFFFF" />

            <View
                android:layout_width="300dp"
                android:layout_height="match_parent"
                android:background="#FFFFF0"/>

        </LinearLayout>
    </HorizontalScrollView>

    <ScrollView
        android:layout_width="match_parent"
        android:layout_height="wrap_content">
        <!--垂直方向的线性布局,两个子视图的颜色分别为青色和黄色-->
        <LinearLayout
            android:layout_width="wrap_content"
            android:layout_height="match_parent"
            android:orientation="vertical">

            <View
                android:layout_width="match_parent"
                android:layout_height="400dp"
                android:background="#00FF00" />

            <View
                android:layout_width="match_parent"
                android:layout_height="400dp"
                android:background="#FFFFAA"/>

        </LinearLayout>
    </ScrollView>

</LinearLayout>
运行测试App,可知ScrollView在纵向滚动,而HorizontalScrollView在横向滚动。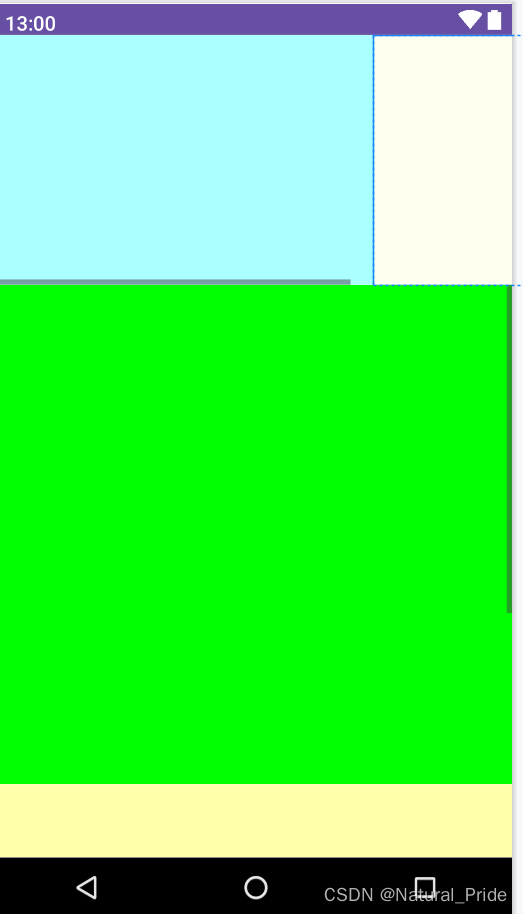
有时ScrollView的实际内容不够,又想让它充满屏幕,怎么办呢?如果把layout_height属性赋值为match_parent,结果还是不会充满,正确的做法是再增加一行属性android:fillViewport(该属性为true表示允许填满视图窗口),属性片段举例如下:
  android:layout_height="match_parent"
  android:fillViewport="true"
原文地址:https://blog.csdn.net/Natural_Pride/article/details/135887787
本文来自互联网用户投稿,该文观点仅代表作者本人,不代表本站立场。本站仅提供信息存储空间服务,不拥有所有权,不承担相关法律责任。
如若转载,请注明出处:http://www.7code.cn/show_64213.html
如若内容造成侵权/违法违规/事实不符,请联系代码007邮箱:suwngjj01@126.com进行投诉反馈,一经查实,立即删除!

![[word] word页面视图放大后,影响打印吗? #笔记#学习方法](https://img-blog.csdnimg.cn/img_convert/b0f507e3421d4317b2c4620b0ffc2d28.jpeg)