本章我们来学习View3D类。
View3D是用来渲染3D场景并显示在2D平面的类,并且该类可以放在QML2D下继承于Item子类的任何场景中,比如将View3D放在Rectangle中:
Rectangle {
        width: 200
        height: 200
        color: "red"
        View3D {
                anchors.fill: parent
                anchors.margins: 40
                // ... ...
        }
}
View3D是用来渲染3D场景的,所以我们可以通过environment属性来设置环境参数,比如设置3D背景色、抗锯齿、天空盒等等,比如设置:
environment: SceneEnvironment {
            clearColor: "red"            // 设置背景色为红色
            backgroundMode: SceneEnvironment.Color   // 设置背景模式为color,也可以设置为天空盒、透明等等
            antialiasingMode: SceneEnvironment.MSAA  // 抗锯齿模式
            antialiasingQuality: SceneEnvironment.High  //  抗锯齿质量
}如果我们要在场景中显示2D类(必须是Item子类),可以通过Node类实现、比如我们要在View3D中显示一个Text:
import QtQuick
import QtQuick.Window
import QtQuick3D
import QtQuick3D.Helpers
Window {
    width: 640
    height: 480
    visible: true
    title: qsTr("Hello World")
    View3D {
        anchors.fill: parent
        environment: SceneEnvironment {
            clearColor: "#F1F1F1"
            backgroundMode: SceneEnvironment.Color
            antialiasingMode: SceneEnvironment.MSAA
            antialiasingQuality: SceneEnvironment.High
        }

        PerspectiveCamera {
            id: camera
            position: Qt.vector3d(0, 0, 440)
        }

        Node {
            Rectangle {
                width: 400
                height: 400
                x: -width/2
                y: -height/2
                color: "#77202020"
                radius: 10
                border.width: 2
                border.color: "#77f0f0f0"
                Text {
                    anchors.centerIn: parent
                    font.pixelSize: 20
                    color: "#FFF"
                    font.family: "Microsoft Yahei"
                    style: Text.Raised
                    styleColor: "#111"
                    text: "QML3D学习 by诺谦"
                }
            }
        }
    }
}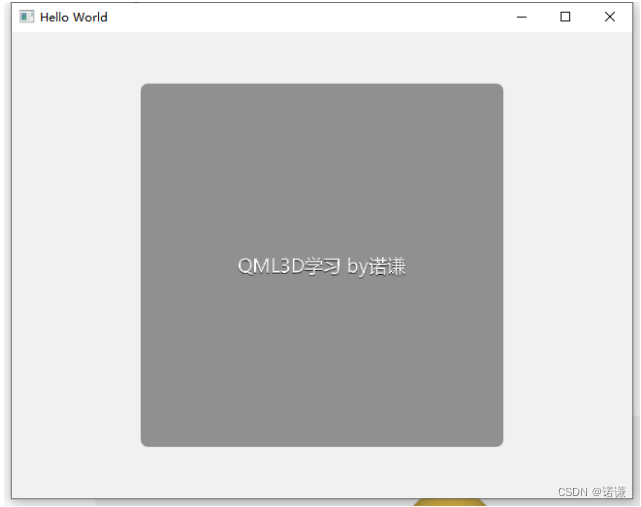
这里我们使用了PerspectiveCamera 相机,要让View3D显示出来则必须需要一个继承于Camera类的相机,否则View3D无法知道我们要从哪个角度去展示3D场景。
我们设置了摄像机的position为Qt.vector3d(0, 0, 440)、只设置了z为440,而欧拉角度默认是0,所以可以看出摄像机的方向默认是从Z方向照射XY方向的。
假如我们设置为:
PerspectiveCamera {
            id: camera
            position: Qt.vector3d(0, -200, 440)    // 摄像机Y方向后退200
            eulerRotation.x: 30                    // 绕x正方向旋转30°
 }
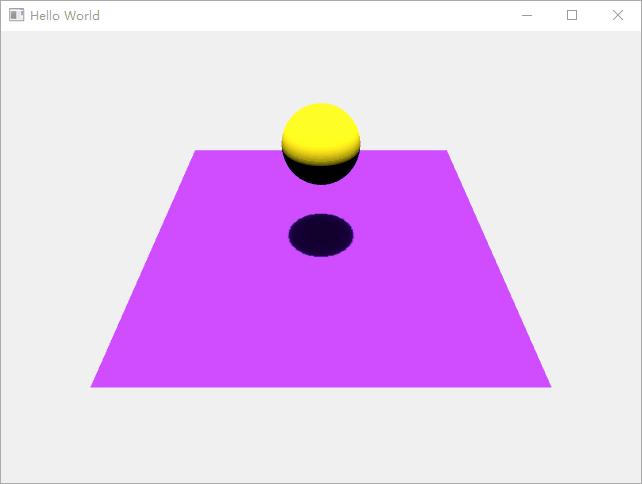
而我们设置的Rectangle的x和y为宽高的负一半,这是为了让Rectangle在原点居中显示,除此之外,Node还可以组合式显示,比如:
Node {
    Rectangle {
        width: 400
        height: 400
        x: -width/2
        y: -height/2
        color: "#77202020"
    }
    Rectangle {
        width: 400
        height: 400
        x: 0
        y: 0
        color: "#77202020"
    }
}效果如下所示:


如上图可以看到,Node类的子类非常多,比如Model类(显示3D模型)、ParticleSystem3D粒子系统类、Light光照类等等。
所以Node类非常重要,下章我们便来来学习Node类,再来学习其它类就会非常的方便快捷。
View3D的其它相关属性和方法介绍
- importScene : 设置公共的Node,比如有多个View3D,其内容都是相同的Node,只是相机位置不一致而已,具体参考示例(View3D Example),注意:该属性只能设置一次,后续更改将无效。
- camera : QtQuick3D::Camera,指定用哪个相机来显示
- environment : QtQuick3D::SceneEnvironment,设置渲染场景,比如背景色
- importScene : QtQuick3D::Node,设置公共的Node,比如有多个View3D,其内容都是相同的Node,只是相机位置不一致而已,具体参考示例(View3D Example),注意:该属性只能设置一次,后续更改将无效。
- renderFormat : enumeration, 设置渲染纹理的格式,默认为ShaderEffectSource.RGBA8
- renderMode : enumeration,渲染模式,默认为View3D.Offscreen,只有当某些GOU硬件不支持时,才会去更改渲染模式。
- renderStats : QtQuick3D::RenderStats,只读属性,统计信息,比如fps实时刷新率,frameTime,renderTime,syncTime, 和maxFrameTime等等
- scene : QtQuick3D::Node, 只读属性, 保存View3D场景的根节点。
方法如下所示:
- vector3d mapFrom3DScene(vector3d scenePos) : 将scenePos场景空间位置(3D)转换到视图平面位置(2D)
- vector3d mapTo3DScene(vector3d viewPos) : 将viewPos视图平面位置(2D)转换到场景空间位置(3D)
- PickResult pick(float x, float y) : 此方法将从视图坐标xy位置“射”一条光线到3D场景中,并返回与射线最近交叉的物体信息。例如,可以使用鼠标坐标来调用它来查找鼠标光标下的对象.
- List<PickResult> pickAll(float x, float y) : 和pick函数类似,不过是从视图坐标xy位置“射”一条光线到3D场景中,并返回与射线所有交叉的物体信息列表并从近到远进行排序
- PickResult rayPick(vector3d origin, vector3d direction) : 获取从场景空间位置origin,发出一个direction方向的射线,并返回与射线最近交叉的物体信息,例如,在判断射击子弹时是否有碰撞
- List<PickResult> rayPickAll(vector3d origin, vector3d direction): 和rayPick函数类似,不过获取的是一个所有交叉的列表
- distance : float, 拾取距离,也就是射出光线的原点与交叉点的距离
- instanceIndex : int,当拾取命中实例模型的实例时,此属性保存实例表中的索引,如果该模型不是由多个子模块组成,那么始终返回0
- normal : vector3d,保存局部坐标空间中被击中的面的法线。
- objectHit : Model,保存被选中的模型对象,我们可以通过!=null来判断是否有选中对象
- position : vector3d,保存拾取命中时,在3D空间中的场景位置
接下来我们便来实现一个点击3D物体变色的示例。
由于点击只有对3D模型才有效果(比如对光无法进行点击),所以我们需要使用Model类,Model类需要在学了Node类后再详解,所以本章只简单使用,示例如下所示:
import QtQuick
import QtQuick.Window
import QtQuick3D
Window {
width: 640
height: 480
visible: true
title: qsTr("Hello World")
View3D {
id: _view
anchors.fill: parent
environment: SceneEnvironment {
clearColor: "#F1F1F1"
backgroundMode: SceneEnvironment.Color
antialiasingMode: SceneEnvironment.MSAA
antialiasingQuality: SceneEnvironment.High
}
camera: camera
PerspectiveCamera {
id: camera
position: Qt.vector3d(0, -900, 800)
eulerRotation.x: 45
}
MouseArea {
anchors.fill: parent
onClicked: (mouse)=> {
let ret = _view.pick(mouse.x, mouse.y)
if(ret.objectHit != null)
ret.objectHit.materials[0].diffuseColor =
Qt.rgba(Math.random(),Math.random(), Math.random(), 1.0)
}
}
DirectionalLight {
eulerRotation: Qt.vector3d(0, 0, 0)
castsShadow: true
brightness: 3
}
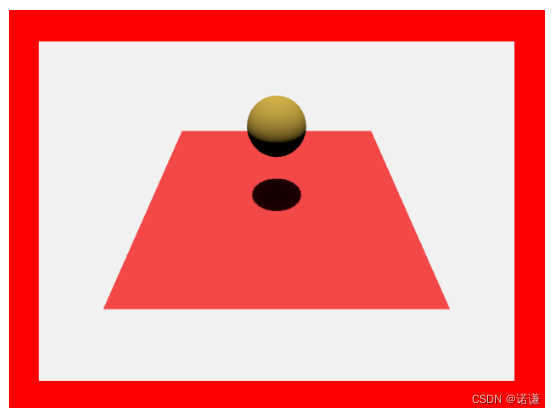
Model {
id: _sphere
source: "#Sphere"
z: 300
pickable: true
scale: Qt.vector3d(2, 2, 2)
materials: DefaultMaterial {
diffuseColor: Qt.rgba(0.6, 0.5, 0.2, 1.0)
}
}
Model {
source: "#Rectangle"
pickable: true
scale: Qt.vector3d(10, 10, 1)
materials: DefaultMaterial {
diffuseColor: Qt.rgba(0.7, 0.2, 0.2, 1.0)
}
}
}
}运行效果如下所示:
未完待续
原文地址:https://blog.csdn.net/qq_37997682/article/details/134742163
本文来自互联网用户投稿,该文观点仅代表作者本人,不代表本站立场。本站仅提供信息存储空间服务,不拥有所有权,不承担相关法律责任。
如若转载,请注明出处:http://www.7code.cn/show_24358.html
如若内容造成侵权/违法违规/事实不符,请联系代码007邮箱:suwngjj01@126.com进行投诉反馈,一经查实,立即删除!