文章目录
一、Vue简介
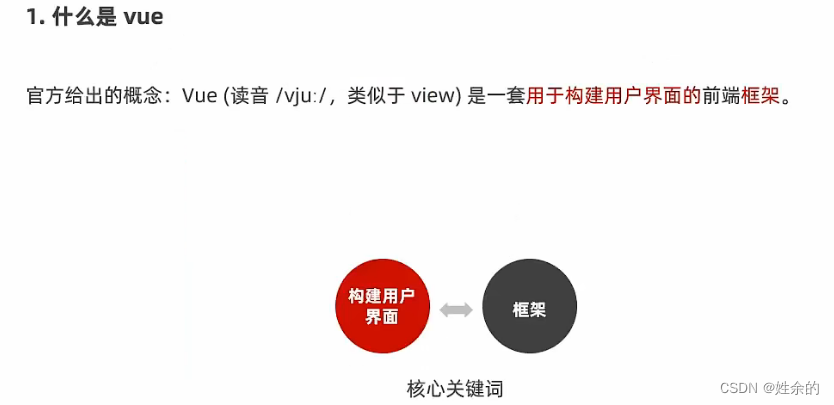
1、什么是Vue
1)构建用户界面
2)框架
- 框架时一套现场的解决方案,程序员智能遵守框架的规范,去编写自己的业务功能
- 要学习vue,就是在学习vue框架中规定的用法!
- vue指令、组件(是对UI结构的复用)、路由、Vuex、vue组件库
- 只有把上面罗列的内容掌握以后,才有开发vue项目的能力
2、Vue的两个特性
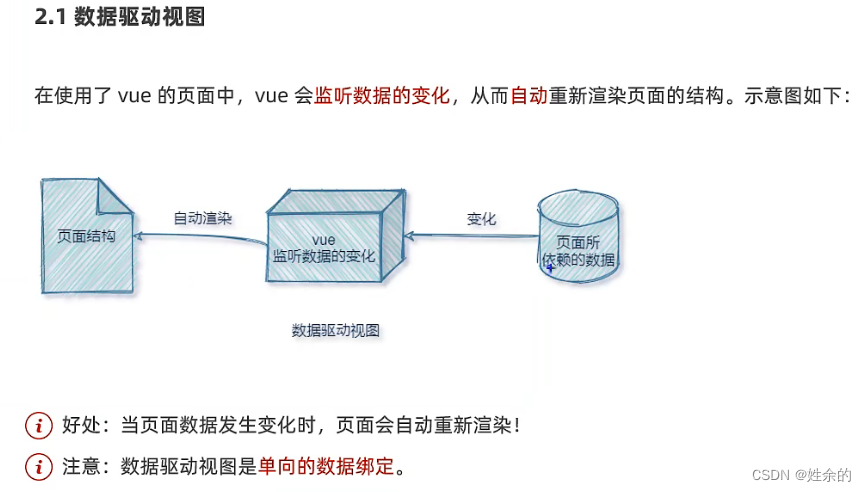
1)数据驱动视图
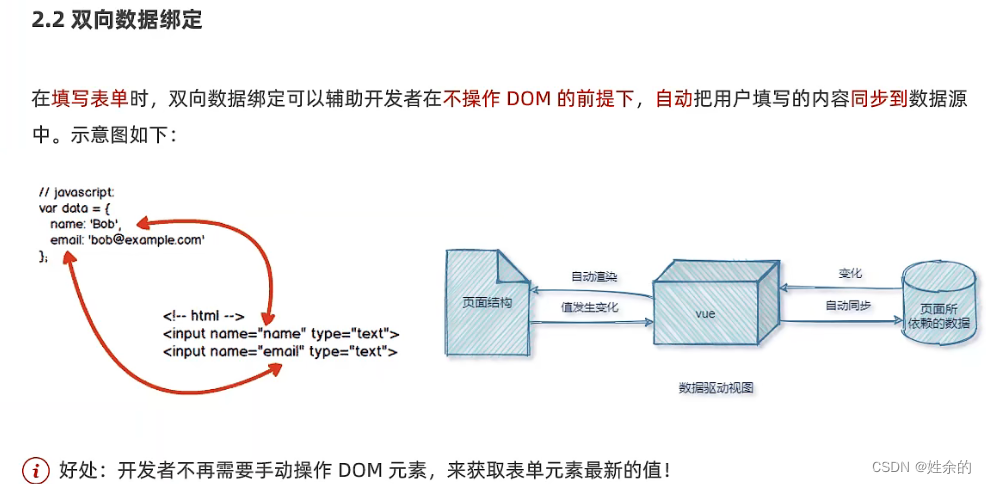
2)双向数据绑定
- 在网页中,
form表单负责采集数据,Ajax负责提交数据 - 好处:程序员不需要手动添加DOM操作即可得到表单最新值
- js数据的变化,会被自动渲染到页面上
- 页面上表单采集的数据发生变化的时候,会被vue自动获取到,并更新到js数据中
3)、MVVM
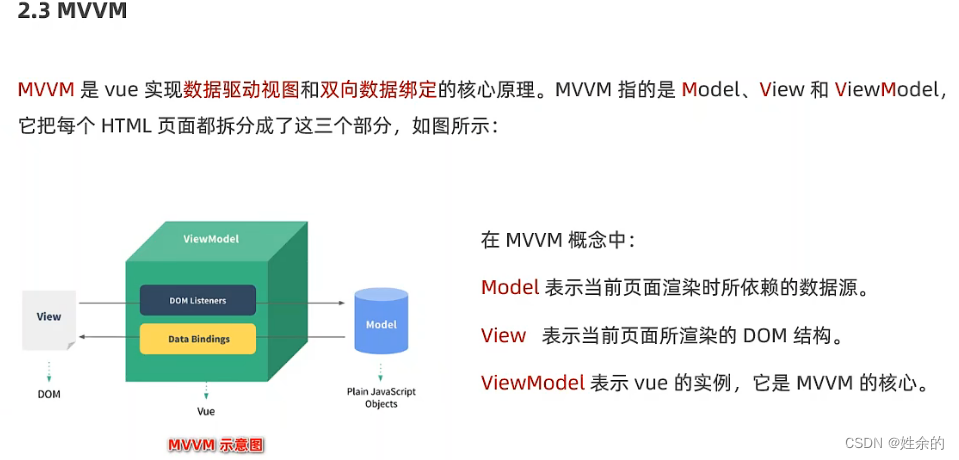
(1)、Model、View、ViewModel
Model:表示当前页面渲染是所依赖的数据源
View:表示当前页面所渲染的DOM结构
ViewModel:表示vue的实例,他是MVVM的核心
(2)、MVVM的工作原理
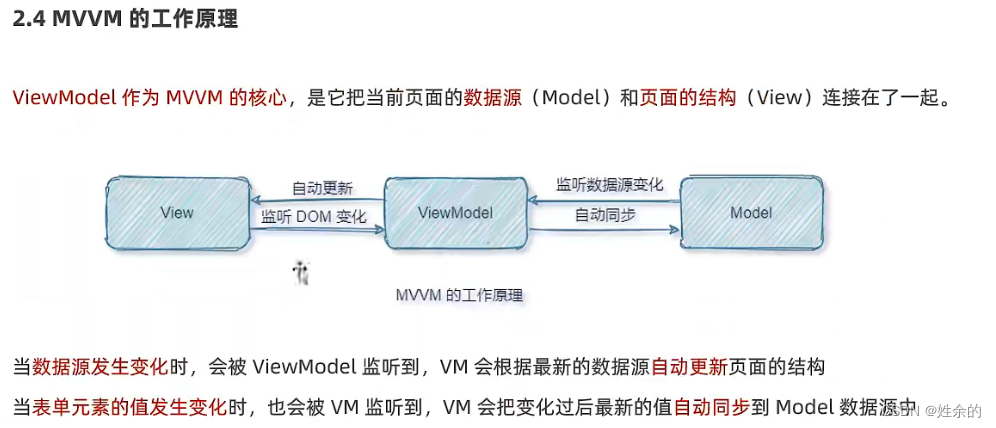
注意:数据驱动试图和双向数据绑定的底层原理是MVVM(Model数据源、View视图、ViewModel就是vue实例)
4、Vue的版本

二、Vue的使用
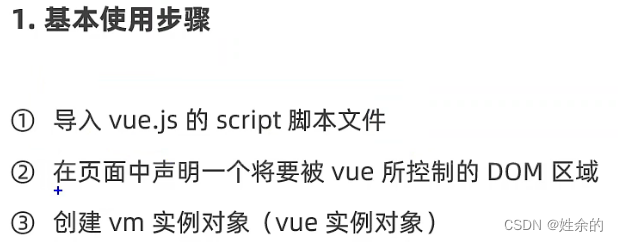
1、基本使用步骤
2、准备所需文件
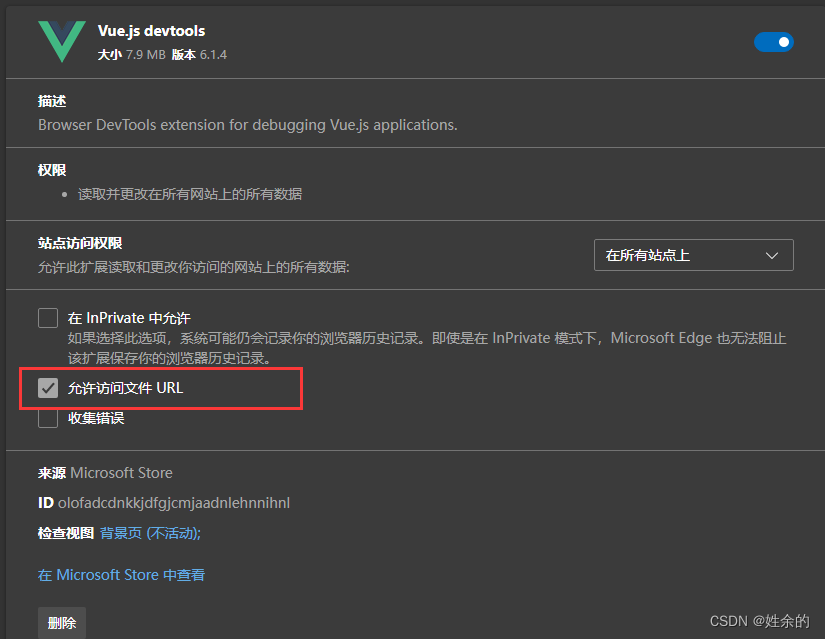
- 我们在Edge浏览器(google请自行找寻扩展包)下载
vue扩展(虽然现在不知道是干嘛用的)并且管理扩展里面点击详细信息让它能够访问文件的URL
- 在官网下载Vue.js,点击下面的下载就可以直接下载Vue.js
下载Vue.js
3、Vue第一个网页
使用Vue将数据渲染到页面上
<!DOCTYPE html>
<html lang="en">
<head>
<meta charset="UTF-8">
<meta name="viewport" content="width=device-width, initial-scale=1.0, maximum-scale=1.0, user-scalable=0">
<meta http-equiv="X-UA-Compatible" content="ie=edge">
<title>Document</title>
<link rel="stylesheet" type="text/css" href="" />
</head>
<body>
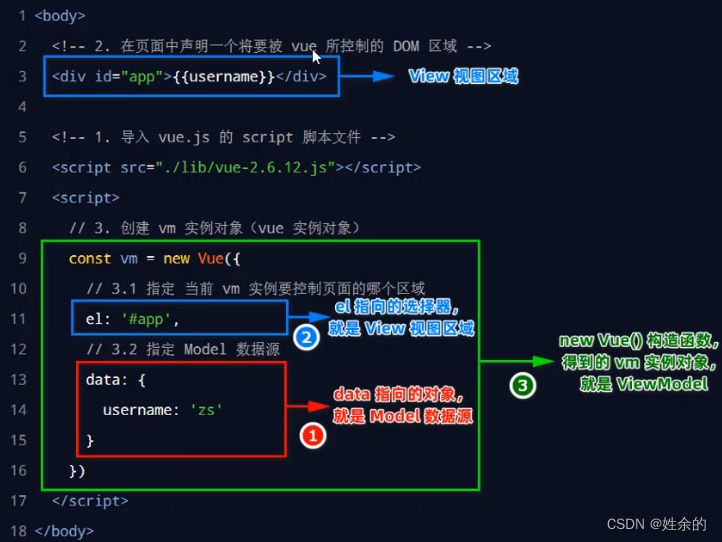
<!-- 希望vue能够控制下面这个div,帮我们把数据渲染到div内部-->
<div id="app">{{ username }}</div>
<!-- 1.导入Vue的库文件,在window全局就有了Vue这个构造函数-->
<script src="./lib/vue.js"></script>
<!-- 2.创建Vue的实例对象-->
<script>
const vm = new Vue({
//el属性是固定的写法,表示当前vm实例要控制页面上的哪个区域,接收的值是一个选择器
el: '#app',
//data对象就是要渲染到页面上的数据
data:{
username: '张三'
}
})
</script>
</body>
</html>
1)、基本代码与MVVM的对应关系
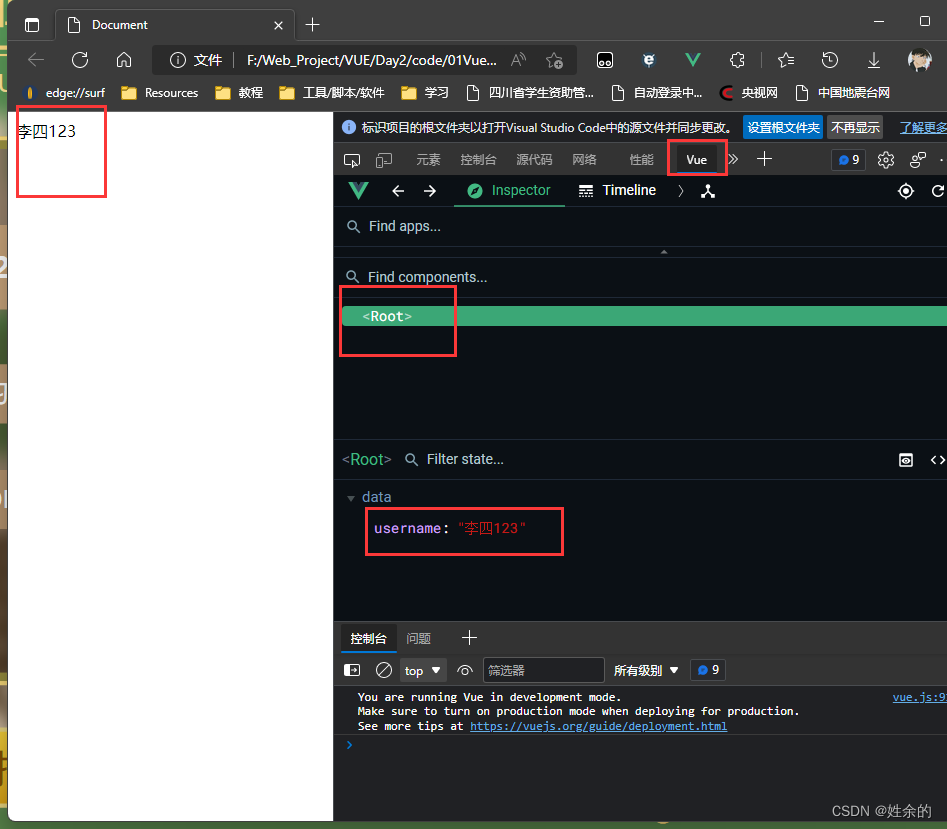
4、使用Edge浏览器中的vue-devtools
我们打开所写的页面,按F12 或者 右键-->检查,找到Vue如下图:就可以查看了
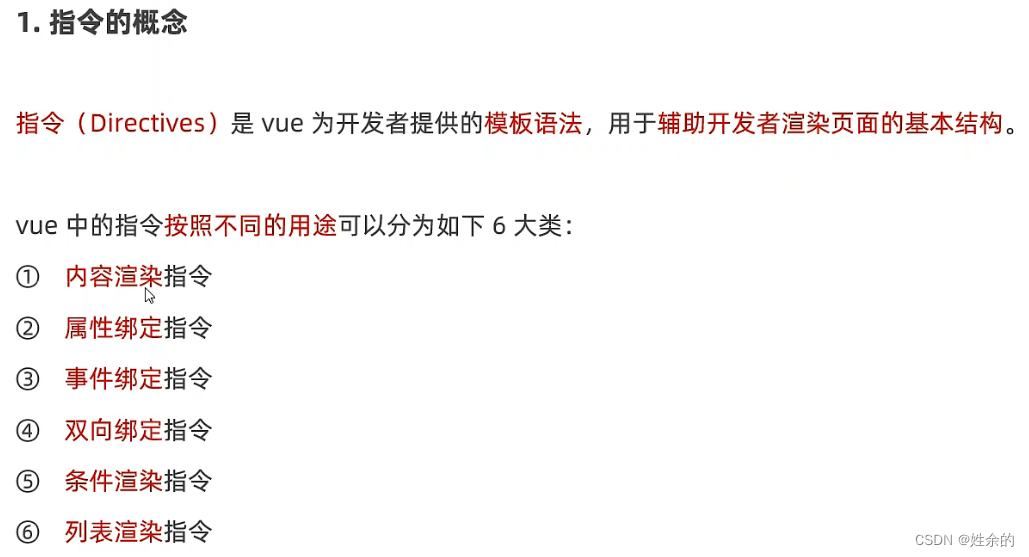
5、Vue的指令与过滤器
1)指令的概念
1.1)内容渲染指令
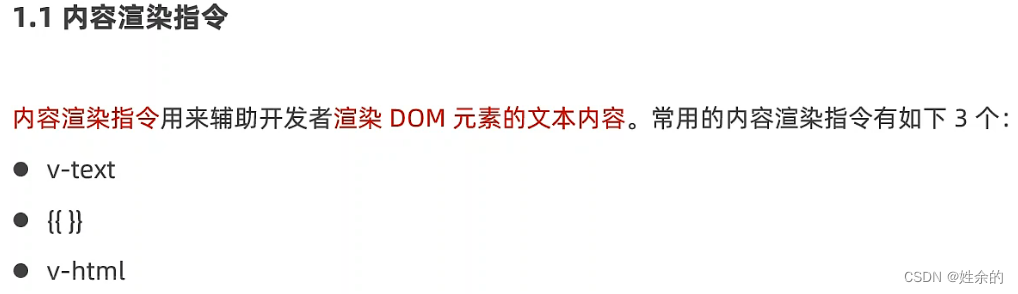
- v-text指令的缺点:会覆盖元素内部原有的内容
- {{ }} 插值表达式:在实际开发中用的最多,只是内容的占位符,不会覆盖原有内容
- v-html 指令的作用:可以把带有标签的字符串,渲染为真正标签的html内容
1.2)属性绑定指令v-bind
<div :title="'box' + index">这是一个div</div>
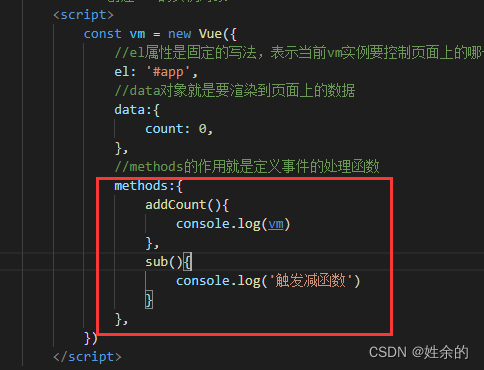
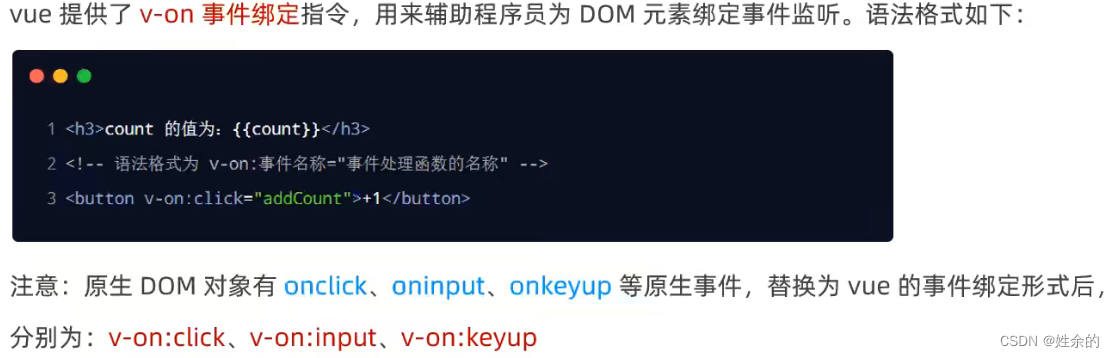
1.3)事件绑定指令v-on
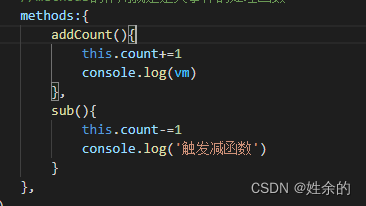
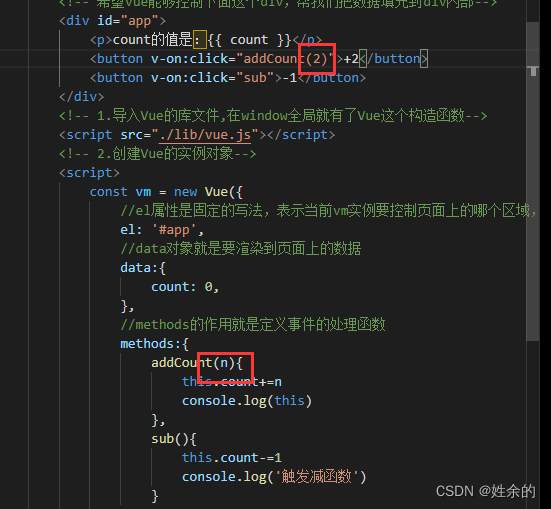
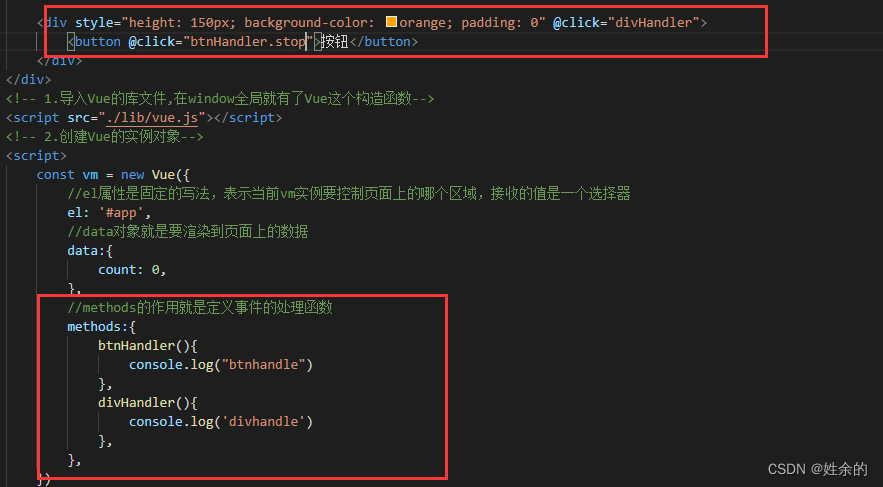
我们将button进行事件绑定:

我们将所需要的函数写在与data同级的methods里
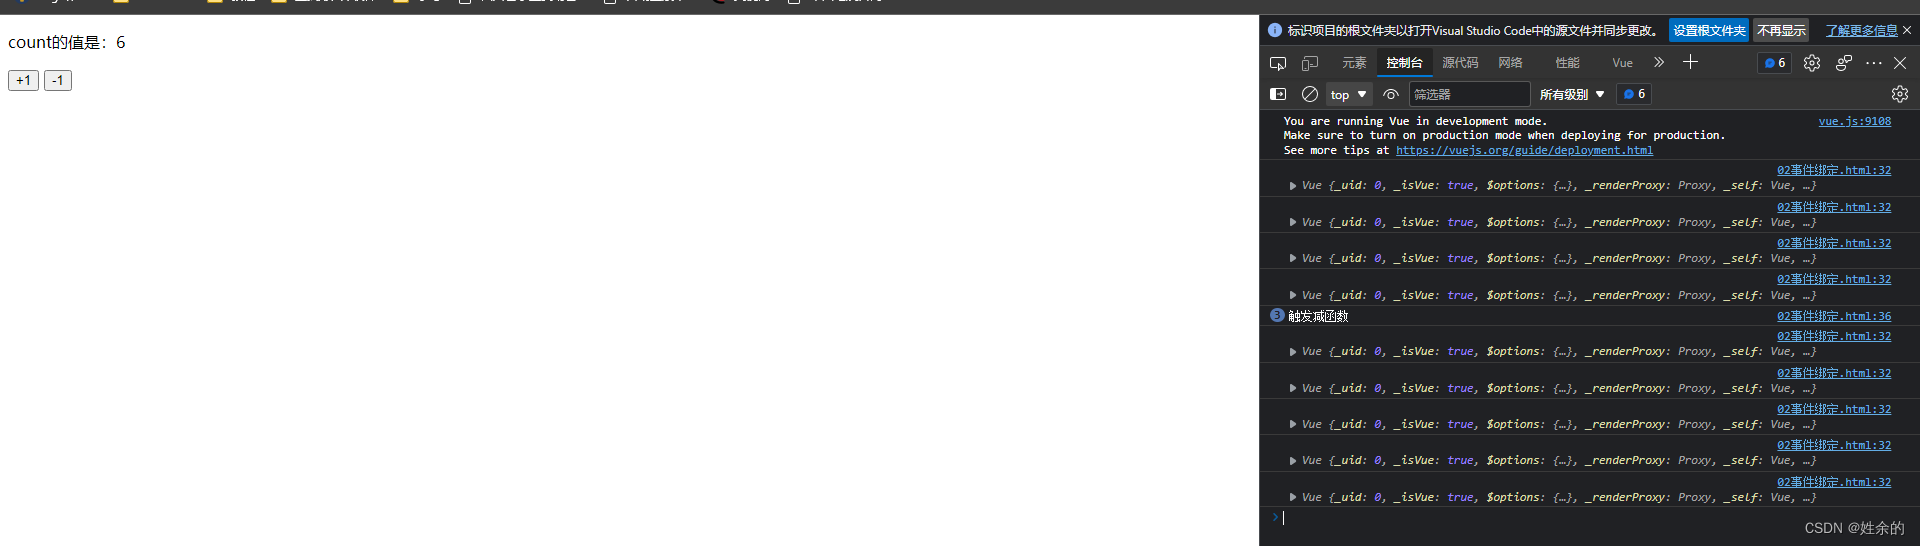
然后我们打印我们的vm实例,在浏览器中查看,点击+1按钮如图:
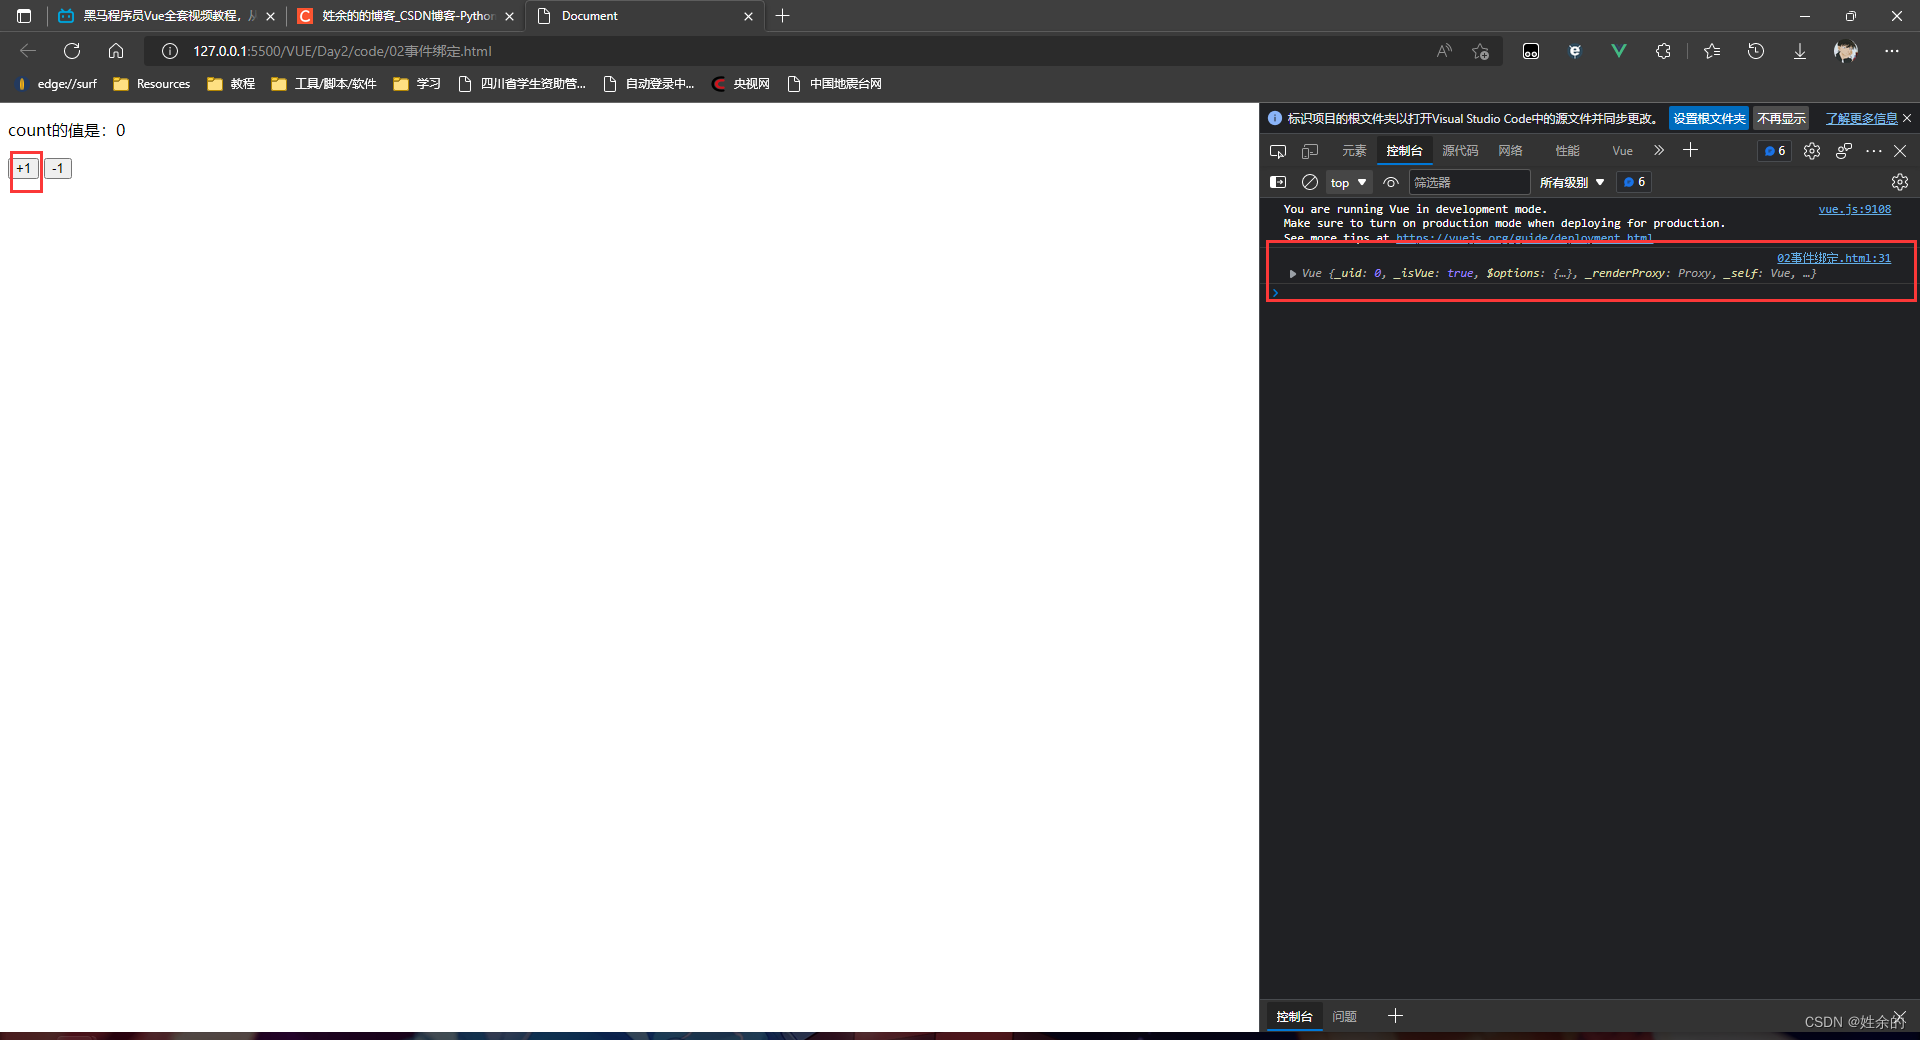
我们得到了一个返回的值,打开右边的对象,然后能看见一个count值:

之后在代码内使用对象vm来调用,或者this(代表vm),vm.count或者this.count
这样就成功了
我们还能进行传参:
事件对象
当我们想实现count为偶数时为红色,count为奇数时为空。那么我们可以在add传入的参数里添加$event
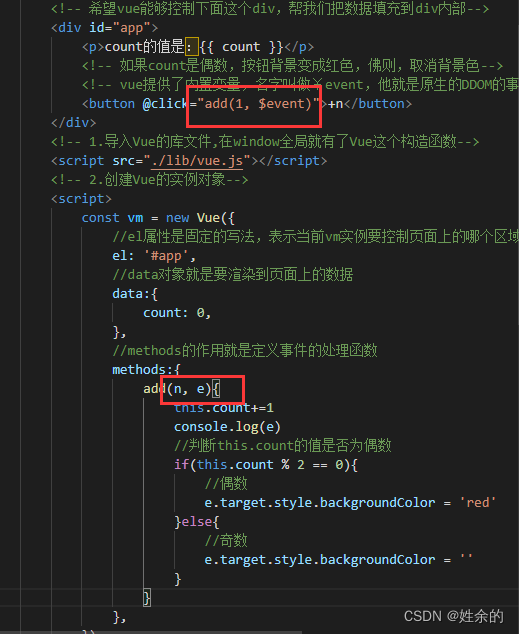
若我们没有传入数字也就是n,那么上面的@click就不需要任何参数,只需要在methods中添加一个e就可以了
这时我们在进入浏览器查看:
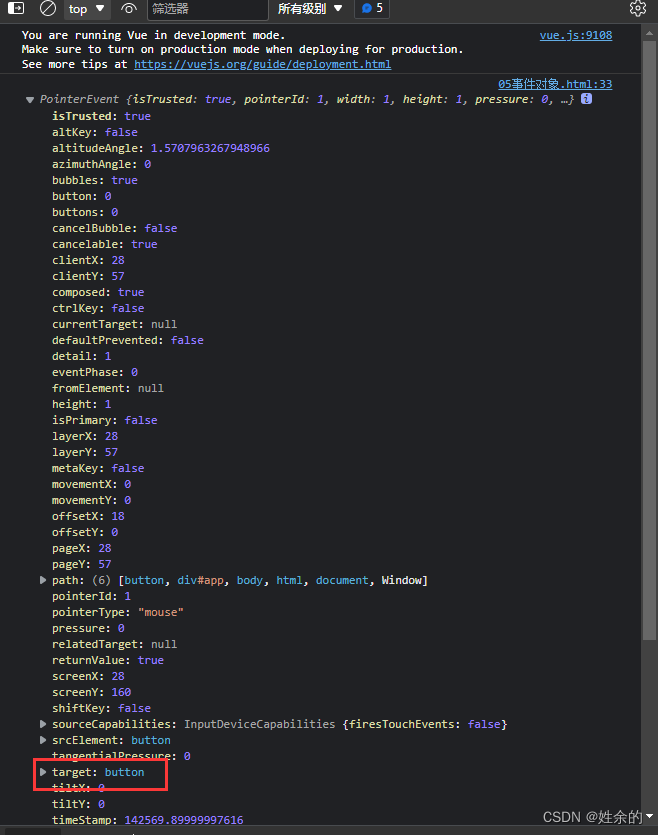
这时我们发现button在target下,所以我们使用e.target调用button,之后需要设置什么属性都可以直接展开逐一调用
v-on总结:
1.4)事件修饰符
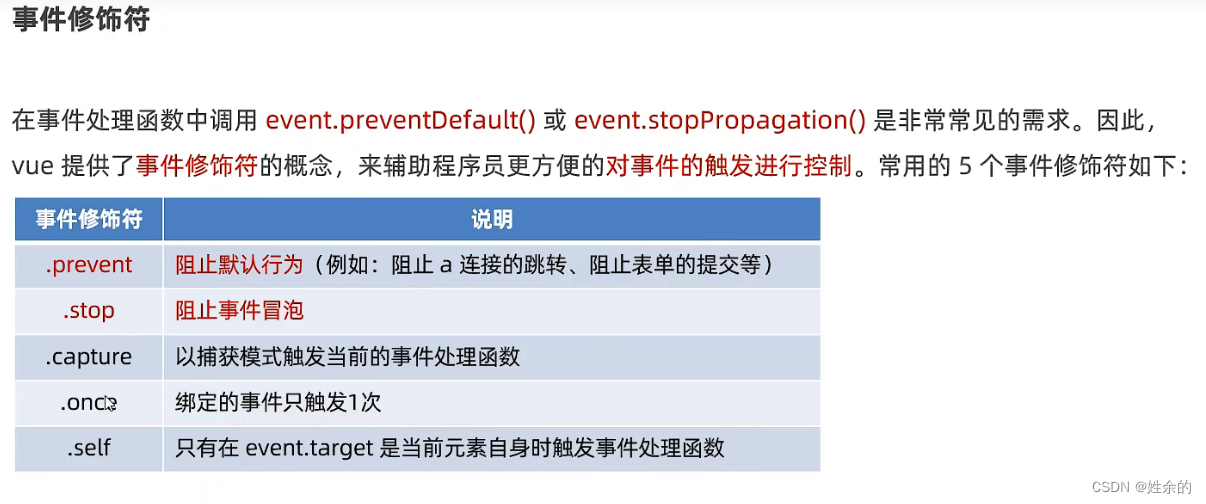
.stop
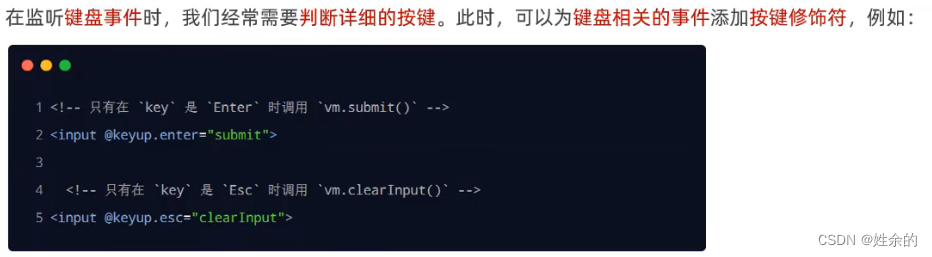
1.5)按键修饰符
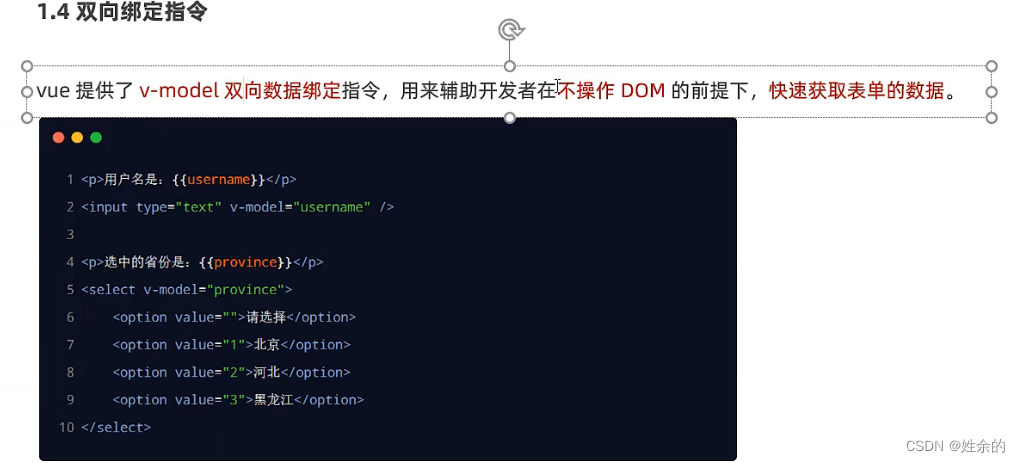
1.6)双向绑定指令v-model
可用:
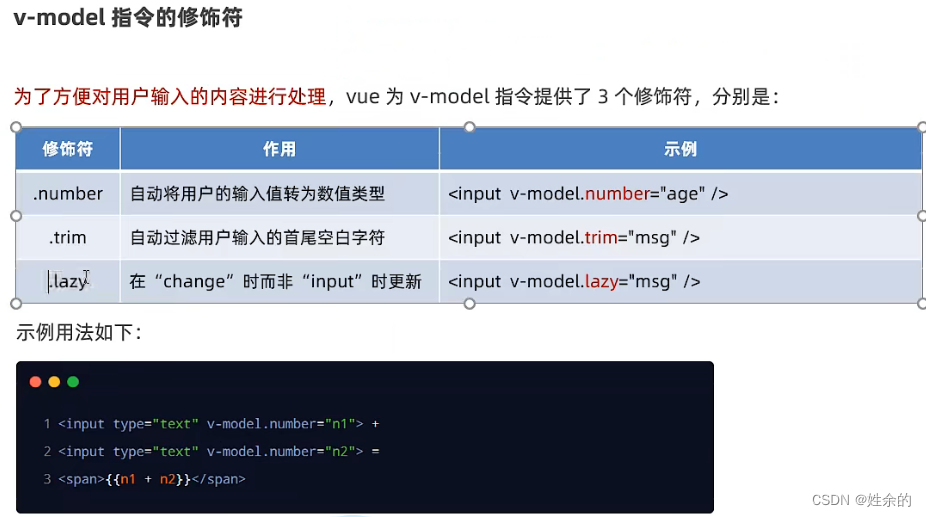
v-model指令修饰符
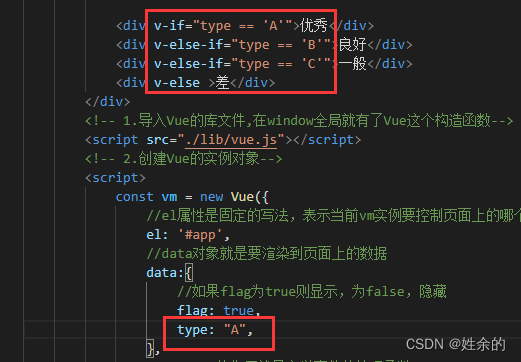
1.7)条件渲染指令v-if
v-show的原理是动态为元素添加或一处 display:none样式来实现元素的显示和隐藏-
如果要频繁的切换元素的显示状态,用v-show性能会更好 v-if的原理是每次动态创建或移除元素,从而来实现元素的显示和隐藏-
如果刚进入页面的时候,某些元素不需要被展示,而且后期这个元素很可能也不需要被展示出来,此时v-if的性能会更好 - 在实际开发中,绝大多数情况,不用考虑性能问题,直接使用 v-if 就好了
v-if还可以单用:
1.8)列表渲染指令v-for(2022.7.3)
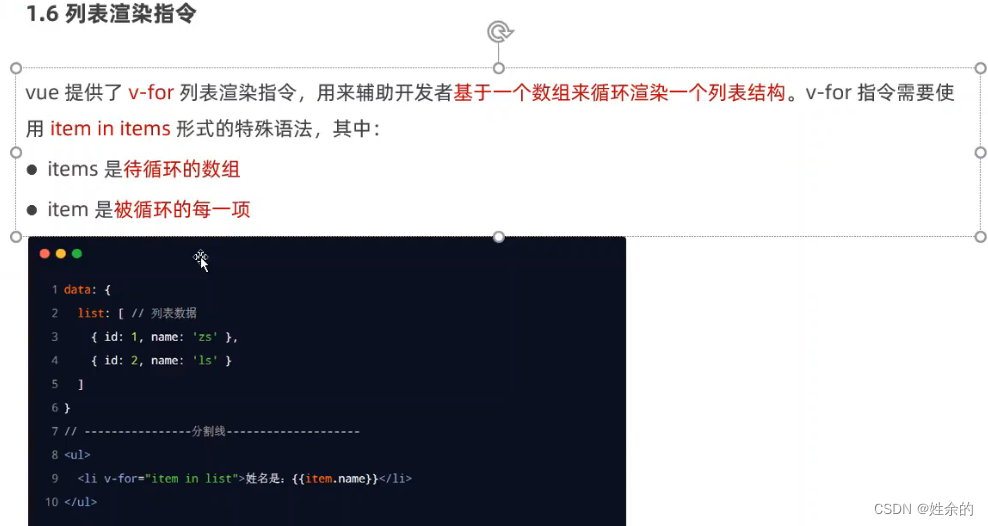

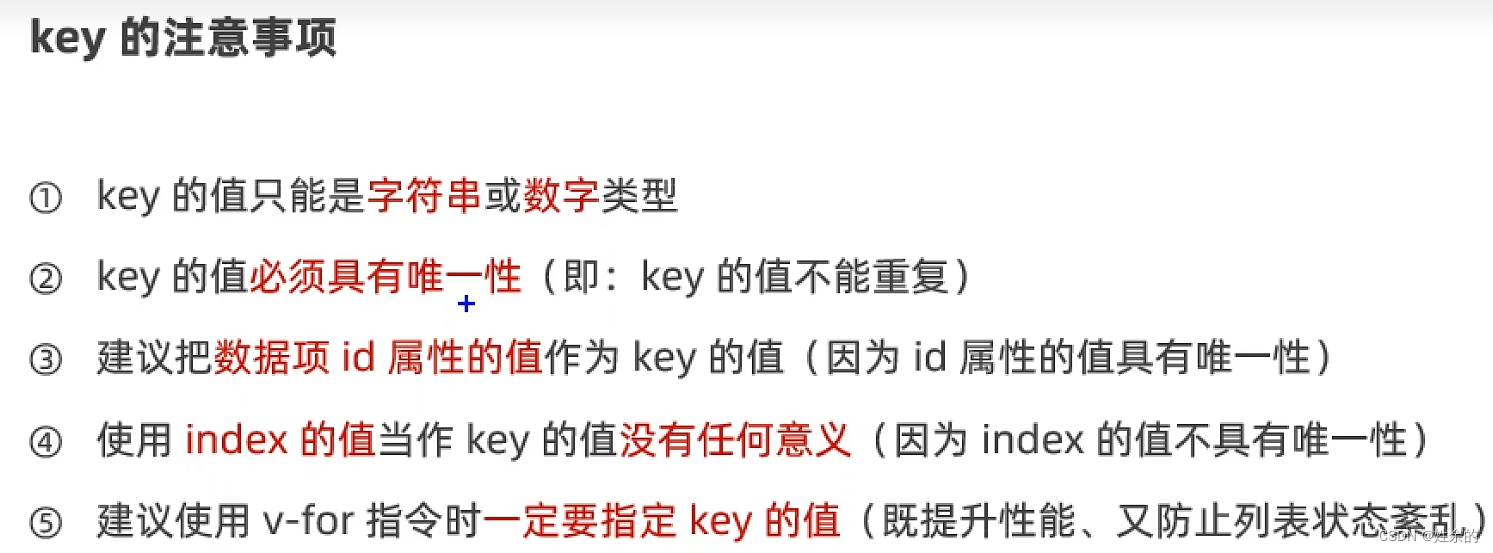
1.8.1)key的注意事项

1.8.2)v-for案例(品牌列表案例)

index.html(主页面,包含vue代码)
<!DOCTYPE html>
<html lang="en">
<head>
    <meta charset="UTF-8">
    <meta http-equiv="X-UA-Compatible" content="IE=edge">
    <meta name="viewport" content="width=device-width, initial-scale=1.0">
    <title>品牌列表渲染</title>
    <link rel="stylesheet" type="text/css" href="./lib/bootstrap.css" />
    <link rel="stylesheet" href="./css/index.css">
</head>
<body>
    <div id="app">
        <!-- 卡片区域-->
        <div class="card">
            <div class="card-heard">
                添加品牌
            </div>
            <div class="card-body">
                <!-- form表单元素有submit事件-->
                <form @submit.prevent="add">
                    <div class="form-row align-item-center">
                        <div class="col-auto">
                            <div class="input-group mb-2">
                                <div class="input-group-prepend">
                                    <div class="input-group-text">品牌名称</div>
                                </div>
                                <!-- 接收值得表单-->
                                <input type="text" class="form-control" placeholder="请输入品牌名称" v-model.trim="brand">
                            </div>
                        </div>
                        <!-- 添加按钮-->
                        <div class="button">
                            <button type="submit" class="btbm btm-primary mb-2">添加</button>
                        </div>
                    </div>
                </form>
            </div>
        </div>

        <!-- 表格区域-->
        <table class="table table-border table-hover table-striped">
            <thead>
                <tr>
                    <th scope="col">#</th>
                    <th scope="col">品牌名称</th>
                    <th scope="col">状态</th>
                    <th scope="col">创建时间</th>
                    <th scope="col">操作</th>
                </tr>
            </thead>
            <tbody>
                <tr v-for="item in list" :key="item.id">
                    <td>{{ item.id }}</td>
                    <td>{{ item.name }}</td>
                    <td>
                        <div class="cunstom-control cunstom-switch">
                            <!-- lable 设置滑动checkbox-->
                            <label class="huadong">
                                <!-- checkbox-->
                                <input type="checkbox" style="display: none;" class="custom-control-input" :id="'cunstomSwich'+item.id" v-model="item.status">
                                <!-- 滑动的圆圈-->
                                <div class="check"></div>
                                <!-- 底色-->
                                <div class="circle"></div>
                            </label>
                            <!-- 设置是否禁用-->
                            <label class="custon-control-label" :for="'cunstomSwich'+item.id" v-if="item.status == true">已启用</label>
                            <label class="custon-control-label" :for="'cunstomSwich'+item.id" v-else>已禁用</label>
                        </div>
                    </td>
                    <td>{{ item.time }}</td>
                    <td>
                        <a href="javascript:;" @click="remove(item.id)">删除</a>
                    </td>
                </tr>
            </tbody>
        </table>
    </div>
    <script src="./lib/vue.js"></script>
    <!-- 2.创建Vue的实例对象-->
    <script>
        const vm = new Vue({
            //el属性是固定的写法,表示当前vm实例要控制页面上的哪个区域,接收的值是一个选择器
            el: '#app',
            //data对象就是要渲染到页面上的数据
            data:{
                //用户输入的品牌名称
                brand: '',
                //下一个可用的id
                nextid: 4,
                //品牌数据列表
                list: [
                { id: 1, name: "宝马",status: true, time: new Date() },
                { id: 2, name: "奔驰",status: false, time: new Date() },
                { id: 3, name: "奥迪",status: true, time: new Date() },
                ]
            },
            //methods的作用就是定义事件的处理函数
            methods:{
                remove(id){
                    this.list = this.list.filter(item => item.id !== id)
                },

                //阻止表单的默认提交行文之后,触发add方法
                add(){
                    //若果判断到brand的值为空字符,则return出去
                    if(this.brand == ''){ return alert('必须填写品牌名称')}
                    //如果没有被return出去,应该执行添加逻辑
                    //1、先把要添加的品牌对象,整理出来
                    //往this.list数组中push步骤 1 中的对象
                    //3、清空 this.brand ;让 this.nextid 自增 +1
                    const obj = {
                        id : this.nextid,
                        name: this.brand,
                        status: true,
                        time: new Date(),
                    }
                    this.list.push(obj)
                    this.brand = ''
                    this.nextid++
                },
            },
        })
    </script>
</body>
</html>
index.css(设置位置和滑动checkbox)
* {
    margin: 0;
    padding: 0;
    border: none;
}
#app{
    margin-top: 10px;
    margin-left: 10px;
    border-radius: 3px;
    margin-right: 10px;
}
.card{
    height: 145px;
    width: 1900px;
}
.card-heard{
    background-color: #f3f3f3f3;
    padding-top: 15px;
    padding-left: 15px;
    padding-bottom: 15px;
}
.col-auto {
    width: 315px;
    height: 39px;
    float: left;
}
.button{
    height: 39px;
    width: 63px;
    float: left;
    margin-left: 10px;
}
.btbm{
    height: 39px;
    width: 63px;
    background-color: #0072F6;
    color: #fff;
    border-radius: 7px;
    text-align: center;
}


.huadong{
    position: relative;
    z-index: 1;
}
.check{
    width: 1.5rem;
    height: .8rem;
    border-radius: 100rem;
    border: 1px solid #dddddd;
    transition: .3s;
}
.circle{
    width: .8rem;
    height: .8rem;
    border-radius: 50%;
    background: #fff;
    position: absolute;
    left: 1px;
    top: 1px;
    transform: translateX(0rem);
    transition: .3s;
}

input:checked ~.check{
    background: #0072F6;
    transition: .3s;
    border-color: #0072F6;
  }
input:checked ~ .circle{
    transform: translateX(.7rem);
    transition: .3s;
}
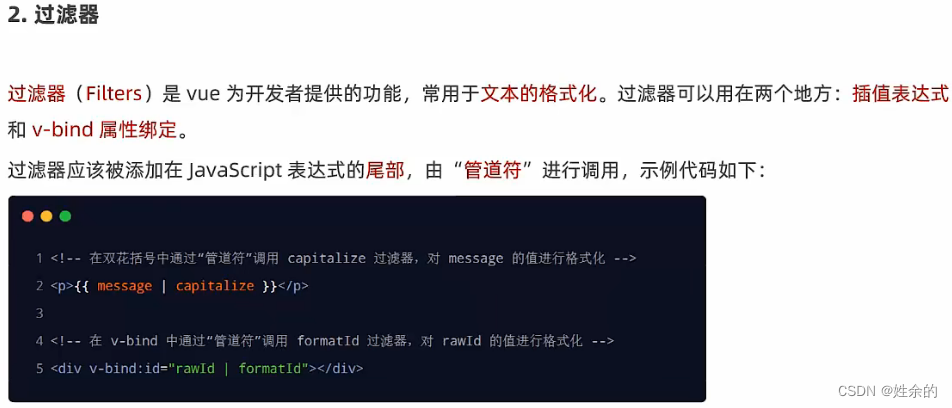
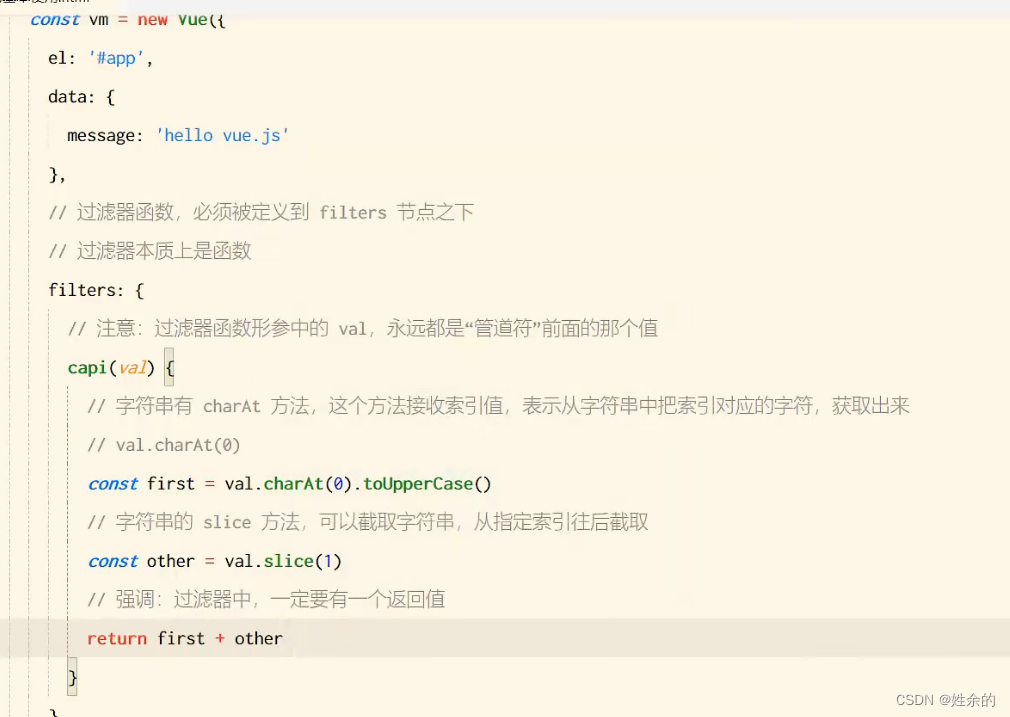
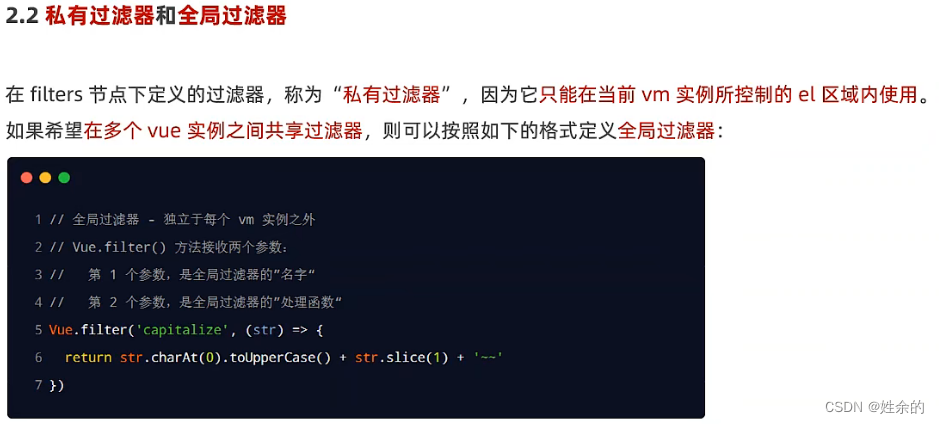
2)、过滤器
- 偷一下懒
2.1)、全局过滤器

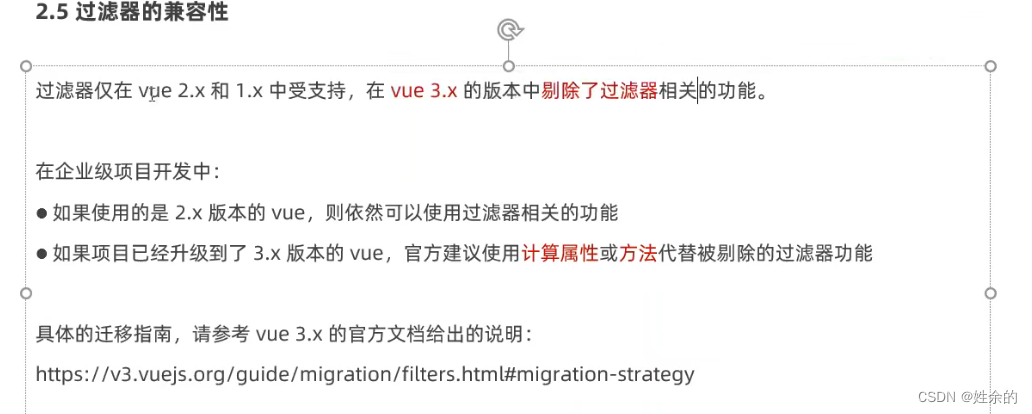
2.2)、过滤器的兼容性
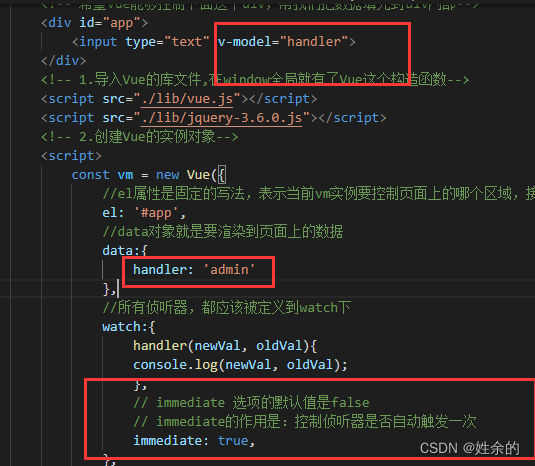
6、侦听器
1)、什么是侦听器

2)、侦听器的基本语法
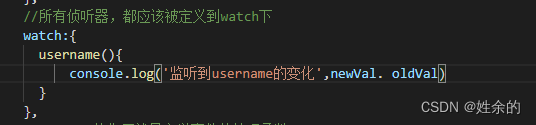
3)、侦听器的格式
3.1)、方法格式的侦听器
3.2)、对象格式的侦听器
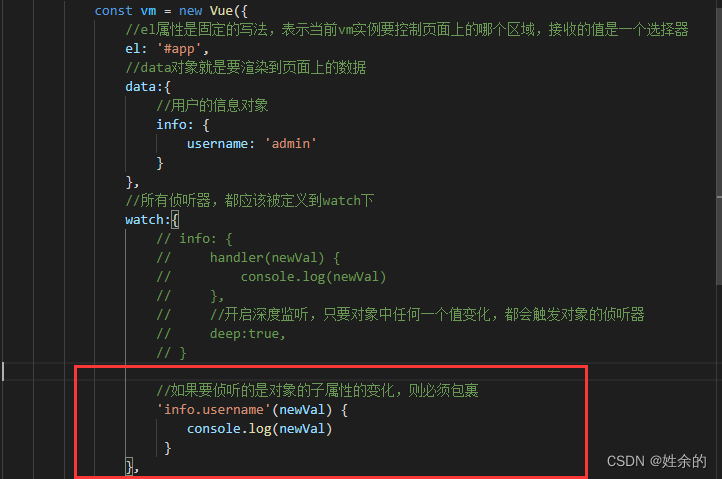
3.2.1)、深度侦听
- 深度侦听对象
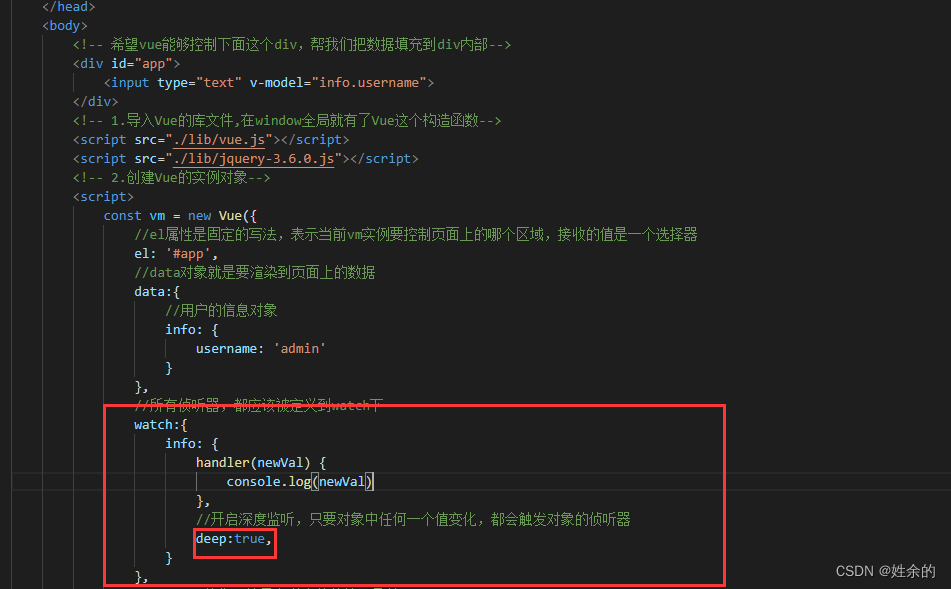
- 深度侦听对象属性
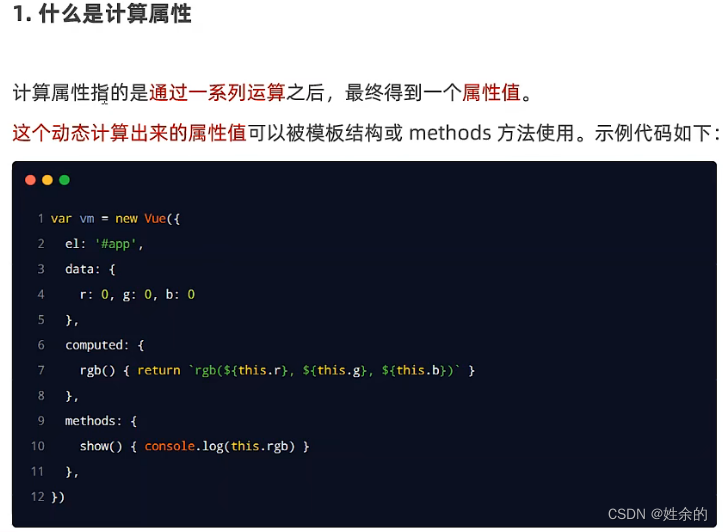
7、计算属性
1)、特点:
1、顶i的时候,要被定义为“方法“
2、在使用计算属性的时候,当普通的属性使用即可
2)、好处:
1、实现了代码的复用
2、只要计算属性中依赖的数据源变化了,则计算属性会自动重新求值
例子:
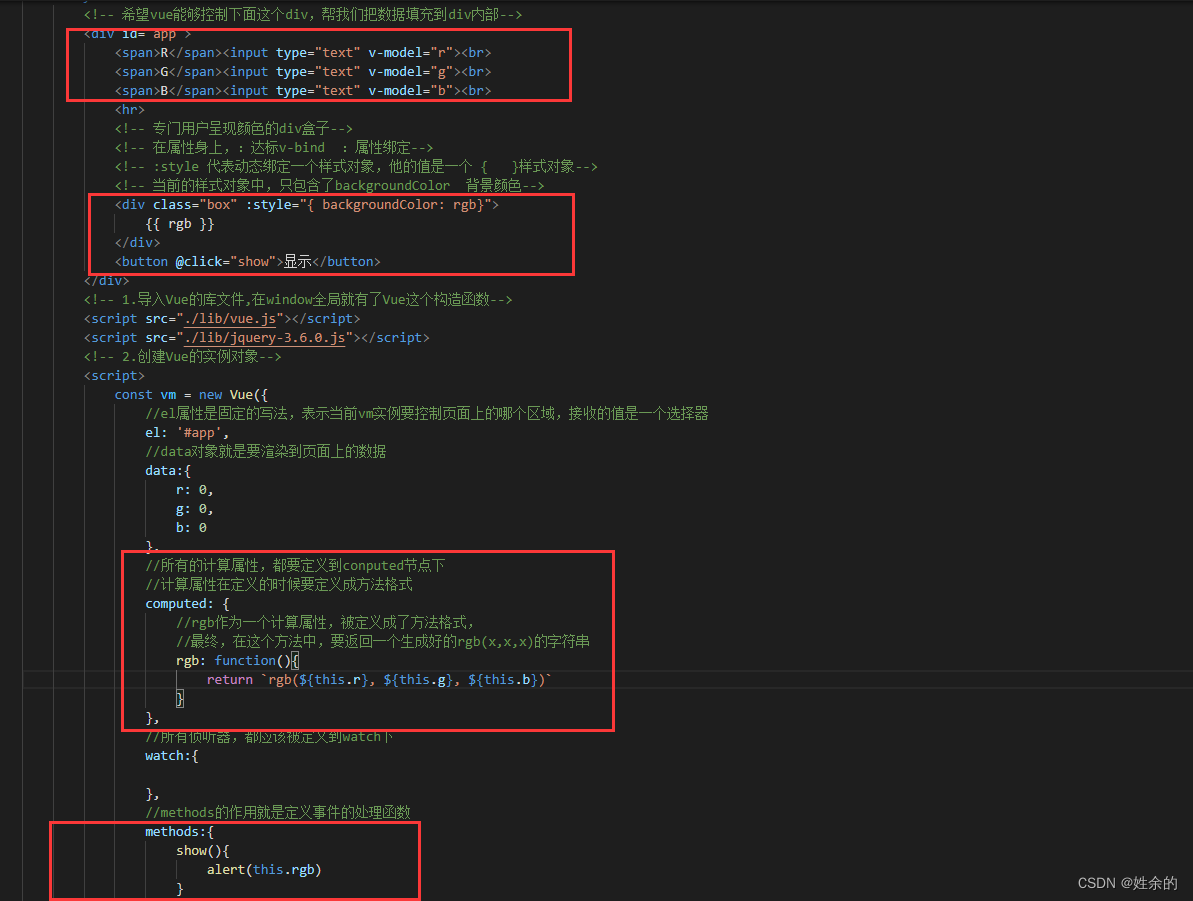
1)、什么是计算属性
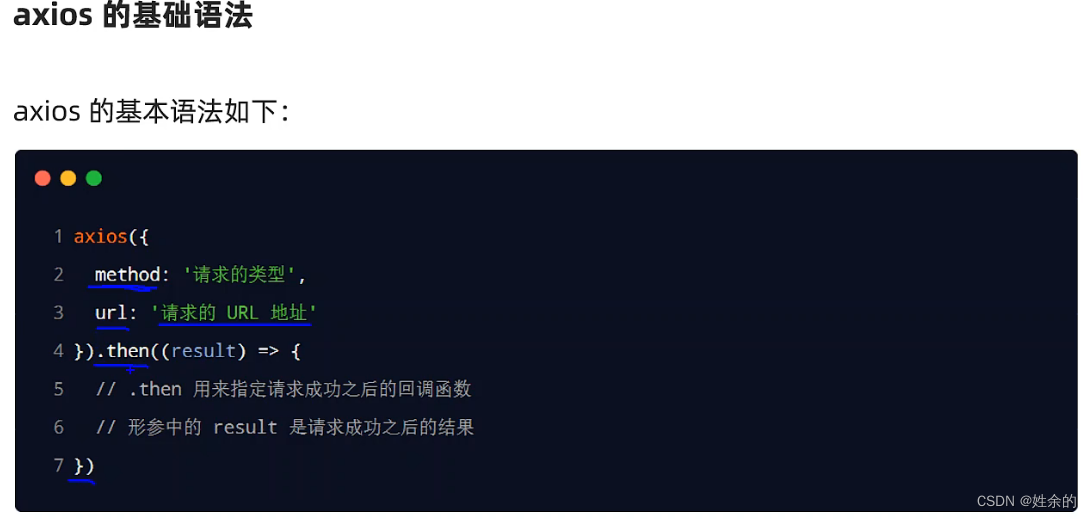
8、axios
1)、axios的基本语法
2)、axios的基本使用
2.1)、发起GET请求
<script>
    //1、调用axios方法得到的返回值是Promise对象
    const result = axios({
        //请求方式
        method: 'GET',
        //请求的地址
        URL: 'localhost:3306',
        //URL中的查询参数
        params: {
            id: 1,
        },
        //请求体参数
        data: {}
    }).then(function(result){
        console.log(result)
    })
</script>
2.2)、发起POST请求
<script>
    document.querySelector("#btnPost").addEventListener('click', async function(){
        //如果调用某方法的返回值是Promise实例,则前面可以添加await!
        //await 只能用在被 async”修饰“的方法中
        //1、调用axios之后,使用async/await进行简化
        //2、使用解构赋值,从axios封装的大对象中,把data属性解结出来
        //3、把解结出来的data属性,使用 冒号 进行重命名,一般都重命名为{ data : res }
        const { data : res} = await axios({
            method: "POST",
            url: "http://www.liulongbin.top:3006/api/post",
        })
        console.log(res.data);
    })
</script>
2.3)、POST、GET原生
<script>
    document.querySelector("#btnGET").addEventListener('click', async function(){
        /*  axios.get('url'地址,{
            //GET 参数
            params: {}
        })

        */
        const { data : res} = await axios.get('http://www.liulongbin.top:3006/api/getbooks', {
            params: {id:1}
        })
        console.log(res);
    })
    document.querySelector("#btnPOST").addEventListener('click', async function(){
        /*  axios.post('url'地址,{
            post请求体数据
        })

        */
        const { data : res} =
        await axios.post('http://www.liulongbin.top:3006/api/post',
        {
            name:'zs', gender:'女'
        })
        console.log(res);
    })
</script>
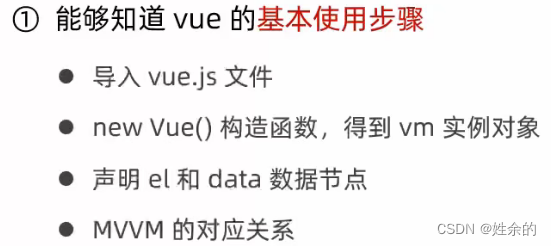
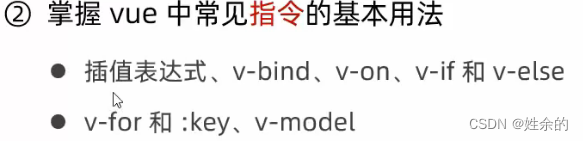
9、总结
1)、了解vue的基本使用步骤
2)、掌握vue中常见指令的基本用法
3)、了解过滤器(Vue3已删除)
3.1)、过滤器注意事项
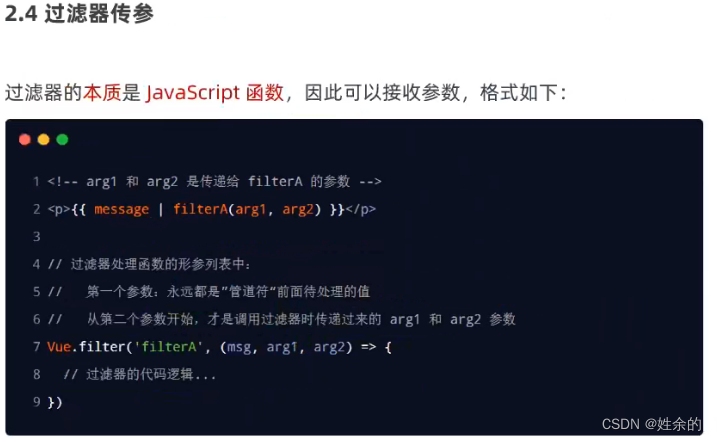
3.2)、过滤器的传参
4)、侦听器
4.1)、方法格式的侦听器
4.2)、对象格式的侦听器
5)、计算属性
5.1)、特点:
1、顶i的时候,要被定义为“方法“
2、在使用计算属性的时候,当普通的属性使用即可
5.2)、好处:
1、实现了代码的复用
2、只要计算属性中依赖的数据源变化了,则计算属性会自动重新求值
例子:
<!DOCTYPE html>
<html lang="en">
    <head>
        <meta charset="UTF-8">
        <meta name="viewport" content="width=device-width, initial-scale=1.0, maximum-scale=1.0, user-scalable=0">
        <meta http-equiv="X-UA-Compatible" content="ie=edge">
        <title>Document</title>
        <link rel="stylesheet" type="text/css" href="./lib/bootstrap.css" />
        <style>
            .box{
                height: 300px;
                width: 300px;
            }
        </style>
    </head>
    <body>
        <!-- 希望vue能够控制下面这个div,帮我们把数据填充到div内部-->
        <div id="app">
            <span>R</span><input type="text" v-model="r"><br>
            <span>G</span><input type="text" v-model="g"><br>
            <span>B</span><input type="text" v-model="b"><br>
            <hr>
            <!-- 专门用户呈现颜色的div盒子-->
            <!-- 在属性身上,:达标v-bind  :属性绑定-->
            <!-- :style 代表动态绑定一个样式对象,他的值是一个 {   }样式对象-->
            <!-- 当前的样式对象中,只包含了backgroundColor  背景颜色-->
            <div class="box" :style="{ backgroundColor: rgb}">
                {{ rgb }}
            </div>
            <button @click="show">显示</button>
        </div>
        <!-- 1.导入Vue的库文件,在window全局就有了Vue这个构造函数-->
        <script src="./lib/vue.js"></script>
        <script src="./lib/jquery-3.6.0.js"></script>
        <!-- 2.创建Vue的实例对象-->
        <script>
            const vm = new Vue({
                //el属性是固定的写法,表示当前vm实例要控制页面上的哪个区域,接收的值是一个选择器
                el: '#app',
                //data对象就是要渲染到页面上的数据
                data:{
                    r: 0,
                    g: 0,
                    b: 0
                },
                //所有的计算属性,都要定义到conputed节点下
                //计算属性在定义的时候要定义成方法格式
                computed: {
                    //rgb作为一个计算属性,被定义成了方法格式,
                    //最终,在这个方法中,要返回一个生成好的rgb(x,x,x)的字符串
                    rgb: function(){
                        return `rgb(${this.r}, ${this.g}, ${this.b})`
                    }
                },
                //所有侦听器,都应该被定义到watch下
                watch:{

                },
                //methods的作用就是定义事件的处理函数
                methods:{
                    show(){
                        alert(this.rgb)
                    }
                }
            })
        </script>
    </body>
</html>
6)、axois
<script>
    document.querySelector("#btnGET").addEventListener('click', async function(){
        /*  axios.get('url'地址,{
            //GET 参数
            params: {}
        })

        */
        const { data : res} = await axios.get('http://www.liulongbin.top:3006/api/getbooks', {
            params: {id:1}
        })
        console.log(res);
    })
    document.querySelector("#btnPOST").addEventListener('click', async function(){
        /*  axios.post('url'地址,{
            post请求体数据
        })

        */
        const { data : res} =
        await axios.post('http://www.liulongbin.top:3006/api/post',
        {
            name:'zs', gender:'女'
        })
        console.log(res);
    })
</script>
原文地址:https://blog.csdn.net/weixin_53547097/article/details/125561193
本文来自互联网用户投稿,该文观点仅代表作者本人,不代表本站立场。本站仅提供信息存储空间服务,不拥有所有权,不承担相关法律责任。
如若转载,请注明出处:http://www.7code.cn/show_39168.html
如若内容造成侵权/违法违规/事实不符,请联系代码007邮箱:suwngjj01@126.com进行投诉反馈,一经查实,立即删除!