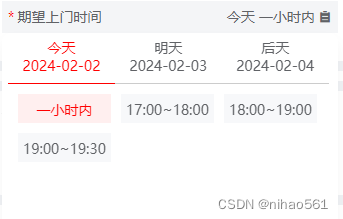
本文介绍: 我们在前面的章回中介绍了各种Sliver相关的组件:SliverList,SliverGrid,SliverAppBar和SliverPadding,本章回将综合使用它们。下面是示例程序的运行

我们在上一章回中介绍了SliverPadding组件相关的内容,本章回中将介绍Sliver综合示例.闲话休提,让我们一起Talk Flutter吧。

概念介绍

我们在前面的章回中介绍了各种Sliver相关的组件:SliverList,SliverGrid,SliverAppBar和SliverPadding,本章回将综合使用它们。下面是示例程序的
运行效果图。不过在使用之前还需要介绍一个新组件:CustomScrollView。该组件相当于一个粘合剂,它可以把各个Sliver组件组合在一起。010slivers

使用方法

和其它组件类似,该组件提供了相关的属性来控制自己,
下面是该组件中常用的属性,掌握这些属性后就可以使用该组件了。

  • scrollDirection属性:主要用来控制列表中滚动方向;
  • controller属性:主要用来控制某个列表的位置;
  • slivers属性:主要用来存放Sliver相关的组件,它的用法类似Column组件中的children属性;
    介绍完这些常用属性后,我们将在后面的小节中通过具体的示例代码来演示它的使用方法。

示例代码

CustomScrollView(
  slivers: [
    SliverAppBar(
      title: const Text('Title of SliverAppBar'),
      backgroundColor: Colors.purpleAccent,
      ///关闭和展开时的高度
      collapsedHeight: 60,
      expandedHeight: 300,

      ///appBar空间扩展后显示的内容
      flexibleSpace: FlexibleSpaceBar(
        ///这个title在appBar的最下方,可以不设定,缩小后它会和SliverAppBar的title重合
        title: const Text('title of FlexibleSpaceBar'),
        background: Container(
          decoration: const BoxDecoration(
            image:DecorationImage(
              opacity: 0.8,
              image: AssetImage("images/ex.png"),
              fit: BoxFit.fill,
            ),
          ),
          ///扩展空间中主要显示的内容
          child: const Center(child: Text('child of container')),
        ),
        centerTitle: true,
        ///拉伸和折叠时的样式,效果不是很明显
        collapseMode: CollapseMode.pin,
        stretchModes: const [
          StretchMode.zoomBackground,
          StretchMode.blurBackground,
          StretchMode.fadeTitle,
        ],
      ),
    ),
    ///SliverAppBar下方显示的内容,这个需要和SliverAppBar一起添加,否则不会出现滑动效果
    ///这个只是一个简单的SliverList,用来配合SliverAppBar使用,真正的介绍在下面的程序中
    SliverList(
      delegate: SliverChildListDelegate(
      // List.generate(40, (index) => Icon(Icons.recommend),),
      List.generate(5, (index) => Text('Item ${index+1}'),),
      ),
    ),
    ///SliverGrid和工厂方法
    SliverGrid.count(
      ///交叉轴显示内容的数量,这里相当于3列
      crossAxisCount: 3,
      ///主轴上显示内容的空间设置,相当于行距
      mainAxisSpacing: 10,
      ///交叉轴上显示内容的空间设置,相当于列距
      crossAxisSpacing: 10,
      childAspectRatio: 1.2,
      ///Grid中显示的内容,一共9个自动换行,分3行显示
      children:List.generate(9, (index) {
        return Container(
          alignment: Alignment.center,
          ///使用固定颜色和随机颜色
          // color: Colors.redAccent,
          // color:Colors.primaries[index%5],
          ///修改为圆角,颜色移动到圆角中
          decoration: BoxDecoration(
            color: Colors.primaries[index%5],
            borderRadius: BorderRadius.circular(20),
          ),
          child: Text('item: $index'),
        );
      }).toList(),
    ),
    ///不使用工厂方法,直接使用SliverGrid的构造方法
    SliverGrid(
      ///Grid中显示的内容,可以使用BuilderDelete直接创建显示内容,或者使用已经有的list
      delegate: SliverChildBuilderDelegate((context,index){
        return const Icon(Icons.face_3_outlined); },
      childCount: 20,
      ),
      ///配置Grid的相关属性,
      gridDelegate:const SliverGridDelegateWithFixedCrossAxisCount(
        ///主轴上显示内容的空间设置,相当于行距
        mainAxisExtent: 20,///这个值不能小于显示内容,否则最后一行的内容会被遮挡
        mainAxisSpacing: 20,
        ///交叉轴显示内容的数量,这里相当于4列
        crossAxisCount: 4,
        ///交叉轴上显示内容的空间设置
        crossAxisSpacing: 20,
        ///显示内容的宽高比
        childAspectRatio: 1.2,
      ),
    ),
    ///不使用工厂方法,直接使用SliverGrid的构造方法,和上一个类似,只是创建显示内容的方法不同
    SliverGrid(
      ///Grid中显示的内容,可以使用BuilderDelete直接创建显示内容,或者使用已经有的list
      delegate: SliverChildListDelegate(
        List.generate(20,
              (index) => const Icon(Icons.camera,color: Colors.blue,),),
      ),
      ///配置Grid的相关属性,同上。不同之处在于交叉轴显示内容的数量不固定,而是与空间有关
      gridDelegate:const SliverGridDelegateWithMaxCrossAxisExtent(
        maxCrossAxisExtent: 40,
        mainAxisExtent: 40,
        mainAxisSpacing: 20,
        crossAxisSpacing: 5,
        childAspectRatio: 1.6,
      ),
    ),
    ///SliverList,可以理解为对ListView的封装,以便用于Sliver中创建delegate对象,使用builder方法。
    SliverList(
      delegate: SliverChildBuilderDelegate((context,index){
        return Container(
          height: 60,
          alignment: Alignment.center,
          child: Text('This is ${index+1} item'),
        );
      },
        ///list的数量
        childCount:5,
      ),
    ),
    ///与上面的SliverList类似,只是不有创建delegate对象,而是直接使用现成的list对象
    SliverList(
      delegate: SliverChildListDelegate(
        List.generate(5, (index) => const Icon(Icons.add),),
      ) ,
    ),
    ///调整显示内容的边距,在上下左右四个方向添加,SliverList,SliverList效果不明显
    SliverPadding(
     ///在上下左右四个方向上添加边距
     // padding: EdgeInsets.only(left: 10,right: 10),
     padding: const EdgeInsets.all(10),
     sliver:SliverList(
       delegate:SliverChildListDelegate(
         List.generate(5,
               (index) => Container(
                 color: Colors.grey,
                 child: Text('Item ${index+1}'),
               ),
         ),
       ) ,
     ) ,
    ),
    ///调整显示内容的边距,在上下左右四个方向添加,配合Grid内部的边距效果比较明显
    SliverPadding(
      padding: const EdgeInsets.all(10),
      sliver: SliverGrid.count(
        mainAxisSpacing: 10,
        crossAxisCount: 4,
        crossAxisSpacing: 10,
        children: List.generate(9, (index) => Container(
          alignment: Alignment.center,
          color: Colors.primaries[index%5],
          child: Text('Item ${index+1}'),
        ),) ,
      ),
    ),
  ],
),

上面是的代码中使用了前面章回中介绍过的所有与Sliver相关的组件,整个界面的外层使用CustomScollView当作容器,容器里的组件全部是SliVer相关的组件,最
上方是SliverAppBar组件,它下面是SliverList和SliverGrid组件,向上滑动时SliverBar会被折叠,SliverList和SliverGrid会跟着一起滚动,不过它们
是做为一个整体来滚动而不是像ListView中一个条目,一个条目地滚动。具体的滚动效果可以看开篇的程序运行效果图。这个程序中包含的内容比较多,单是SliverList
就有好几个,大家可以对比着看,建议大家自己动手去实践,这样可以真正体会到SliverList等组件的功能,以及它们包含的细节。
看官们,与”Sliver综合示例”相关的内容就介绍到这里,欢迎大家在评论区交流与讨论!

原文地址:https://blog.csdn.net/talk_8/article/details/135574910

本文来自互联网用户投稿,该文观点仅代表作者本人,不代表本站立场。本站仅提供信息存储空间服务,不拥有所有权,不承担相关法律责任。

如若转载,请注明出处:http://www.7code.cn/show_57070.html

如若内容造成侵权/违法违规/事实不符,请联系代码007邮箱:suwngjj01@126.com进行投诉反馈,一经查实,立即删除!

发表回复

您的电子邮箱地址不会被公开。 必填项已用 * 标注