本文介绍: MVC工作流程Spring MVC掌握三个功能创建 Spring MVC 项目推荐安装插件EditStarters基础注解@RequestMapping指定 GET 和 POST 方法类型@ResponseBody获取参数传递 单个 或 多个参数参数重命名 @RequestParam接收 JSON 对象 @RequestBody获取 URL 中参数 @PathVariable上传文件 @RequestPart获取 Cookie 数据
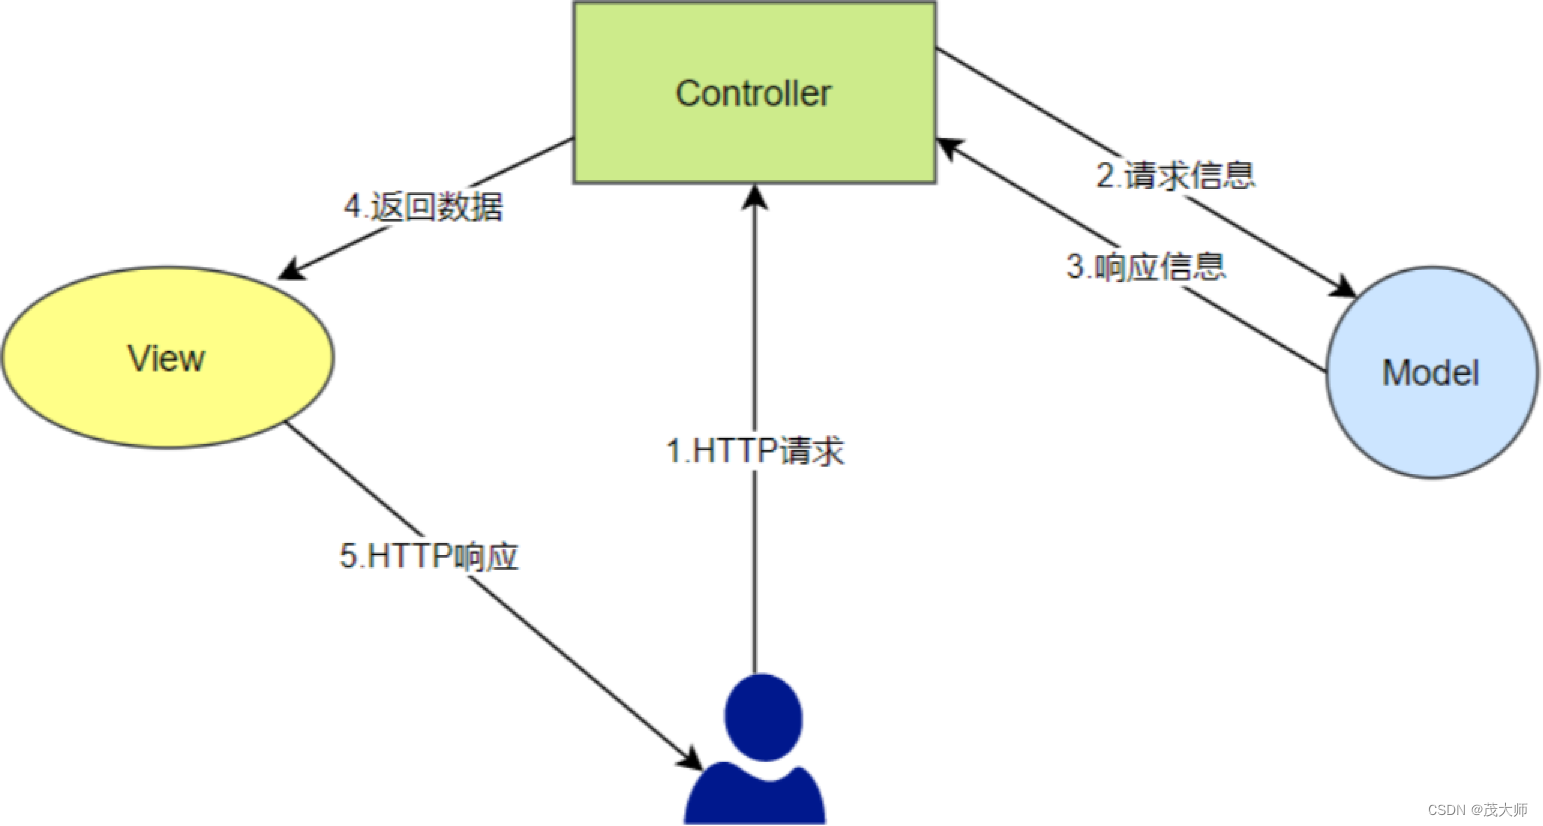
MVC
视图(View)
控制器(Controller)
工作流程
- 客户端向服务器发起 HTTP 请求
- 控制器(Controller)接收 HTTP 请求,并向 模型(Model)请求信息
- 模型(Model)对象 在数据库中进行相应数据的存取,完成后将响应信息返回给 控制器(Controller)
- 控制器(Controller)收到响应信息后,又将其交给 视图(View)渲染结果,展示给用户,即通过 视图(View)将 HTTP 响应传递给用户
Spring MVC
- MVC 是一种思想,Spring MVC 是对 MVC 思想的实现
- Spring MVC 是一个实现了 MVC 模式,并继承了 Servlet API 的 Web 框架
- 常说的 SSM 项目就等于 Spring Boot + Spring MVC + MyBatis
掌握三个功能
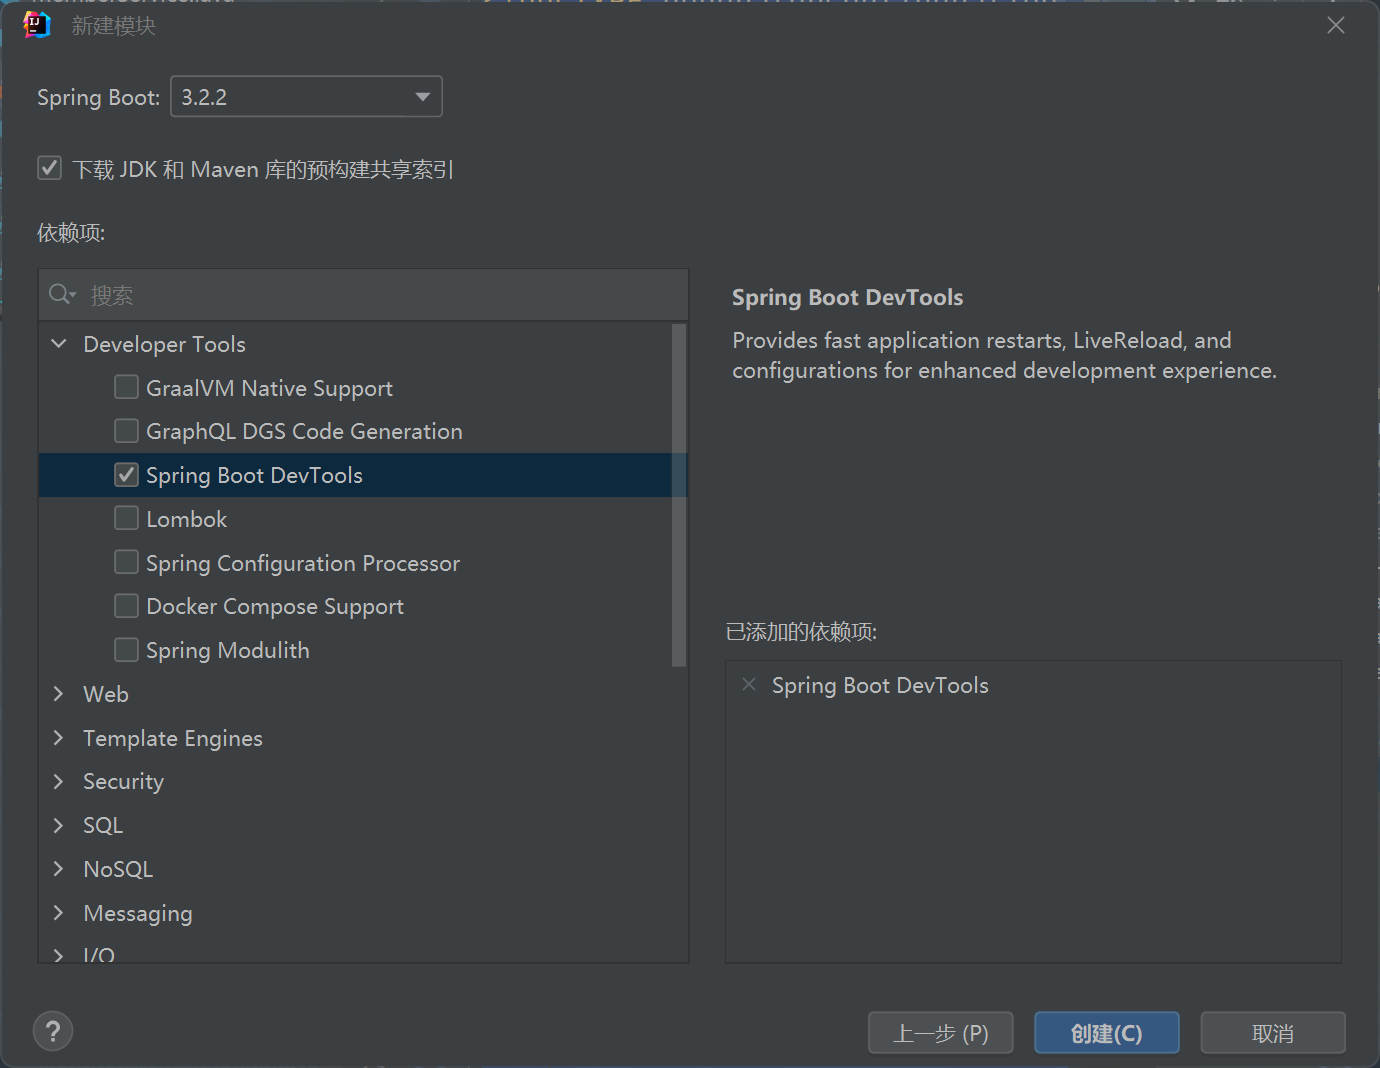
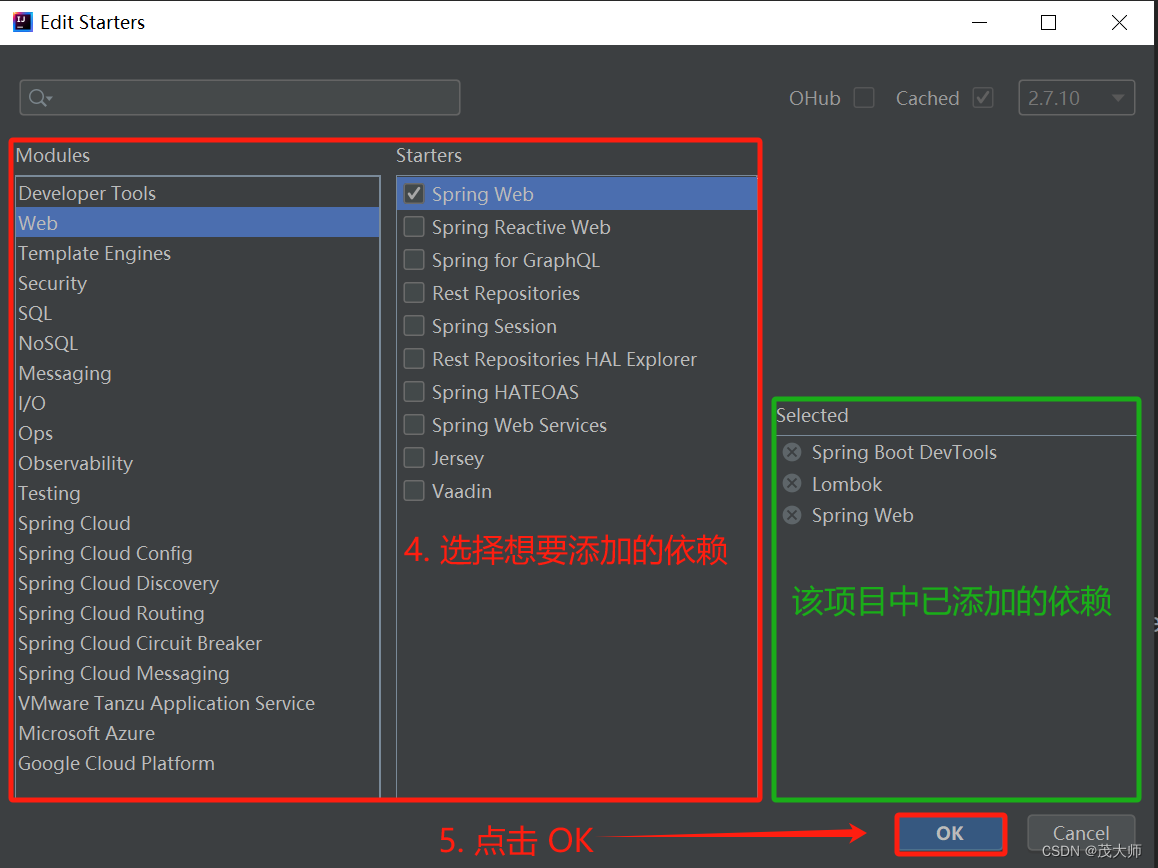
创建 Spring MVC 项目
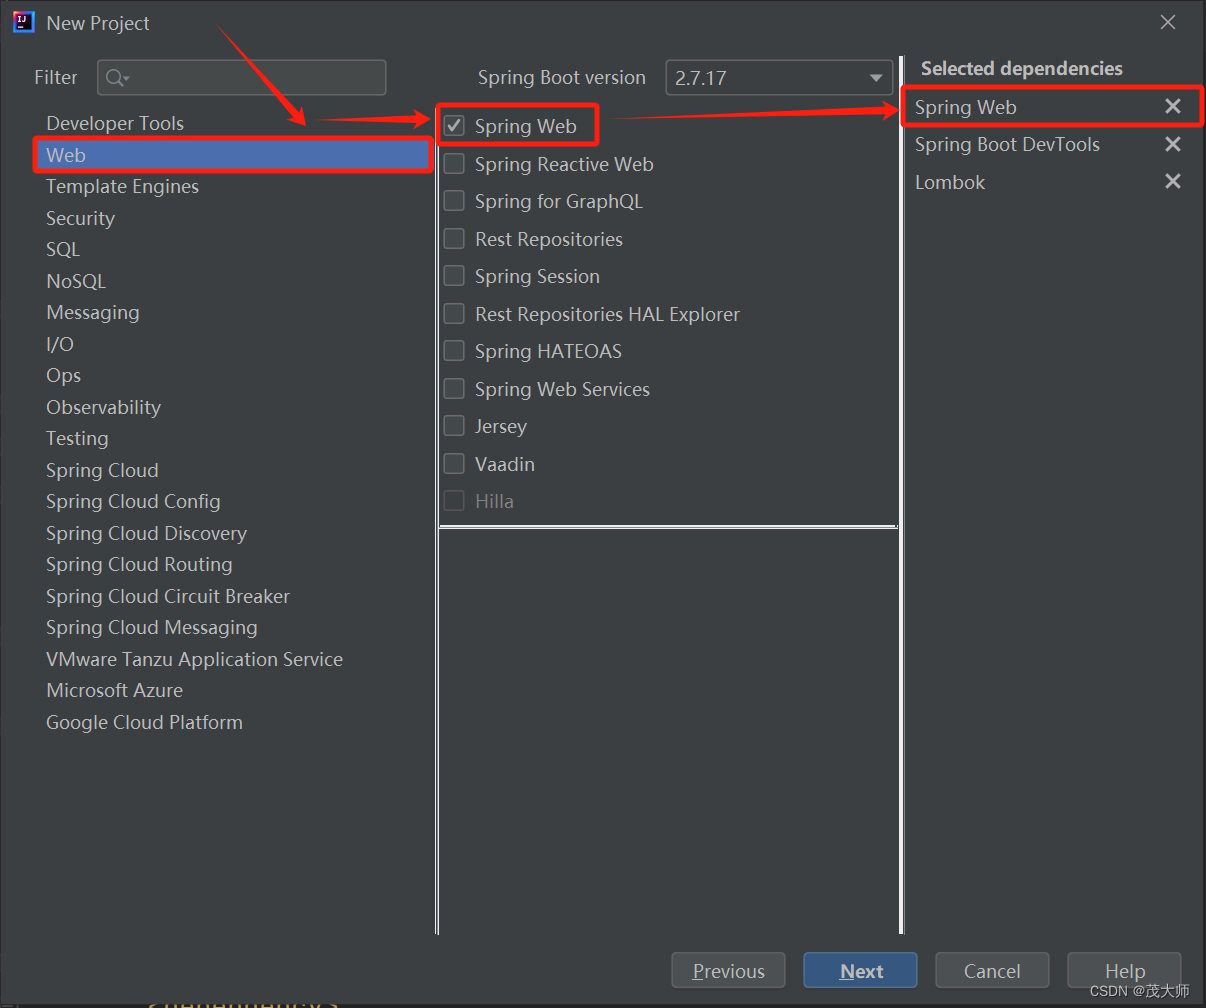
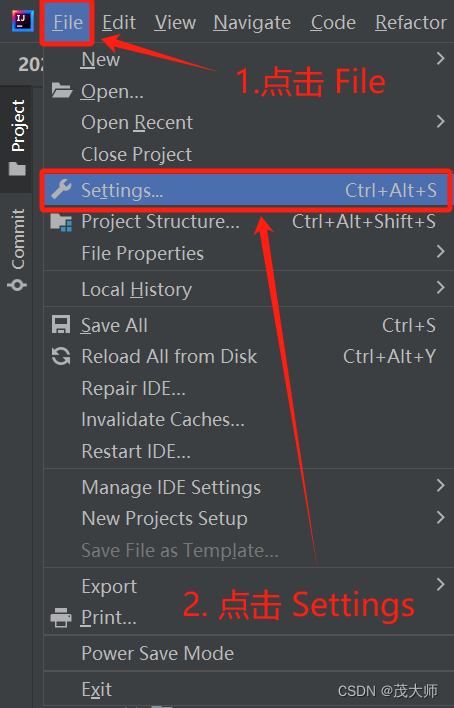
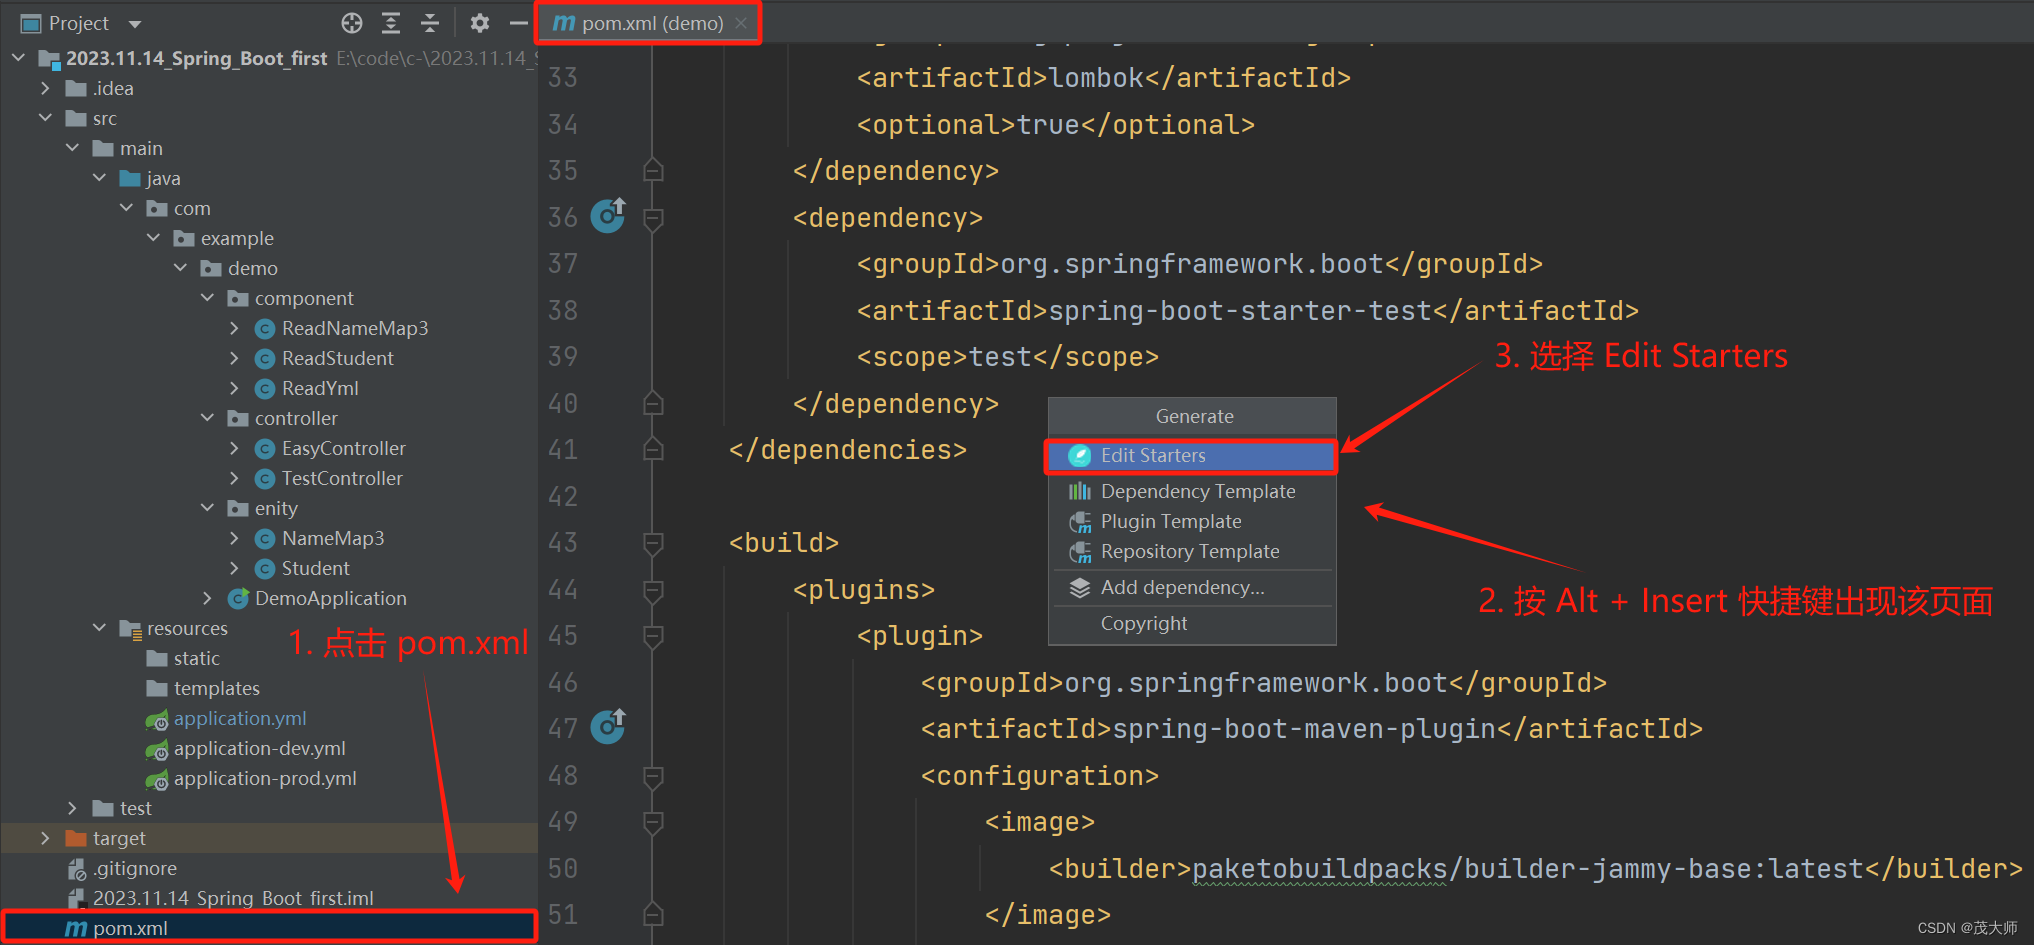
推荐安装插件 EditStarters
安装步骤
注意:
- 安装完该插件后最好重启 IDEA
使用方法
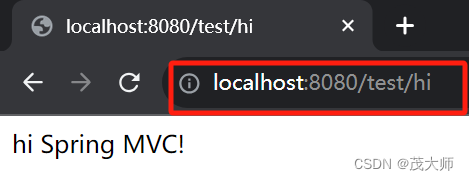
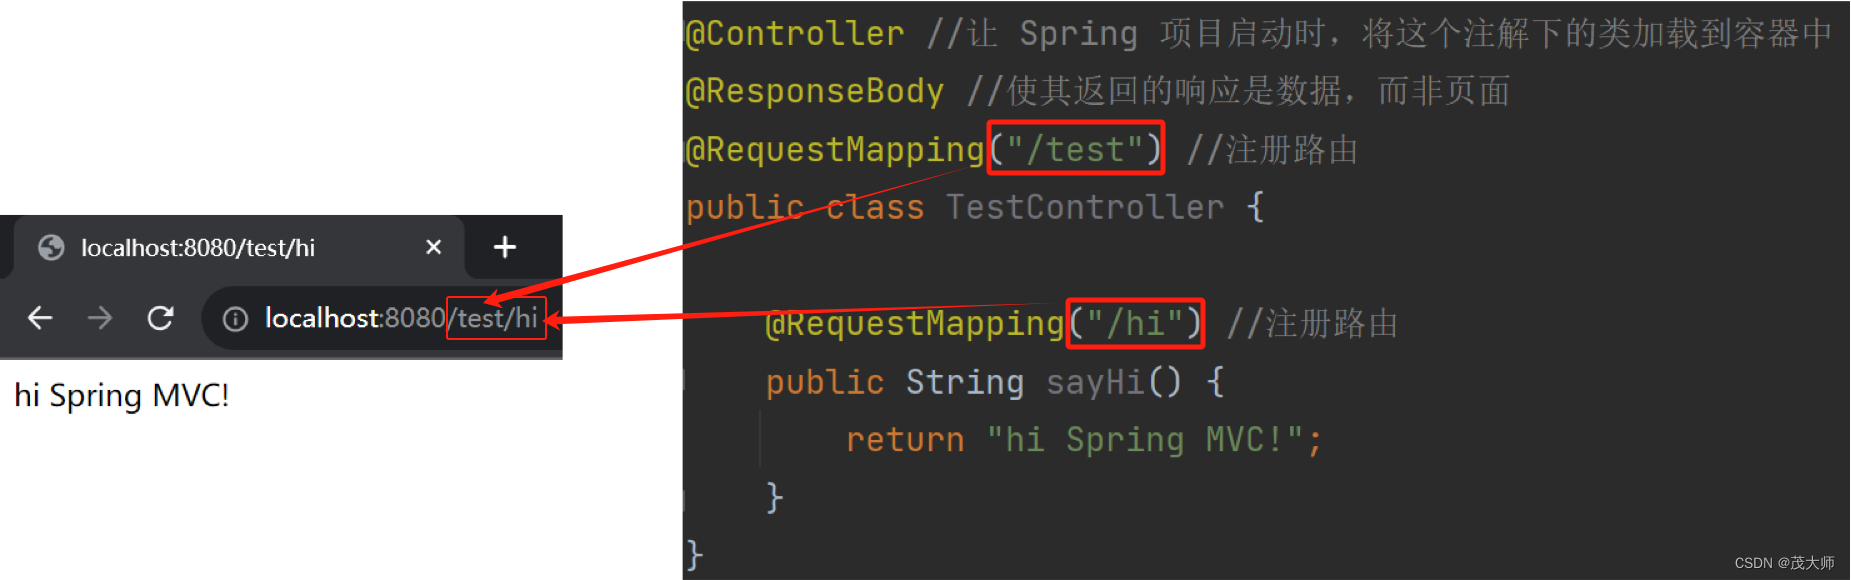
实现连接功能
import org.springframework.stereotype.Controller; import org.springframework.web.bind.annotation.RequestMapping; import org.springframework.web.bind.annotation.ResponseBody; @Controller //让 Spring 项目启动时,将这个注解下的类加载到容器中 @ResponseBody //使其返回的响应是数据,而非页面 @RequestMapping("/test") //注册路由 public class TestController { @RequestMapping("/hi") //注册路由 public String sayHi() { return "hi Spring MVC!"; } }运行结果:

基础注解
@RequestMapping
实例理解
//此处的 路由设置可以是 一级路由 也可以是 N级路由 @RequestMapping("/test/index")指定 GET 和 POST 方法类型
- GET 请求的三种写法
// 写法一
@RequestMapping(value = "/index",method = RequestMethod.GET)
// 写法二
@GetMapping("/index")
- POST 请求的两种写法
// 写法一
@RequestMapping(value = "/index",method = RequestMethod.POST)
// 写法二
@PostMapping("/index")
@ResponseBody
阅读下面文章之前 建议点击下方链接了解 Postman 的使用
获取参数
参数名称匹配
- 在 Spring MVC 中,当有多个参数进行参数匹配时,是按照参数的名称进行匹配的,而不是参数的位置
- 这意味着,无论你在方法中如何排列参数,只要参数的名称与前端传递的参数名称相匹配,就可以正确的获取到参数值
包装类类型参数
- 在Spring MVC 中,建议方法的参数使用包装类类型,而非基础类类型
- 如果方法的参数为基础类型(int、double 等),当前端忘记传递参数时,程序会报 500 错误
- 因为基础类型不能为 null
- 而如果参数类型为包装类类型(Integer、Double等),即使前端忘记传递参数,参数值也只会为 null,不会引发报错
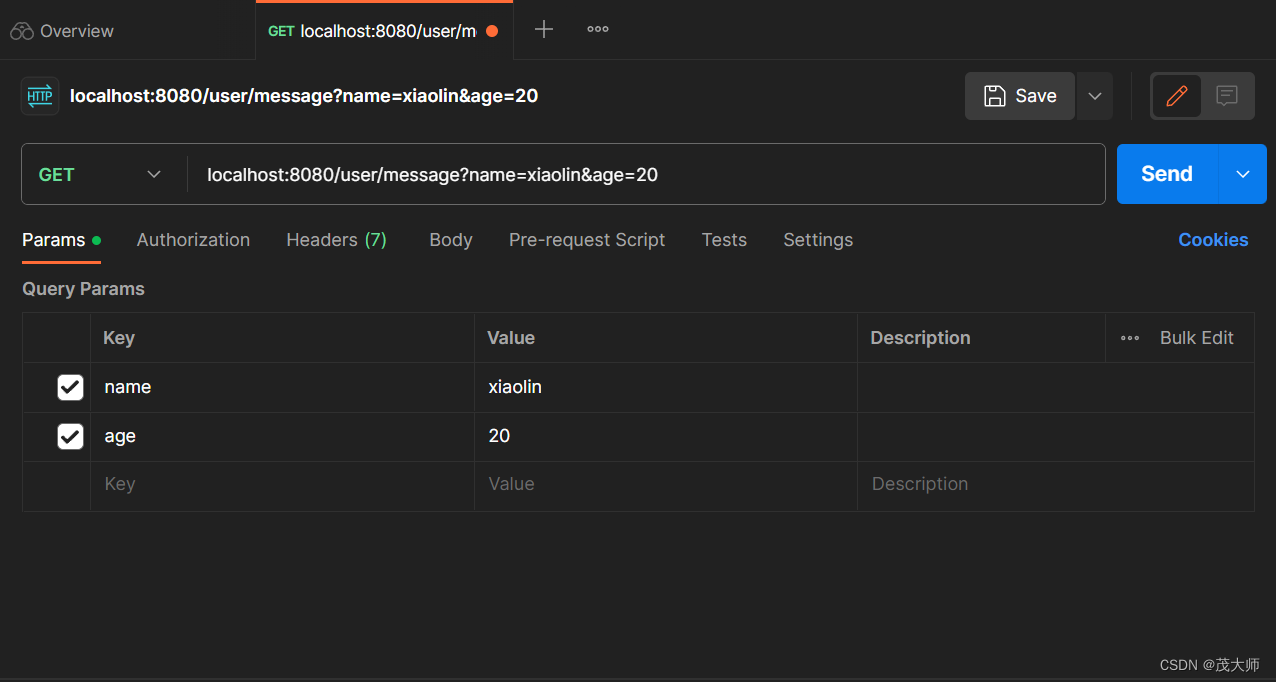
传递 单个 或 多个参数
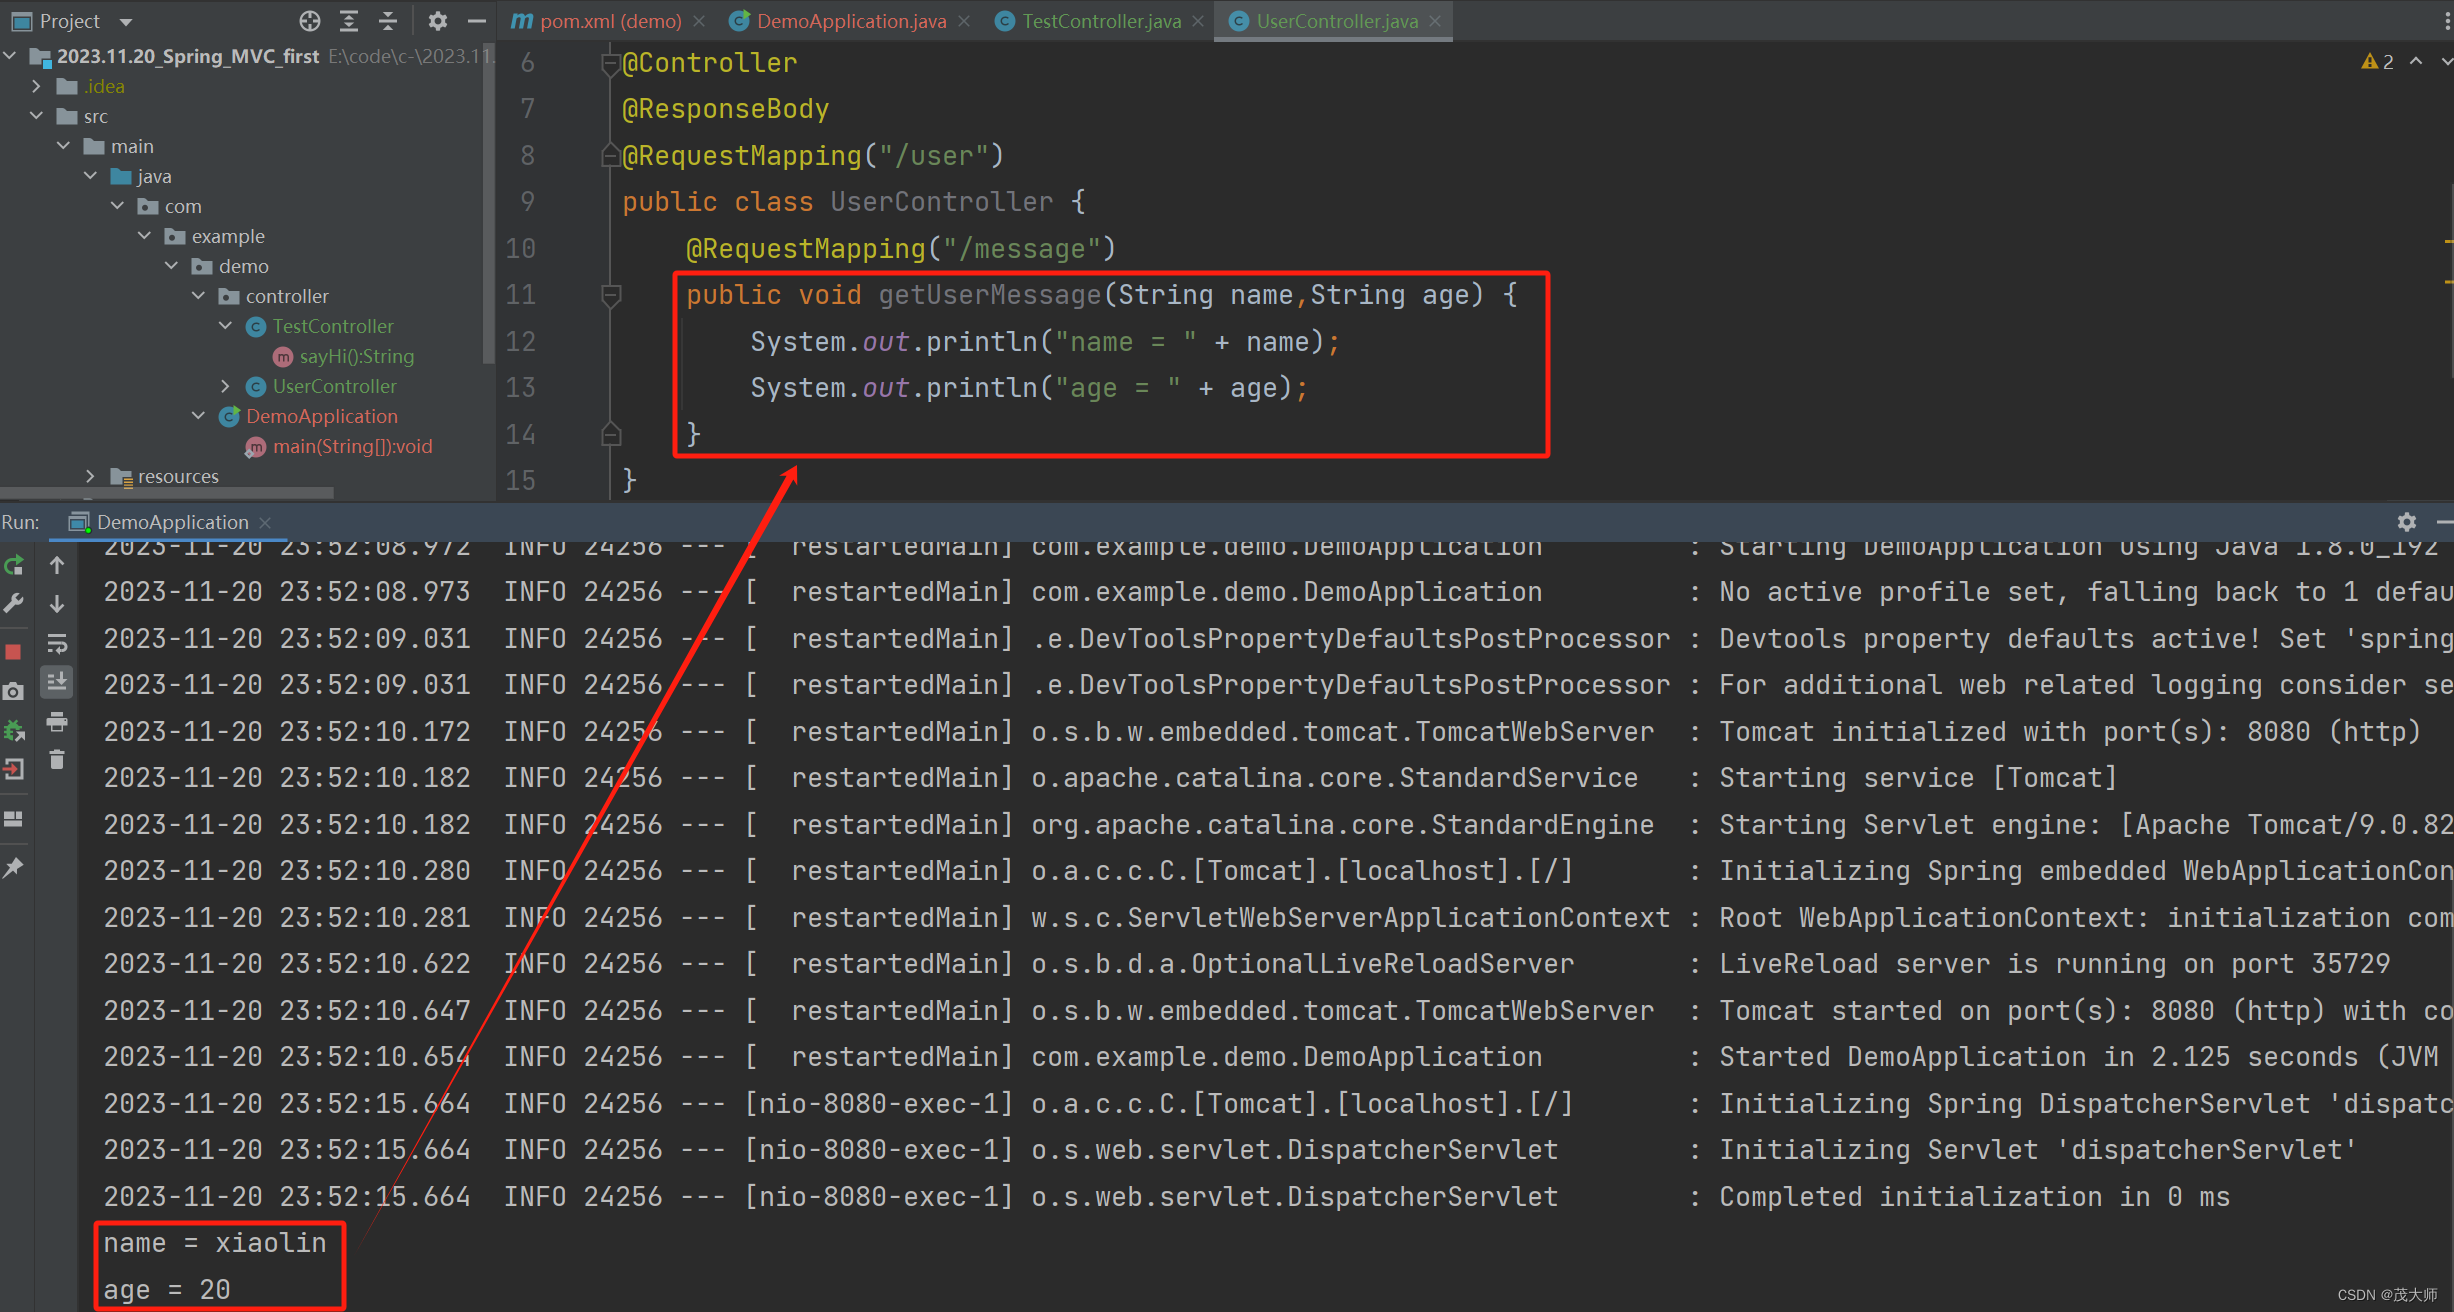
import org.springframework.stereotype.Controller;
import org.springframework.web.bind.annotation.*;

@Controller
@ResponseBody
@RequestMapping("/user")
public class UserController {
    @RequestMapping("/message")
    public void getUserMessage(String name,String age) {
        System.out.println("name" + name);
        System.out.println("age" + age);
    }
}
参数重命名 @RequestParam
value
defaultValue
实例理解
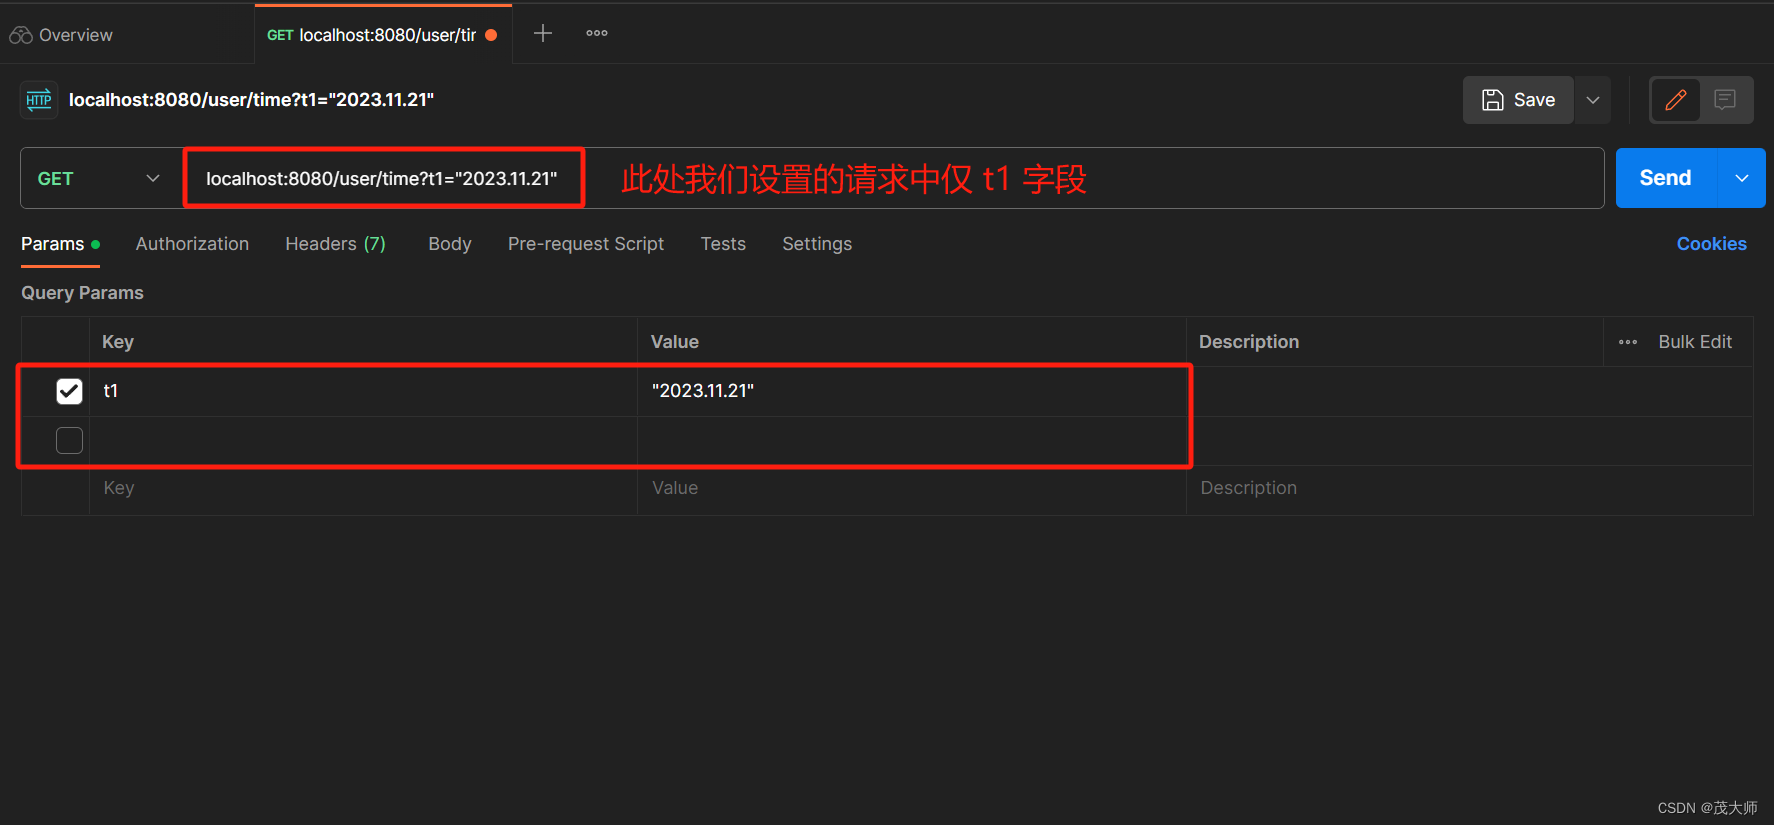
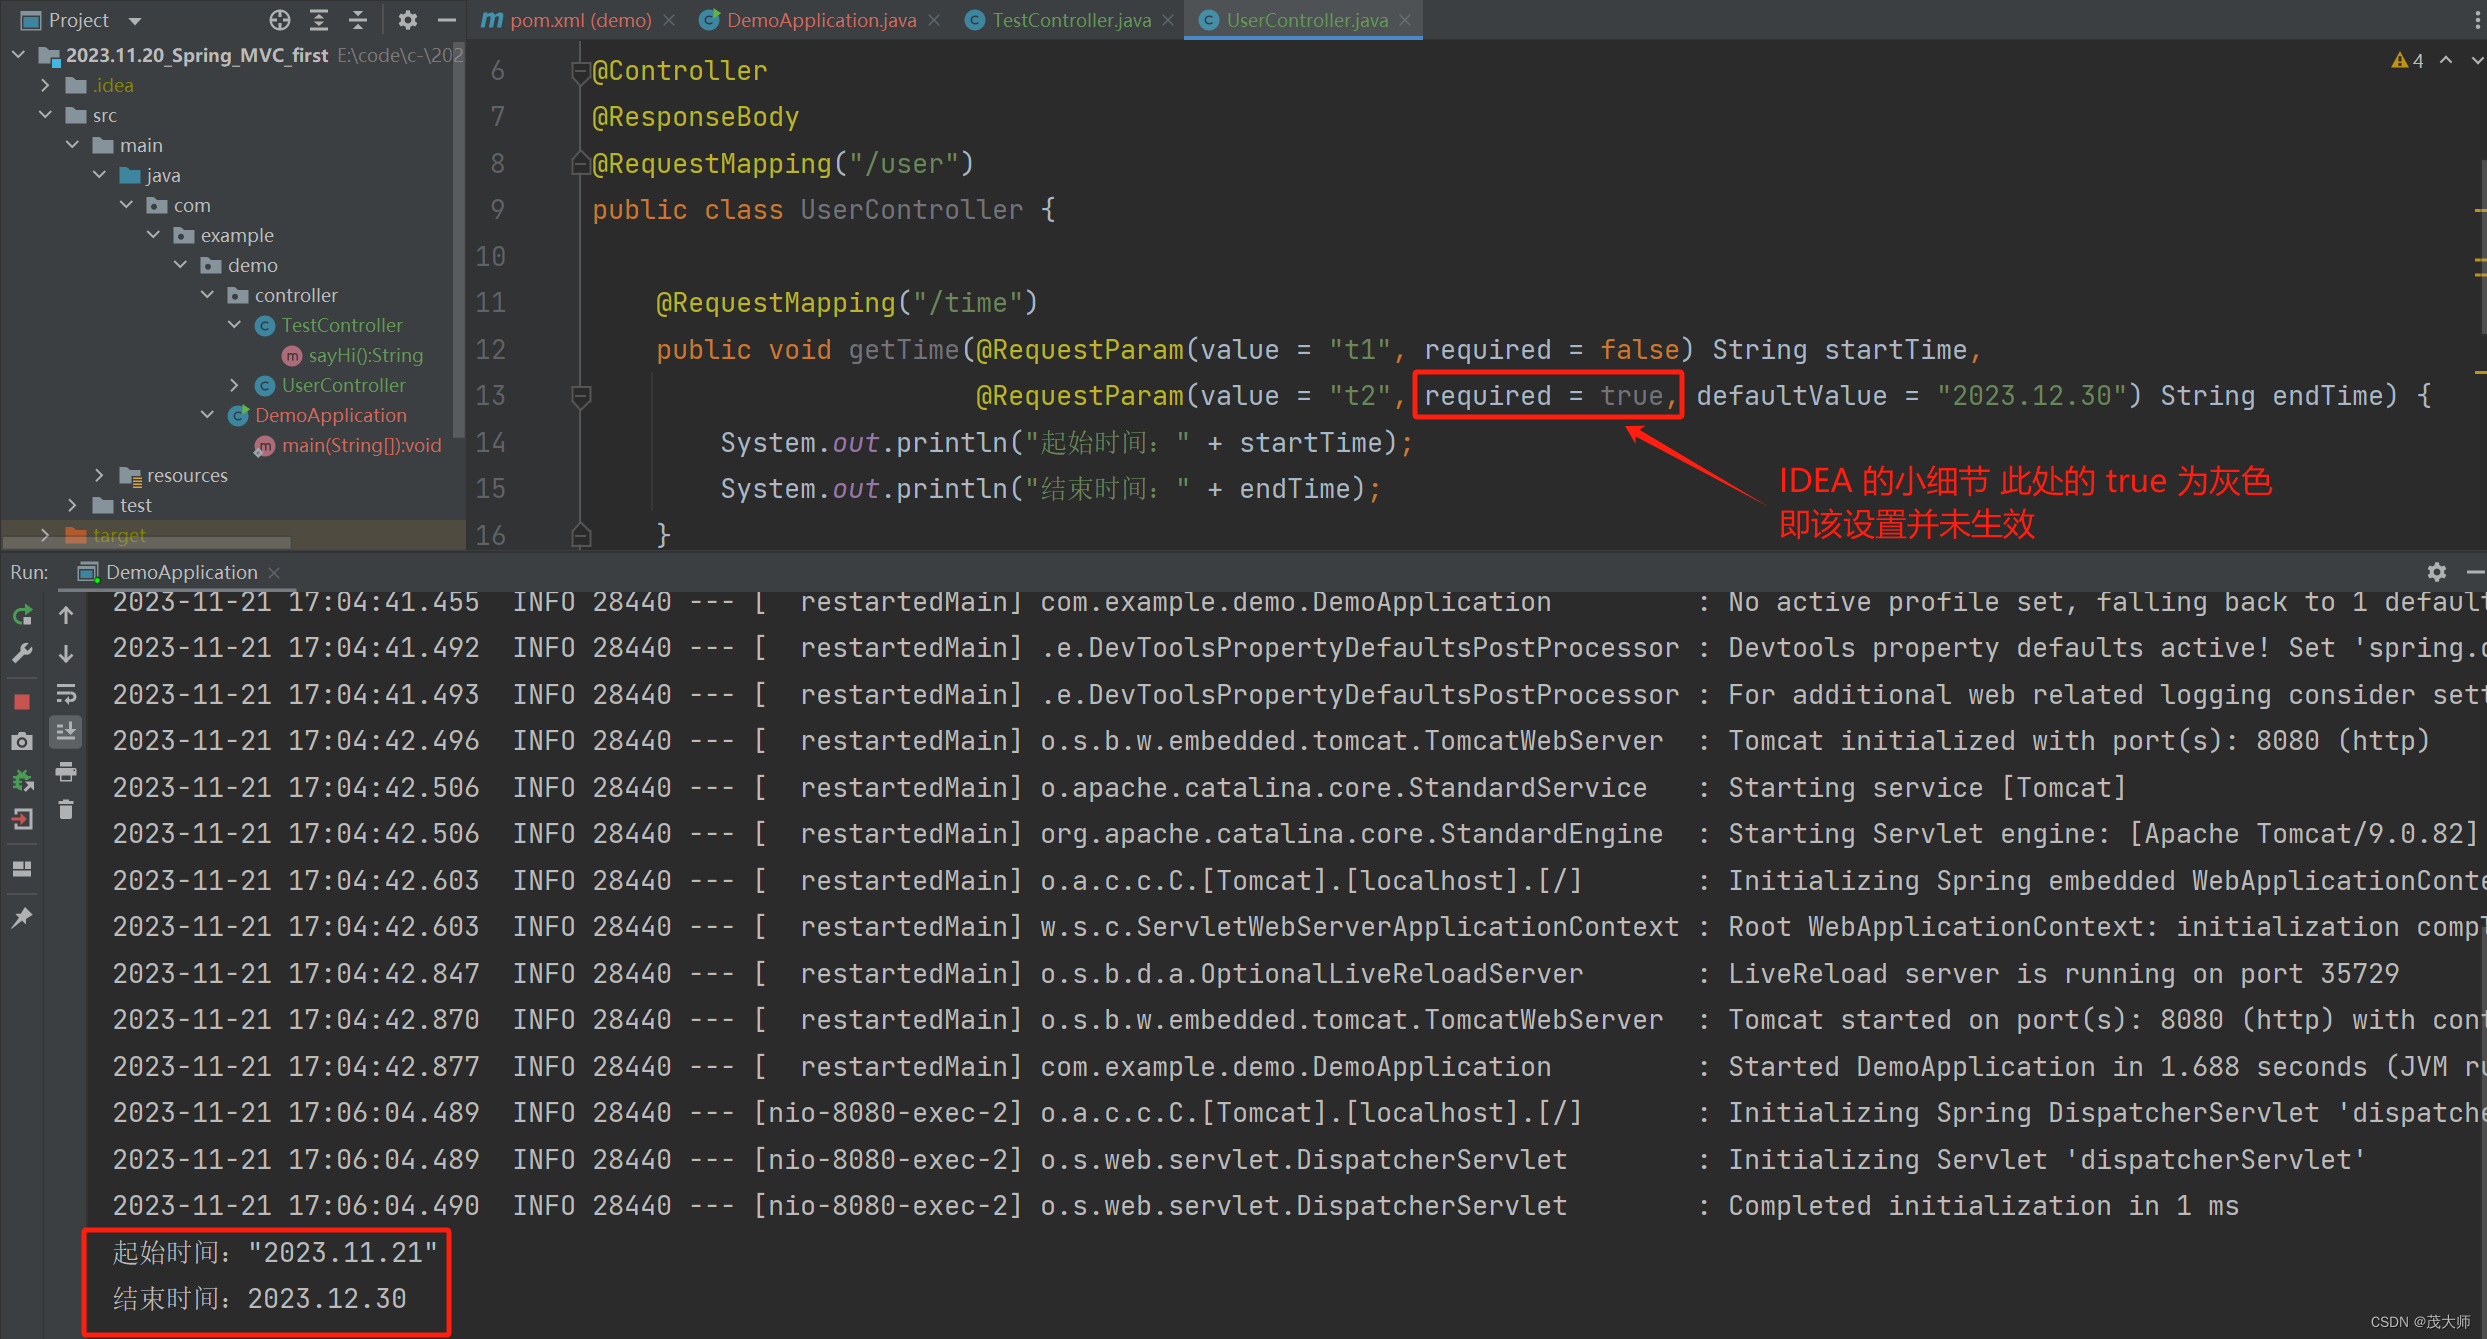
import org.springframework.stereotype.Controller;
import org.springframework.web.bind.annotation.*;

@Controller
@ResponseBody
@RequestMapping("/user")
public class UserController {

    @RequestMapping("/time")
    public void getTime(@RequestParam(value = "t1", required = false) String startTime,
                        @RequestParam(value = "t2", required = true, defaultValue = "2023.12.30") String endTime) {
        System.out.println("起始时间:" + startTime);
        System.out.println("结束时间:" + endTime);
    }
}
- 该段代码将 t1 重命名为 startTime,将 t2 重命名为 endTime
- 此时 startTime 被设置为 非必传参数
- endTime 的 required 被设置为 true ,表示前端发送的请求中必须包含 t2 字段
- 但是 endTime 又被设置了 defaultValue,表示其默认值为 “2023.12.30”
- 所以即使 endTime 的 required 被设置为了 true,但是又因为 defaultValue 的设置,从而导致 endTime 的 required 又被自动设置为了 false
验证结果:
接收 JSON 对象 @RequestBody
实例理解
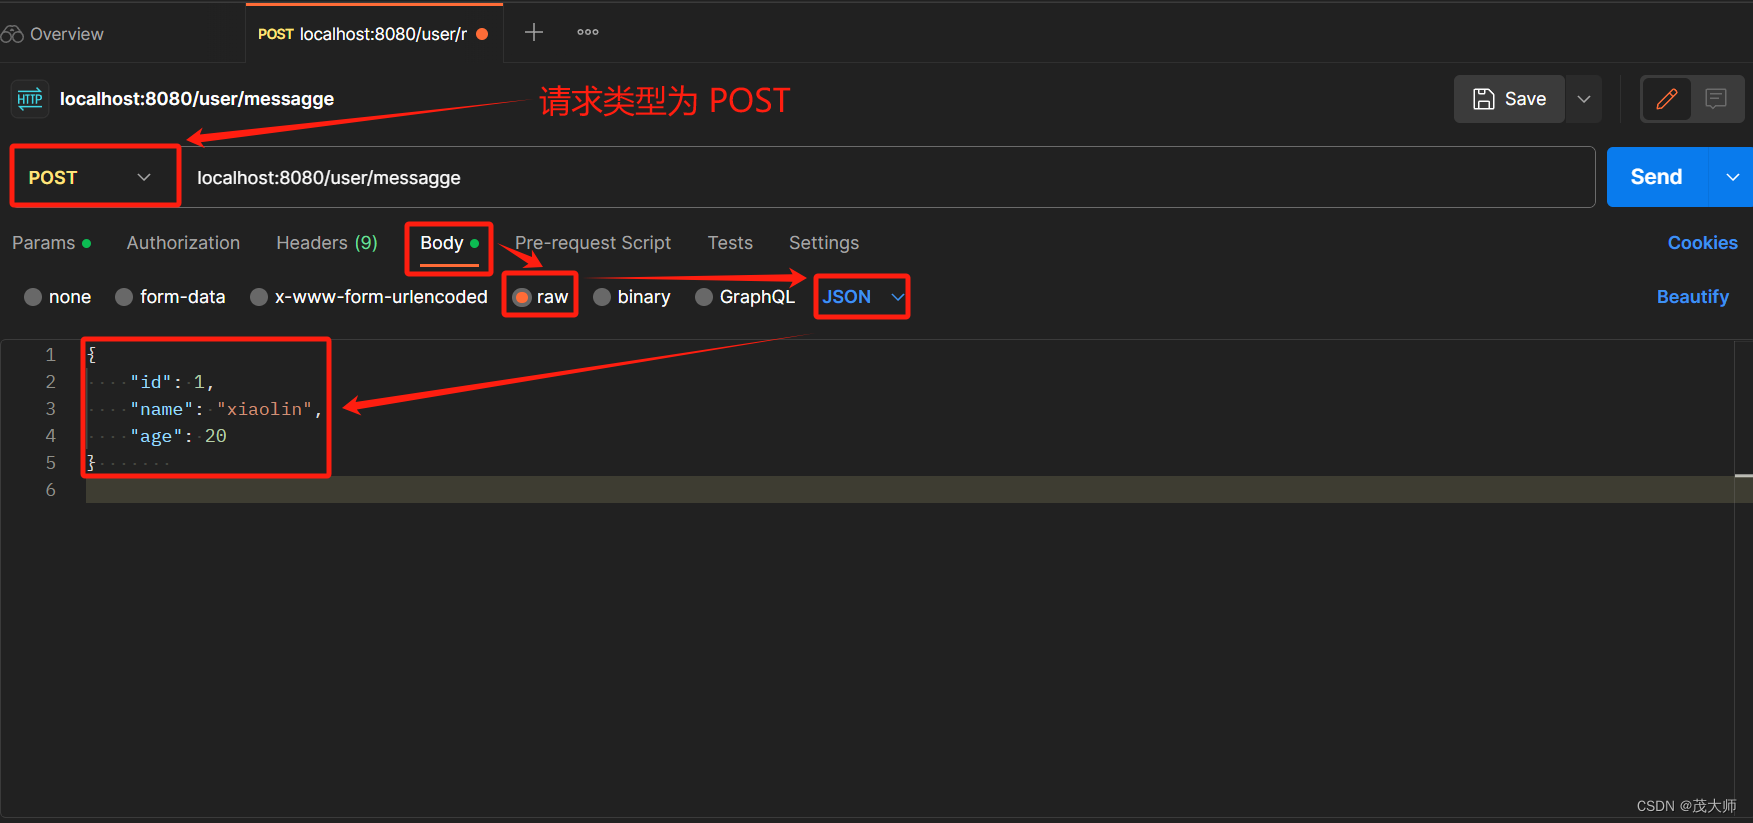
- 此时前端想发送的请求如下图所示
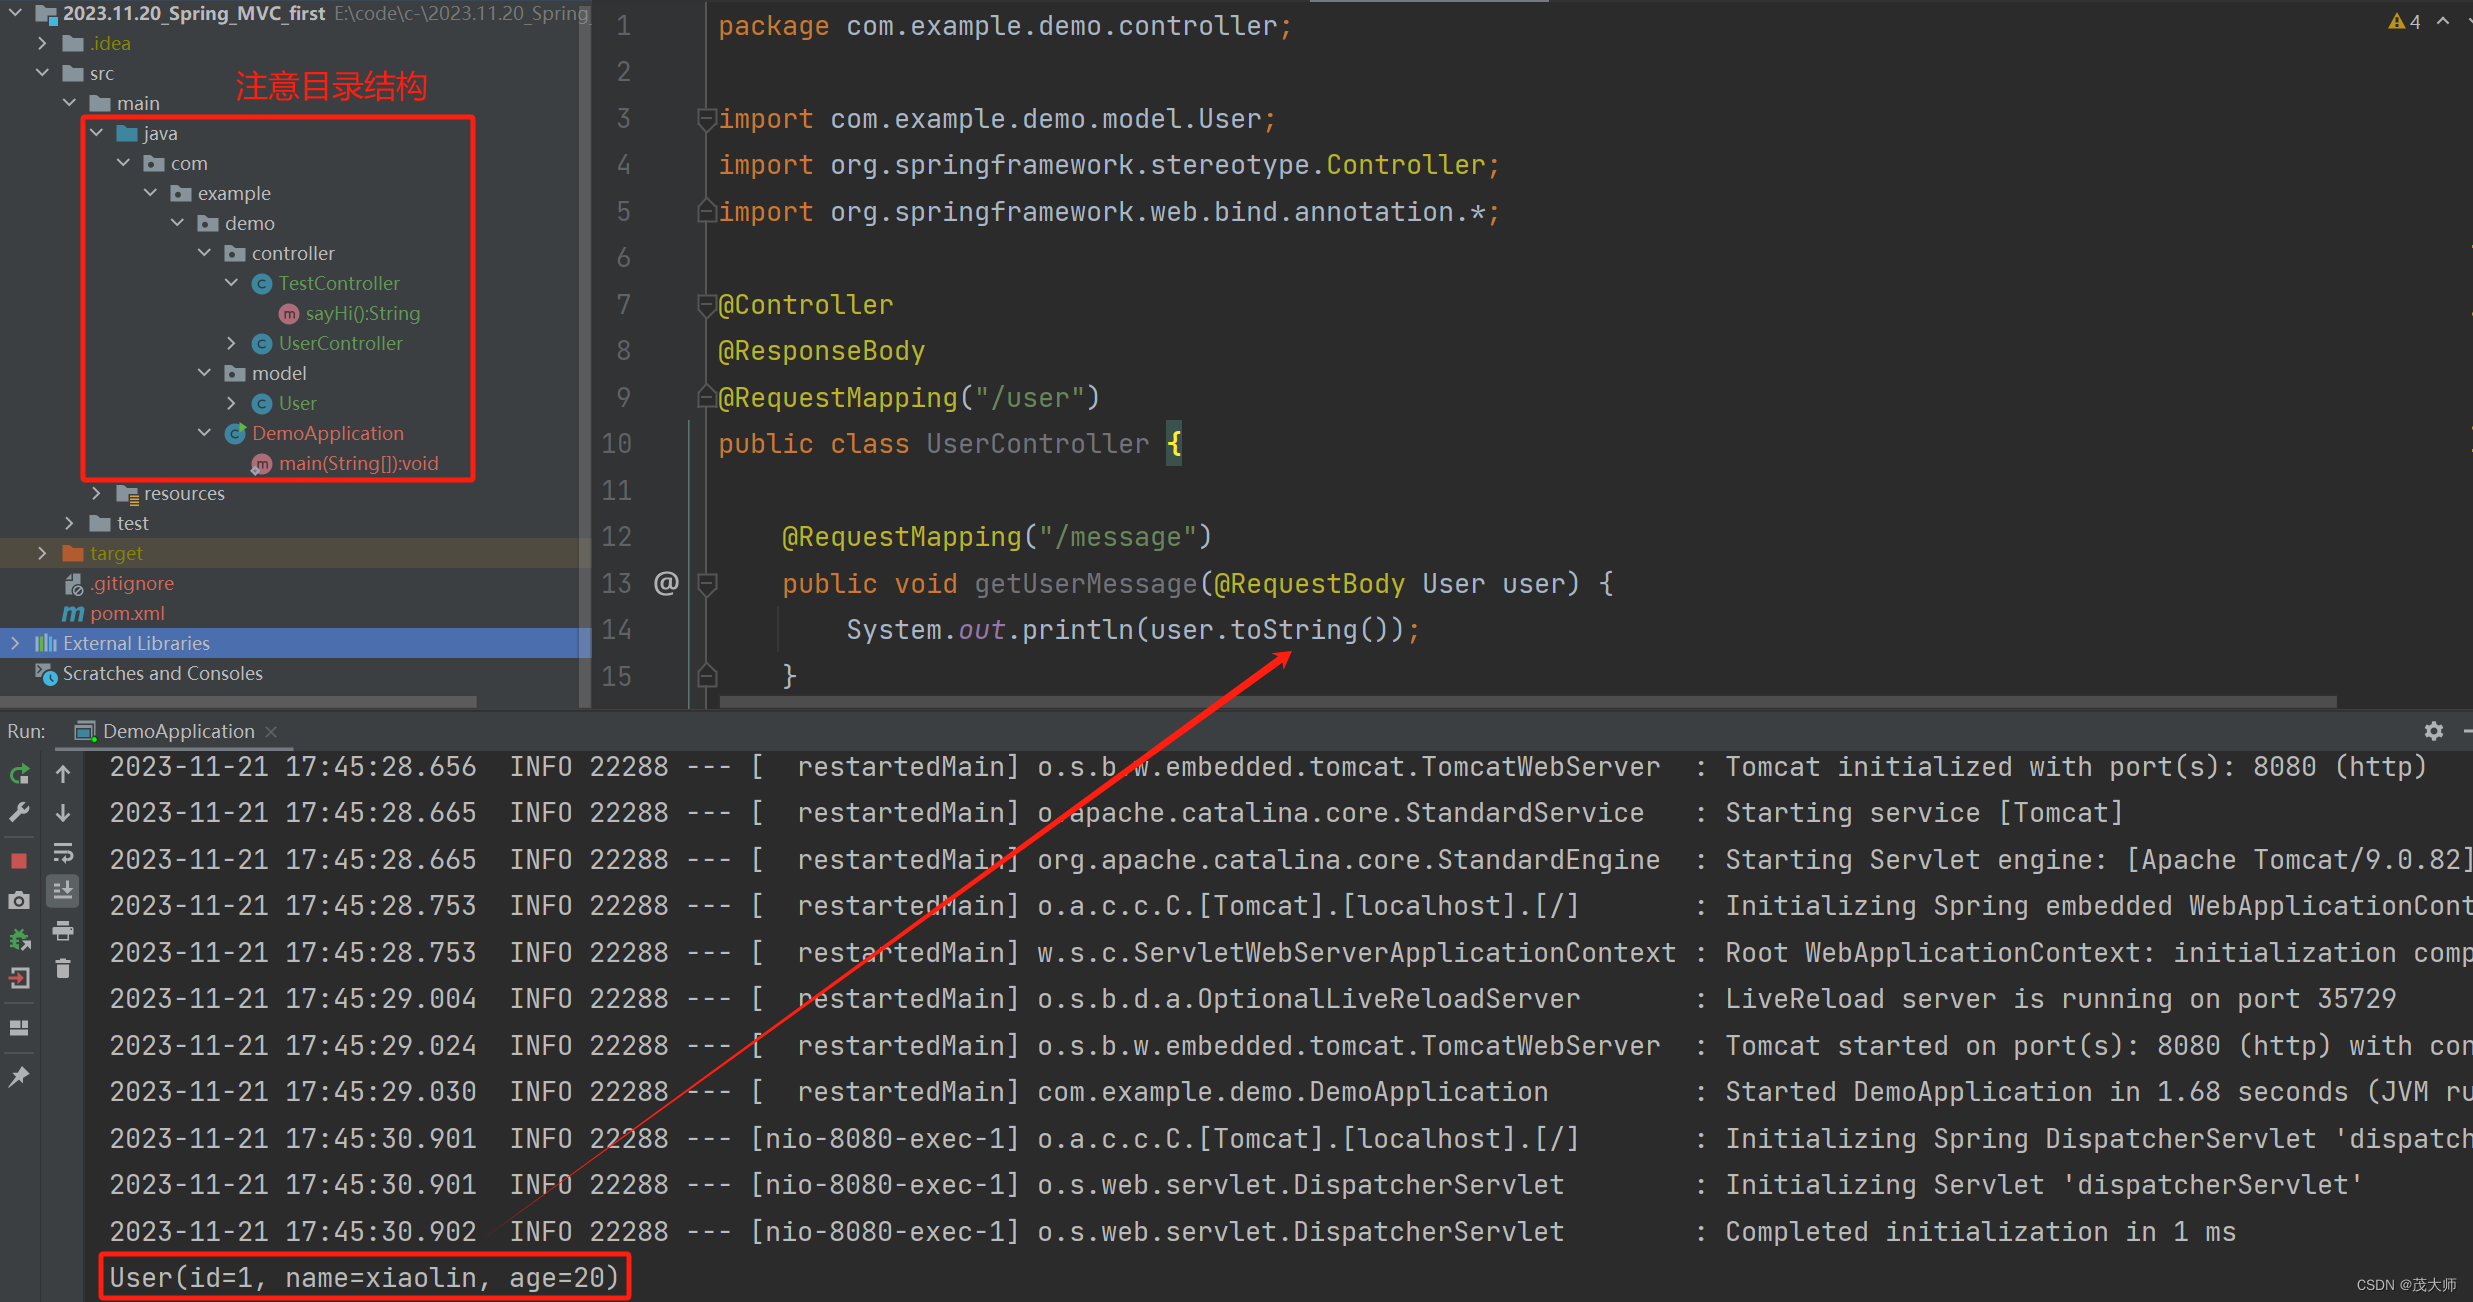
import lombok.Data; import org.springframework.stereotype.Component; @Component @Data public class User { private int id; private String name; private int age; }import com.example.demo.model.User; import org.springframework.stereotype.Controller; import org.springframework.web.bind.annotation.*; @Controller @ResponseBody @RequestMapping("/user") public class UserController { @RequestMapping("/message") public void getUserMessage(@RequestBody User user) { System.out.println(user.toString()); } }运行结果:
获取 URL 中参数 @PathVariable
实例理解
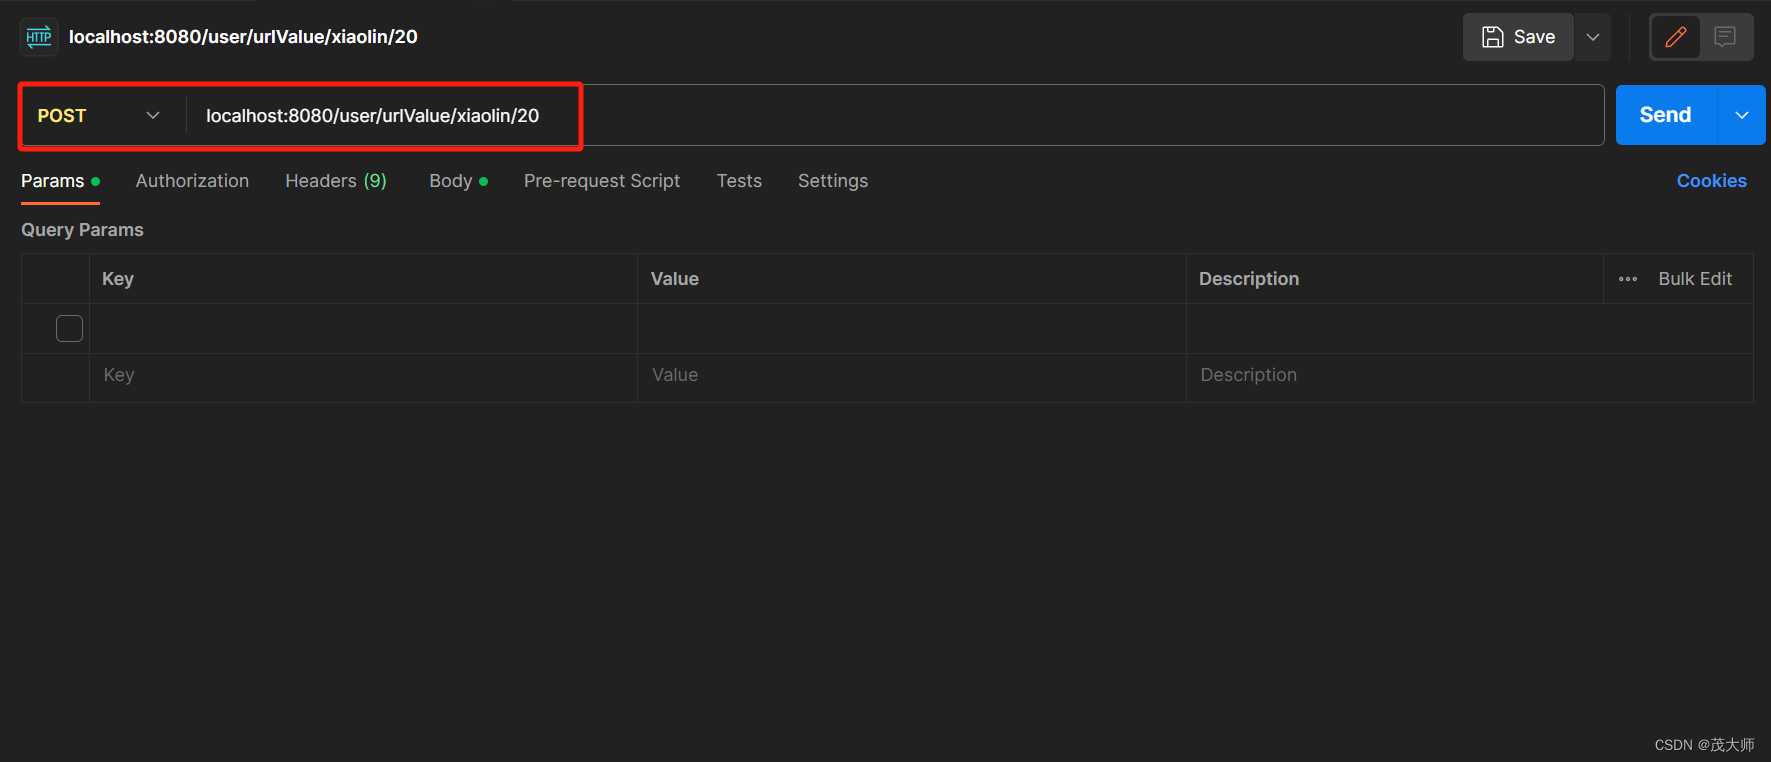
- 此时前端想发送的请求如下图所示
- 我们使用 @POSTMapping 注解来接收 URL 中的参数值
import com.example.demo.model.User;
import org.springframework.stereotype.Controller;
import org.springframework.web.bind.annotation.*;

@Controller
@ResponseBody
@RequestMapping("/user")
public class UserController {

    @PostMapping("/urlValue/{name}/{age}")
    public String getUrlValue(@PathVariable(value = "name") String name,
                              @PathVariable(value = "age",required = false) String age) {
        return "name:" + name + ", age:" + age;
    }
}
注意:
- 此处的参数 name 为必传参数,age 为非必传参数
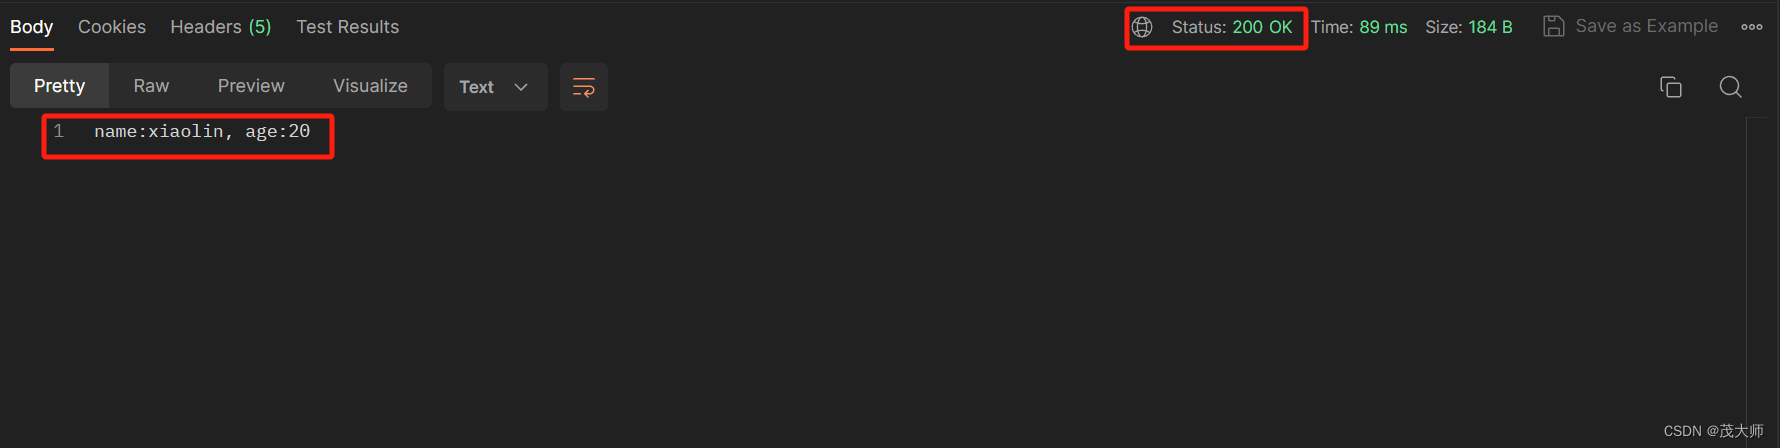
运行结果:
- 一般来说清晰、有意义的URL结构可以提高你的网站在搜索引擎中的排名
- 使用路径变量(如 “/user/{id}”) ,而不是查询字符串(如 “/user?id=123″)可以使URL 看起来更加整洁和易于理解,这有可能帮助提高 SEO 效果
- SEO 全称为 Serch Engine Optimization,译为 搜索引擎优化
- SEO 是一种利用引擎的规则提高网站在有关搜索引擎内的自然排名
- 目的是让其在行业占据领先地位,获得品牌效益
上传文件 @RequestPart
实例理解
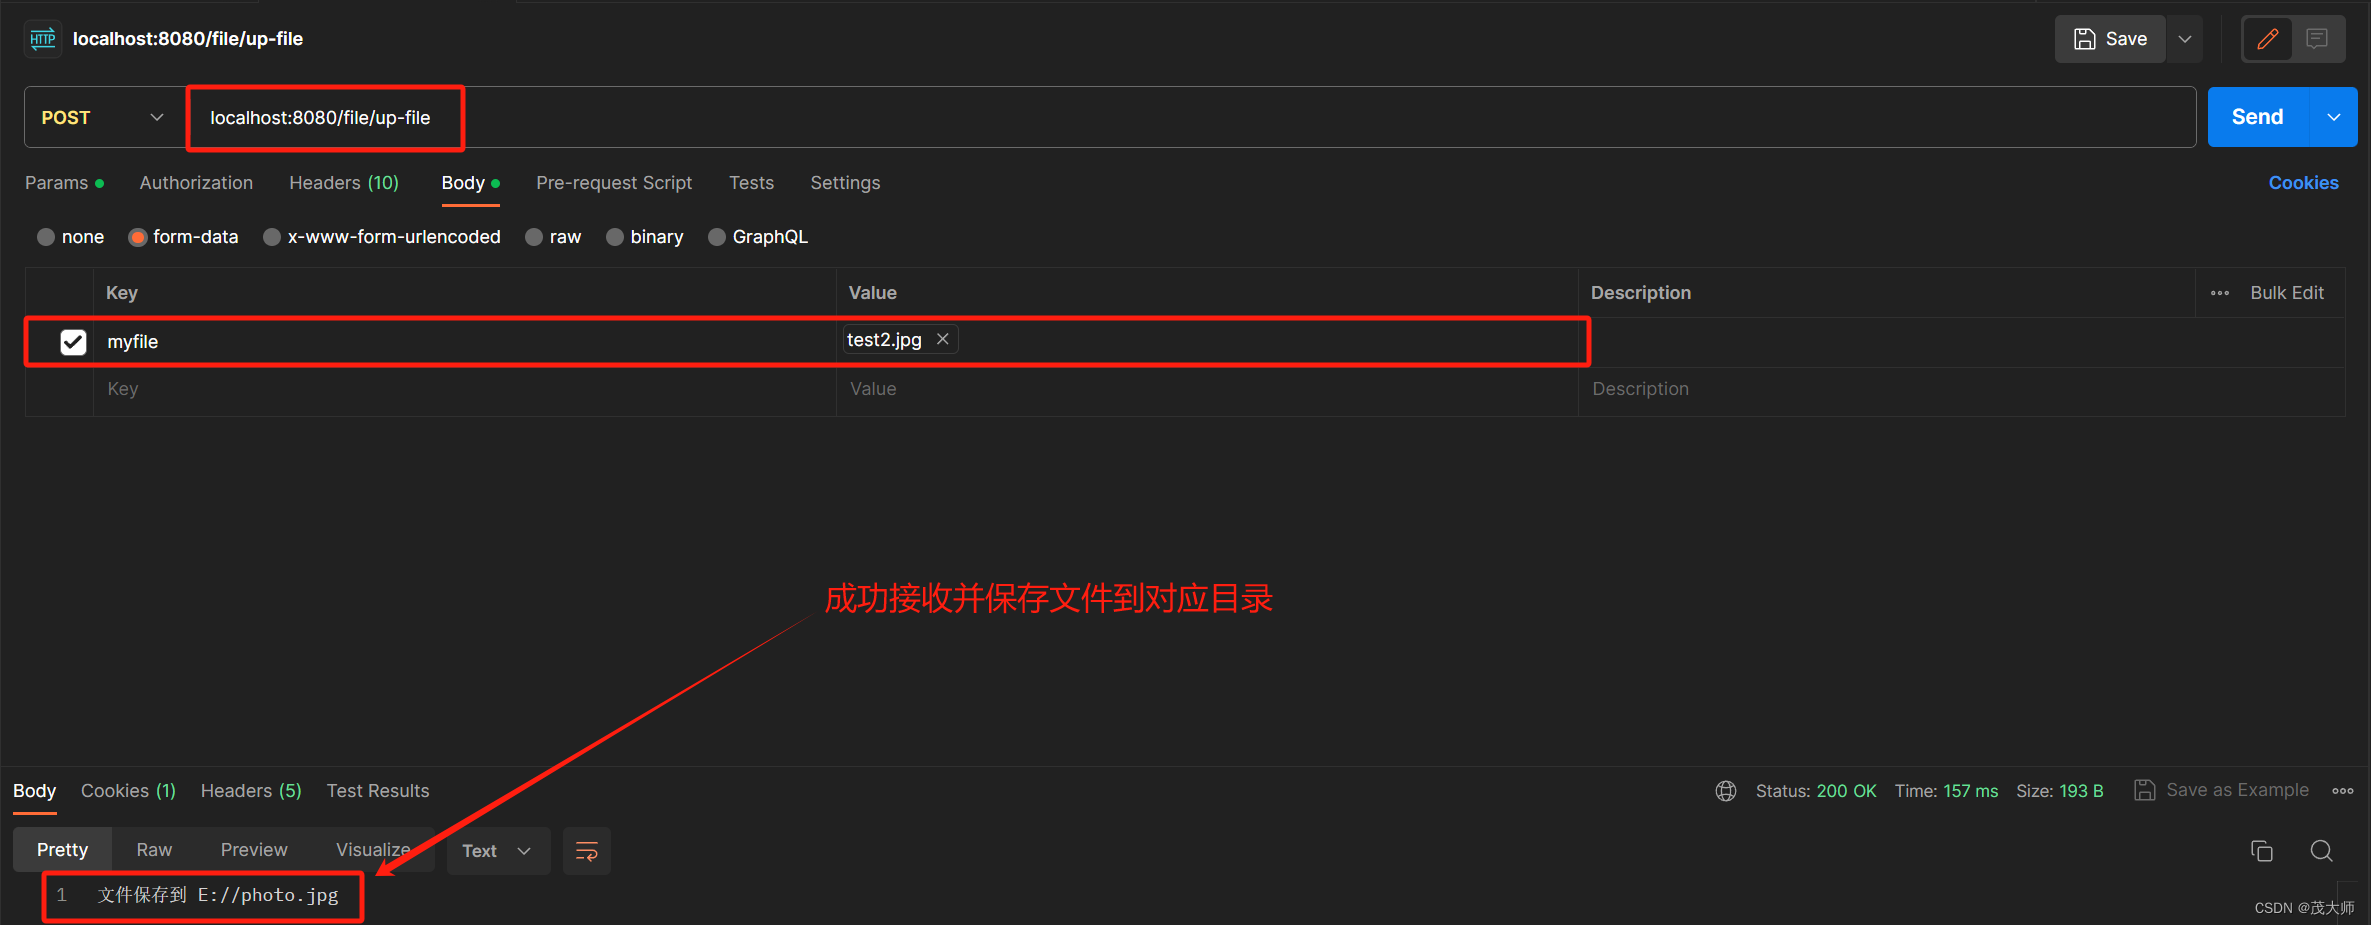
- 此时前端通过 from 表单将文件传给后端
import org.springframework.stereotype.Controller;
import org.springframework.web.bind.annotation.RequestMapping;
import org.springframework.web.bind.annotation.RequestPart;
import org.springframework.web.bind.annotation.ResponseBody;
import org.springframework.web.multipart.MultipartFile;

import java.io.File;
import java.io.IOException;

@Controller
@ResponseBody
@RequestMapping("/file")
public class FileController {
    @RequestMapping("/up-file")
    public String upFile(@RequestPart("myfile")MultipartFile file) throws IOException {
        String path = "E://photo.jpg";
//        将传来的文件存放到对应的目录下
        file.transferTo(new File(path));
        return "文件保存到 " + path;
    }
}
注意:
解决方法
- UUID 全称为通用唯一标识码,即每个人都可以创建不与其他人冲突的 UUID,具有唯一性
- 从而我们可以 引入 UUID 来作为上传文件的文件名
- 因此保证了每一个上传的文件都会拥有一个唯一的保存路径 path
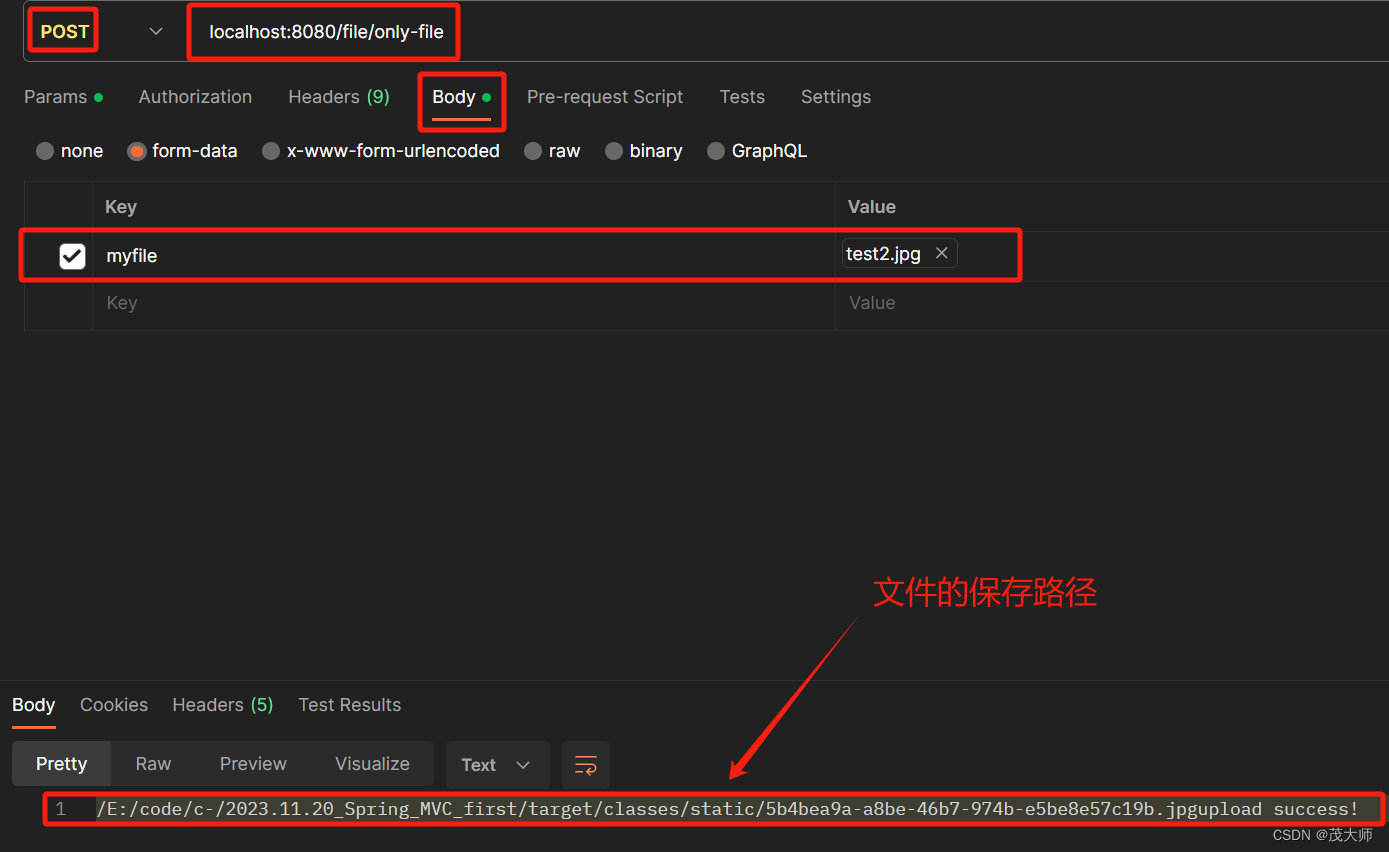
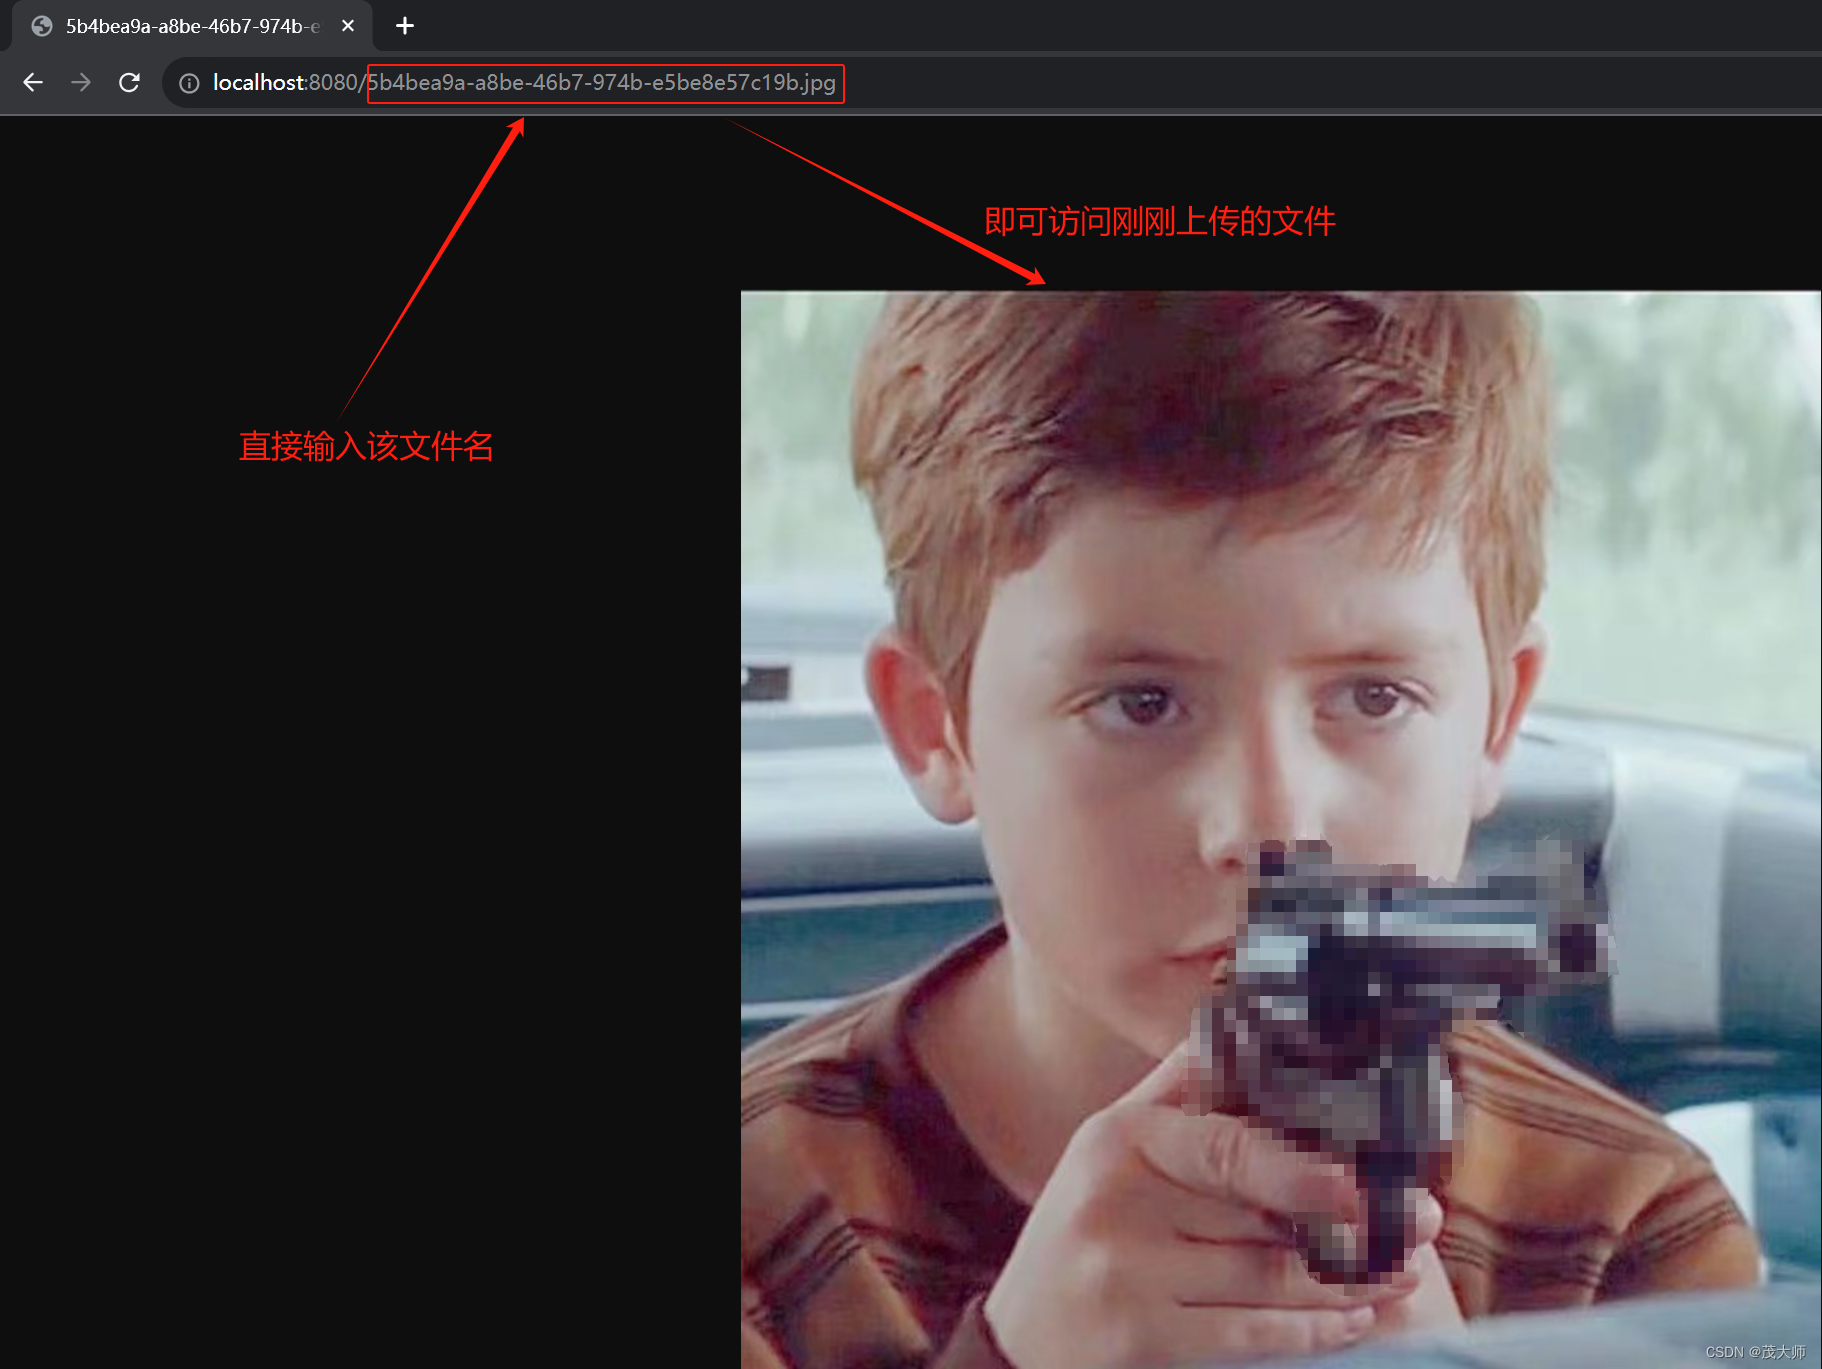
import org.springframework.stereotype.Controller;
import org.springframework.util.ClassUtils;
import org.springframework.web.bind.annotation.RequestMapping;
import org.springframework.web.bind.annotation.RequestPart;
import org.springframework.web.bind.annotation.ResponseBody;
import org.springframework.web.multipart.MultipartFile;

import java.io.File;
import java.io.IOException;
import java.util.UUID;

@Controller
@ResponseBody
@RequestMapping("/file")
public class FileController {

    @RequestMapping("/only-file")
    public String upFile(@RequestPart("myfile")MultipartFile file) throws IOException {
//        获取上传文件的原始文件名,并从中提取出文件的后缀名
        String fileName = file.getOriginalFilename().substring(file.getOriginalFilename().lastIndexOf("."));
//        生产一个文件路径,该路径位于 static 目录下,并且文件名是一个随机的 UUID 加上文件的后缀名
        String filePath = ClassUtils.getDefaultClassLoader().getResource("static").getPath() + "/" + UUID.randomUUID() + fileName;
        file.transferTo(new File(filePath));
        return filePath + "upload success!";
    }
}
- 同样 通过 Postman 来构造 from 表单来给后端传输文件
获取 Cookie 数据
传统方式
实例理解
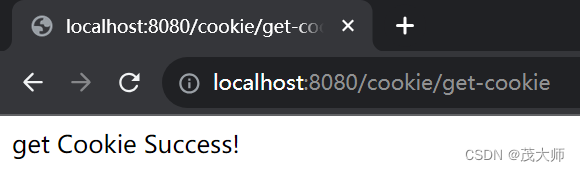
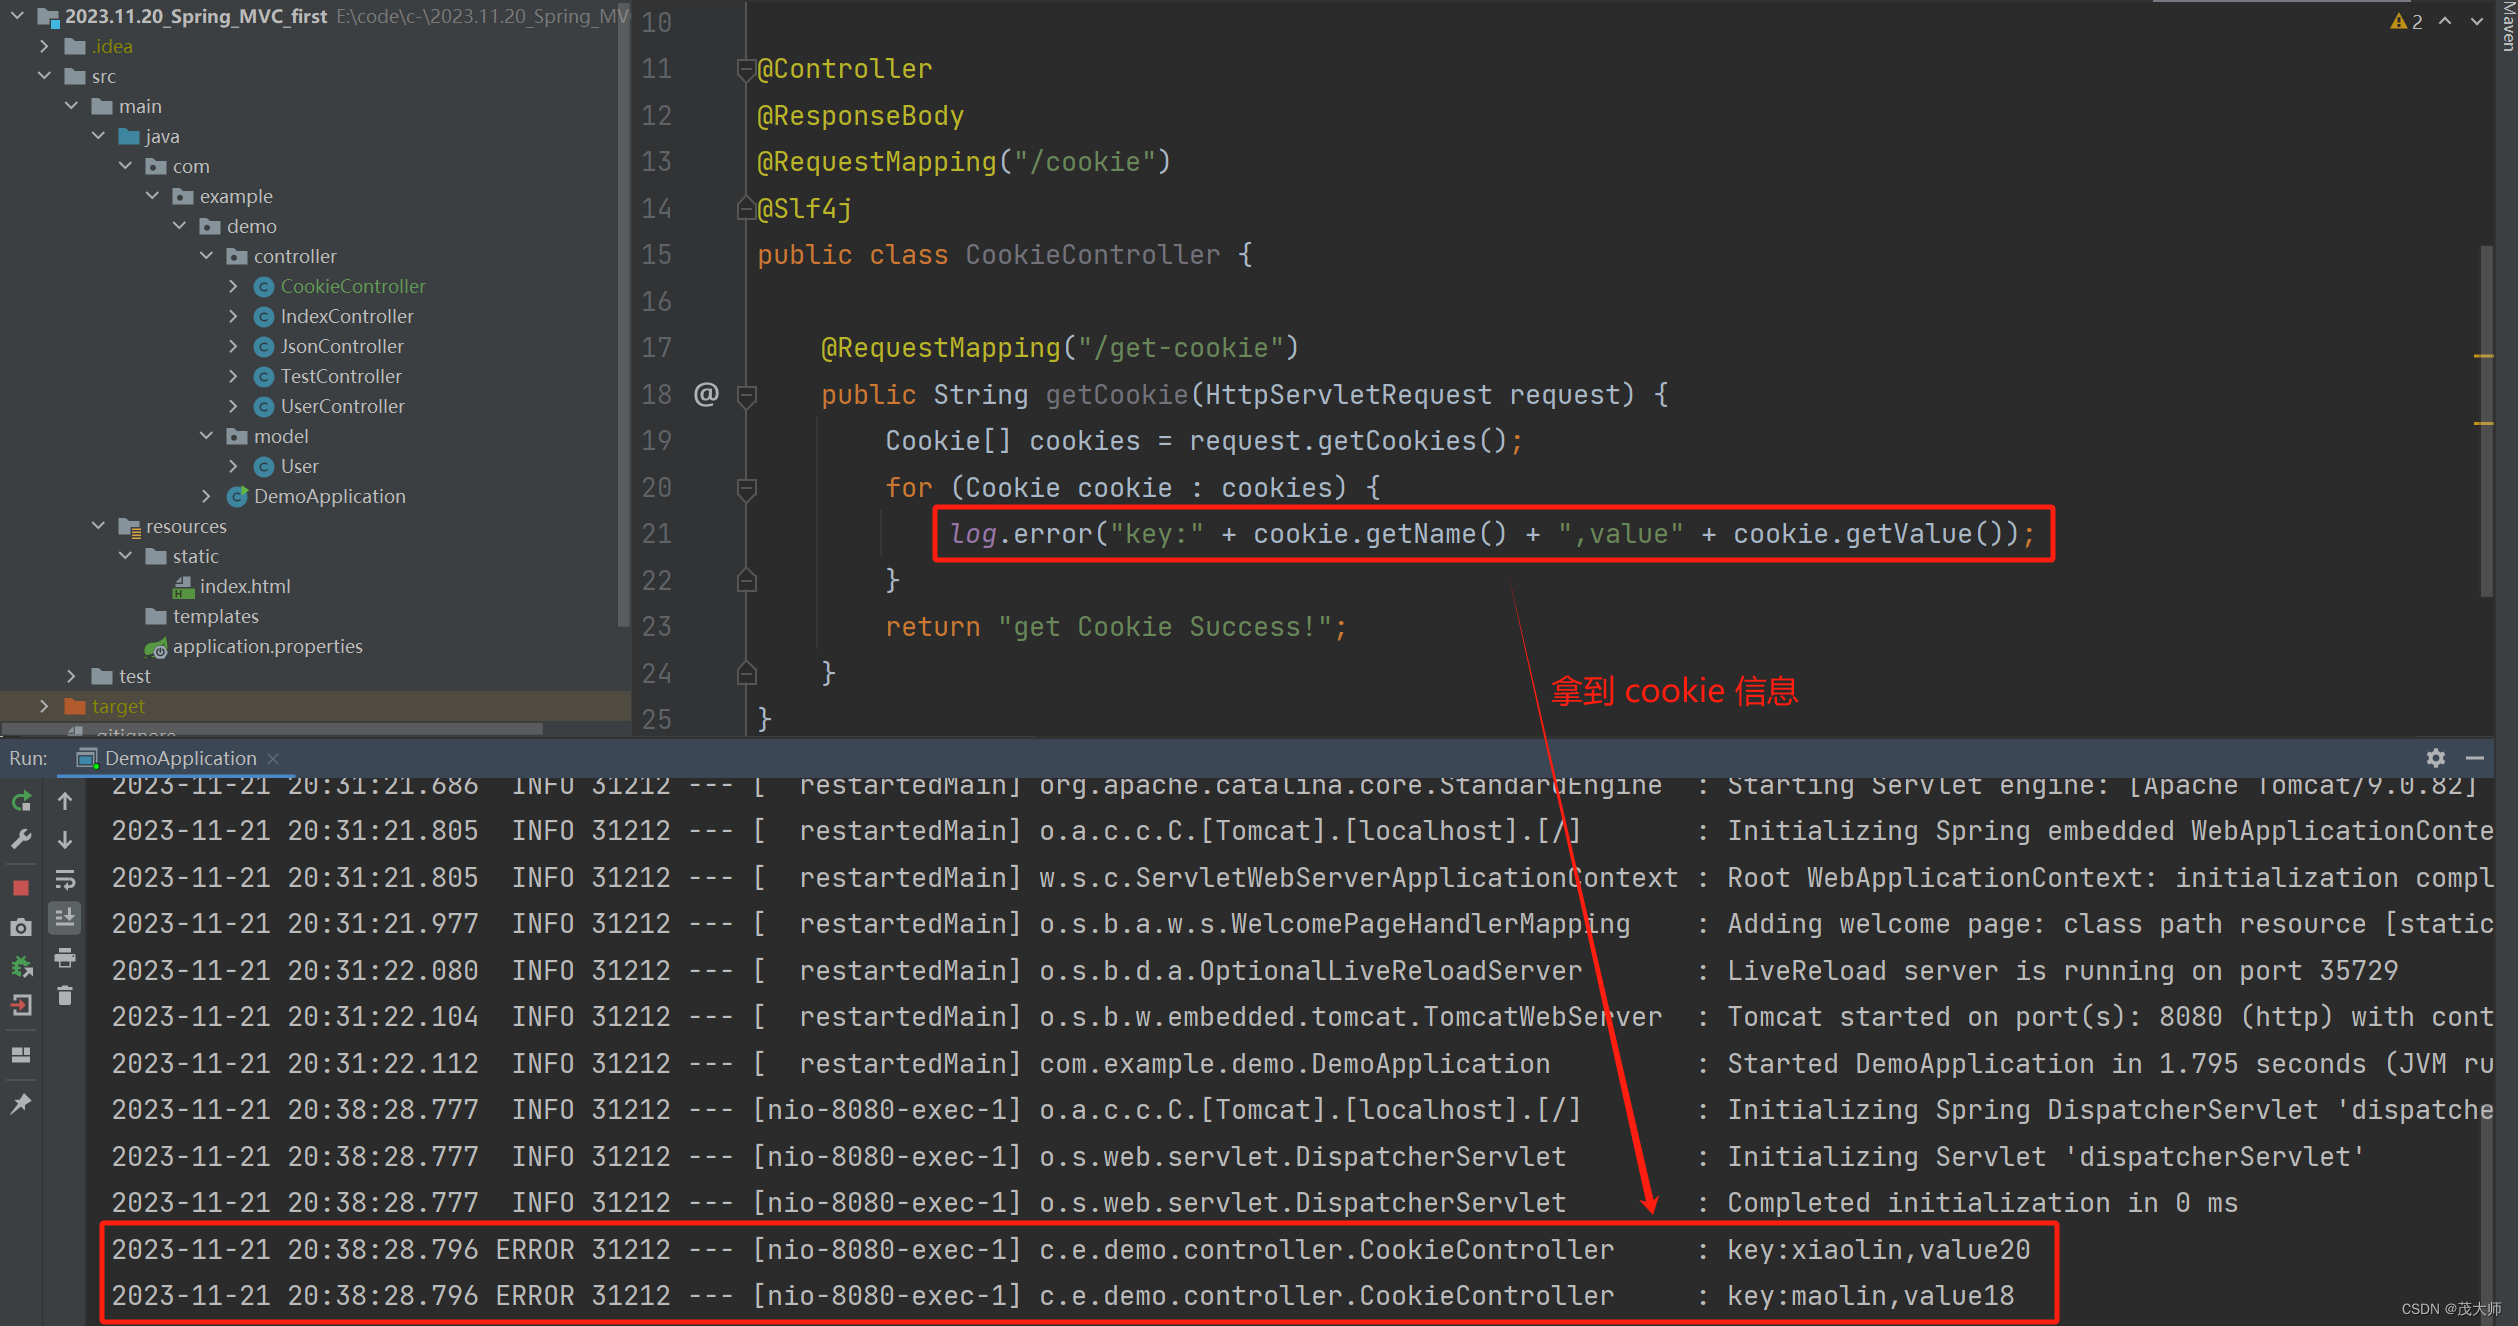
import lombok.extern.slf4j.Slf4j;
import org.springframework.stereotype.Controller;
import org.springframework.web.bind.annotation.RequestMapping;
import org.springframework.web.bind.annotation.ResponseBody;

import javax.servlet.http.Cookie;
import javax.servlet.http.HttpServletRequest;

@Controller
@ResponseBody
@RequestMapping("/cookie")
@Slf4j
public class CookieController {

    @RequestMapping("/get-cookie")
    public String getCookie(HttpServletRequest request) {
        Cookie[] cookies = request.getCookies();
        for (Cookie cookie : cookies) {
            log.error("key:" + cookie.getName() + ",value" + cookie.getValue());
        }
        return "get Cookie Success!";
    }
}
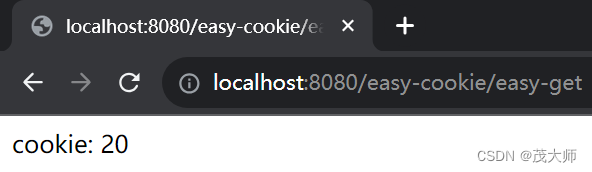
使用 @CookieValue 注解方式
实例理解
- 通过使用 @Cookievalue 注解来直接获取 cookie 所对应 name 为 “xiaolin” 的 value 值
import org.springframework.stereotype.Controller;
import org.springframework.web.bind.annotation.CookieValue;
import org.springframework.web.bind.annotation.RequestMapping;
import org.springframework.web.bind.annotation.ResponseBody;

@Controller
@ResponseBody
@RequestMapping("/easy-cookie")
public class EasyCookieController {

    @RequestMapping("/easy-get")
    public String easyGetCookie(@CookieValue("xiaolin") String value) {
        return "cookie: " + value;
    }
}

获取 Header 数据
传统方式
实例理解
import org.springframework.stereotype.Controller;
import org.springframework.web.bind.annotation.RequestHeader;
import org.springframework.web.bind.annotation.RequestMapping;
import org.springframework.web.bind.annotation.ResponseBody;

import javax.servlet.http.HttpServletRequest;

@Controller
@ResponseBody
@RequestMapping("/header")
public class HeaderController {

    @RequestMapping("/old-header")
    public String getHeader(HttpServletRequest request) {
        String UserAgent = request.getHeader("User-Agent");
        return "old get header success! User-Agent = " + UserAgent;
    }
}
使用注解 @RequestHeader 方式
实例理解
- 通过使用 @RequestHeader 注解来直接获取 header 中 ” User-Agent ” 的值
import org.springframework.stereotype.Controller;
import org.springframework.web.bind.annotation.RequestHeader;
import org.springframework.web.bind.annotation.RequestMapping;
import org.springframework.web.bind.annotation.ResponseBody;

@Controller
@ResponseBody
@RequestMapping("/header")
public class HeaderController {

    @RequestMapping("/get-header")
    public String getHeader(@RequestHeader("User-Agent")String ua) {
        return "get header success! User-Agent = " + ua;
    }
}
- 在浏览器的 URL 地址框中输入相对应地址,来读取 ” User-Agent ” 的值


读取 Session 数据
- Spring MVC 基于 Servlet 实现
- 所以读取 Session 数据也是通过 HttpServletRequest 的 getSession 方法
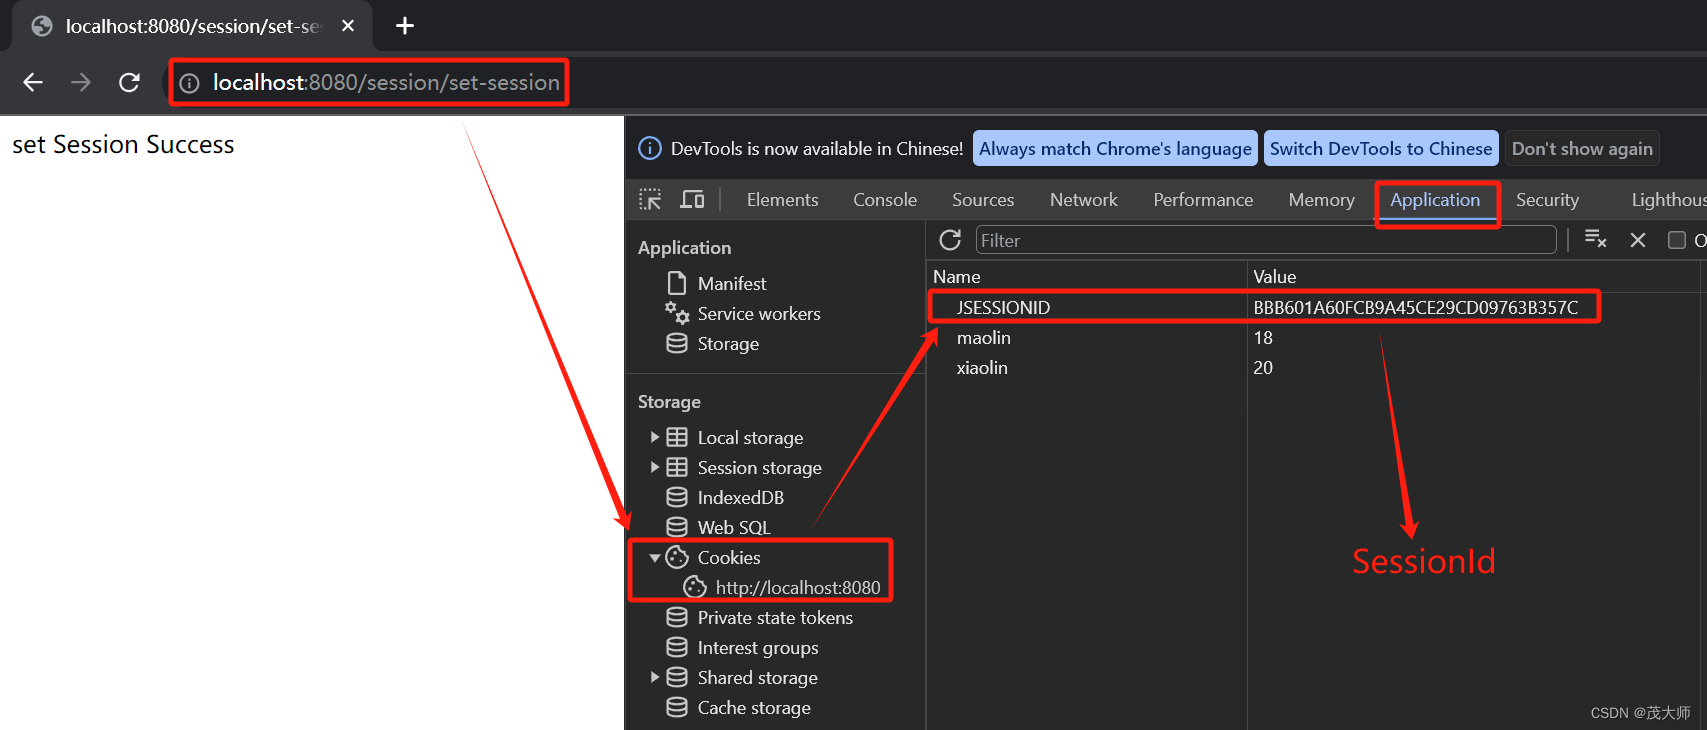
import org.springframework.stereotype.Controller;
import org.springframework.web.bind.annotation.RequestMapping;
import org.springframework.web.bind.annotation.ResponseBody;

import javax.servlet.http.HttpServletRequest;
import javax.servlet.http.HttpSession;

@Controller
@ResponseBody
@RequestMapping("session")
public class SessionController {

    @RequestMapping("set-session")
    public String setSession(HttpServletRequest request) {
        HttpSession session = request.getSession(true);
        session.setAttribute("MasterMao","hello");
        return "set Session Success";
    }
}
传统方式
实例理解
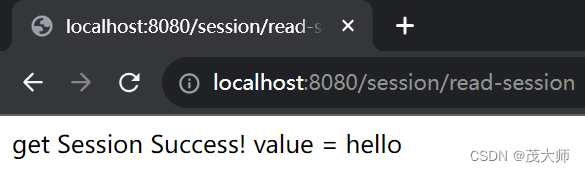
- 此处使用 getSession 来读取 Session 数据
import org.springframework.stereotype.Controller;
import org.springframework.web.bind.annotation.RequestMapping;
import org.springframework.web.bind.annotation.ResponseBody;

import javax.servlet.http.HttpServletRequest;
import javax.servlet.http.HttpSession;

@Controller
@ResponseBody
@RequestMapping("session")
public class SessionController {

    @RequestMapping("read-session")
    public String readSession(HttpServletRequest request) {
        HttpSession session = request.getSession(false);
        String value = (String) session.getAttribute("MasterMao");
        if (value == null) {
            return "session error!";
        }
        return "get Session Success! value = " + value;
    }
}
- 在浏览器的 URL 地址框中输入相对应地址,来读取到 Session 数据
使用 @SessionAttribute 注解方式
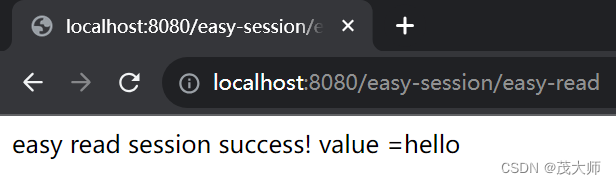
实例理解
import org.springframework.stereotype.Controller;
import org.springframework.web.bind.annotation.RequestMapping;
import org.springframework.web.bind.annotation.ResponseBody;
import org.springframework.web.bind.annotation.SessionAttribute;

@Controller
@RequestMapping("easy-session")
@ResponseBody
public class EasySessionController {

    @RequestMapping("easy-read")
    public String easyReadSession(@SessionAttribute(value = "MasterMao", required = false) String value) {
        return "easy read session success! value =" + value;
    }
}
- 在浏览器的 URL 地址框中输入相对应地址,来读取到 Session 数据
返回静态页面
- Spring MVC 默认情况下返回的是 View 视图(xxx.html)
- 而上文中我们通过添加 @ResponseBody 注解,修改成了 后端返回给前端的是数据,而非页面
- 此时我们不加 @ResponseBody 注解,就让后端返回一个静态页面给前端
实例理解
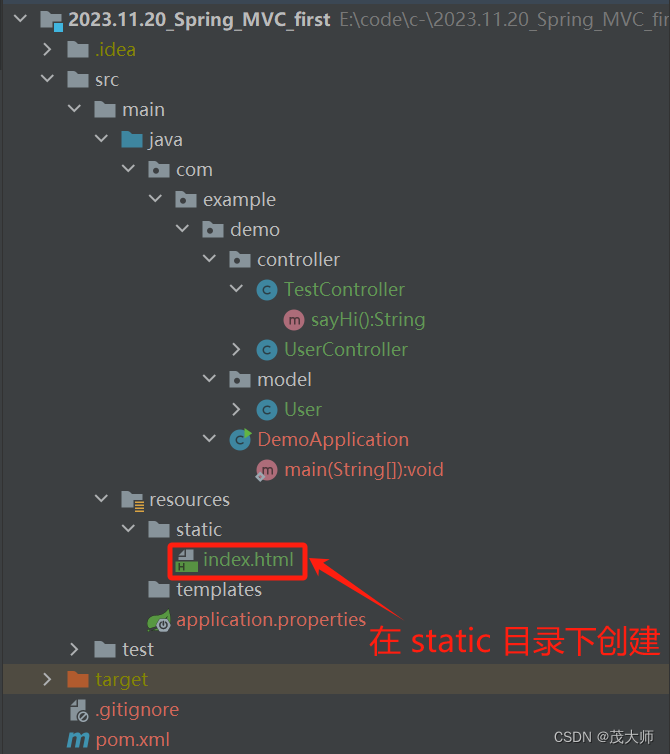
- 首先我们需在对应目录下创建一个前端页面,如下图所示
<!DOCTYPE html> <html lang="en"> <head> <meta charset="UTF-8"> <meta http-equiv="X-UA-Compatible" content="IE=edge"> <meta name="viewport" content="width=device-width, initial-scale=1.0"> <title>测试页面</title> </head> <body> <h3>Hello Spring MVC!</h3> </body> </html>import org.springframework.stereotype.Controller; import org.springframework.web.bind.annotation.RequestMapping; @Controller @RequestMapping("/html") public class IndexController { @RequestMapping("/index") public String respIndex() { // 编写业务逻辑代码 return "/index.html"; } }
注意:
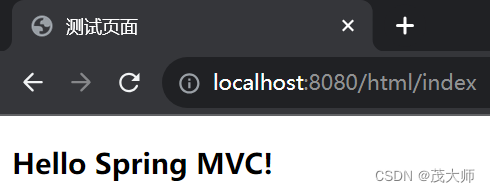
- 一个 URL 地址为 localhost:8080/html/index
- 该地址表示向程序中发送请求,根据 URL 的路径对应到程序中相应的控制器方法上
- 此处对应的控制器方法为 respIndex 方法,然后执行该方法中业务逻辑,处理该请求
- 又由于 Spring MVC 默认情况下返回的是页面,此处我们也未添加 @ResponseBody 注解
- 即 respIndex 方法返回的字符串,被 Spring MVC 转变为相对应的页面,返回给了前端
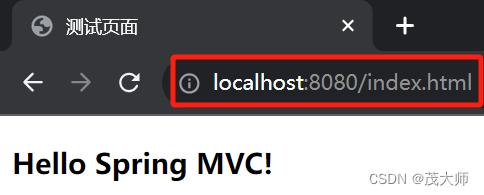
- 另一个 URL 地址为 localhost:8080/index.html
- 该 URL 地址直接指向静态 HTML 文件
- 即服务器将直接返回 index.html 文件的内容,不经过任何控制器方法
返回 JSON 对象
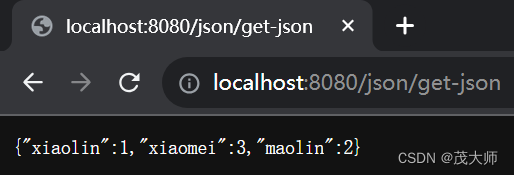
- 在 SpringMVC 中返回 HashMap 对象,实际上就是返回 JSON 对象给前端
实例理解
import org.springframework.stereotype.Controller; import org.springframework.web.bind.annotation.RequestMapping; import org.springframework.web.bind.annotation.ResponseBody; import java.util.HashMap; @Controller @RequestMapping("/json") @ResponseBody public class JsonController { @RequestMapping("/get-json") public HashMap<String,Integer> respJson() { HashMap<String,Integer> map = new HashMap<>(); map.put("xiaolin", 1); map.put("maolin", 2); map.put("xiaomei", 3); return map; } }运行结果:
原文地址:https://blog.csdn.net/weixin_63888301/article/details/134518248
本文来自互联网用户投稿,该文观点仅代表作者本人,不代表本站立场。本站仅提供信息存储空间服务,不拥有所有权,不承担相关法律责任。
如若转载,请注明出处:http://www.7code.cn/show_3766.html
如若内容造成侵权/违法违规/事实不符,请联系代码007邮箱:suwngjj01@126.com进行投诉反馈,一经查实,立即删除!
声明:本站所有文章,如无特殊说明或标注,均为本站原创发布。任何个人或组织,在未征得本站同意时,禁止复制、盗用、采集、发布本站内容到任何网站、书籍等各类媒体平台。如若本站内容侵犯了原著者的合法权益,可联系我们进行处理。